Few things are capable of ruining a live performance like the screeching sound of microphone feedback. Not only does microphone feedback disrupt the audience and the musicians on stage, but it also presents the risk of hearing damage. For these reasons, it is imperative that you learn how to prevent microphone feedback on stage. In this article, you’ll learn a quick, 5-step method to eliminate feedback before it occurs during a live performance.
What Causes Microphone Feedback?
Microphone feedback is the product of a microphone and a speaker that form a closed feedback loop. The microphone signal is amplified through the speaker, the sound from the speaker is picked up by the microphone and then amplified through the speaker again. The howling, squealing, or screeching sound becomes louder each time it is amplified.
Maximum Gain Before Feedback
Any time signal from a microphone is sent to a speaker in the same room, there is a risk that a feedback loop will be created. This image might help to visualize this type of feedback loop.
Sound from the vocalist enters the microphone. The microphone signal is sent to be amplified through speakers. The signal can only be amplified up to a certain point before feedback will occur. This is because some of the sound from the speaker enters the microphone and is amplified again.
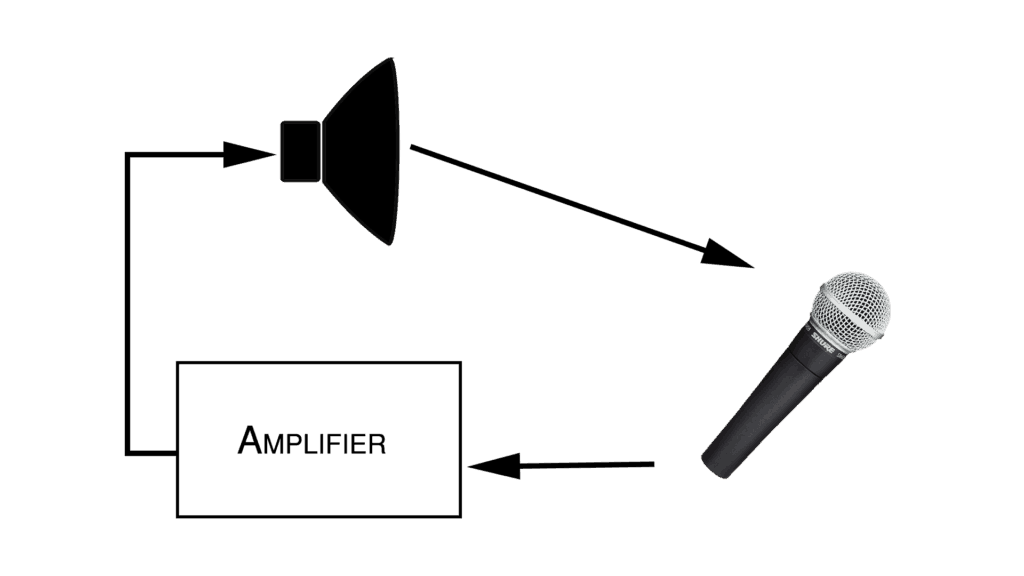
The point at which the sound from the speaker becomes louder at the microphone than the sound from the vocalist, feedback will occur. The amount of amplification allowed before this point is called the maximum gain before feedback.
If you follow the next five steps, you will drastically increase your system’s maximum gain before feedback.
1. Provide Space Between Microphones and Speakers
The most effective way to increase a system’s maximum gain before feedback is to create more distance between the microphone and the speakers.
Inverse Square Law
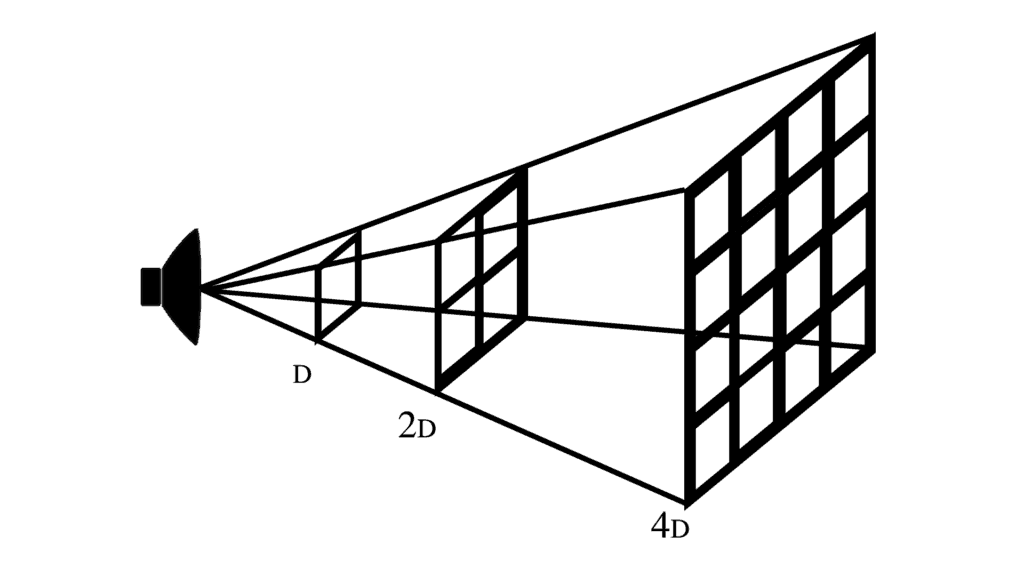
The reason distance is so effective in preventing feedback is because of the inverse square law. This law of physics states that with every doubling of distance, the intensity level of a sound wave will be decreased by 6dB. This means that the level of a sound will be quartered with each doubling of distance.
You can use this image to better understand the inverse square law. Remember that a decibel is a unit that measures change. +6dB is a doubling of sound pressure level (SPL) and -6dB is a halving of sound pressure level (SPL). A sound wave that is 96dB SPL contains double the energy of a sound wave that is 90dB SPL.
Learn more in the inverse square law post that I wrote for Audio University.
Main Speakers
The mains are the speakers that point toward the audience. It is best to create as much space as possible between the main speakers and the microphones on stage. This will allow enough space for the sound from the speakers to decrease in level by the time it reaches the microphones.
It is also helpful to place the speakers as close to the listeners as you practically can. This will allow the speakers to be quieter while still providing adequate loudness to the listeners.
Monitor Wedges
Monitor wedges are the speakers on stage that allow the musicians to hear themselves. Signal from a vocal microphone will be sent to a monitor wedge for the person singing to hear his or her voice. For this reason, it would be counterproductive to put unnecessary distance between the monitor wedge and the vocalist.
The more space there is between the monitor wedge and the vocalist, the louder the monitor will need to be. Instead, it’s best to place the monitor wedge as close and as on-axis to the vocalist as possible.
In-Ear Monitors
Remember that the closer a speaker is to the listener, the quieter it can be. This is why in-ear monitors (IEMs) are so effective. Because in-ear monitors are placed inside the musicians’ ears, they can be extremely quiet while still allowing the musicians to hear themselves.
Whereas a musician might request a floor monitor to be so loud that feedback will occur, in-ear monitors can almost always provide enough loudness to a musician without causing feedback.
If you can convince a musician to use IEMs, it will not only reduce the chances of feedback, but will also decrease the stage volume and, thus, improve the FOH mix.
2. Choose Directional Microphones
Using directional microphones is another way to increase your system’s maximum gain before feedback. This will allow microphones to be in closer proximity to speakers without causing feedback.
Microphone Polar Pattern
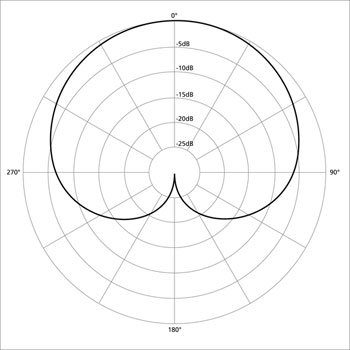
A microphone’s polar pattern determines its directionality. The most common microphone polar pattern for live sound reinforcement is cardioid. A cardioid microphone will pick up sound from the front while rejecting sound from the rear. One reason they are so popular for live sound reinforcement is that they reject the sound coming from speakers and therefore increase the maximum gain before feedback.
When setting up your microphones on stage, pay mind to their polar pattern. You can see in this polar pattern graph that a cardioid microphone resembles a heart. This graph shows that cardioid mics reject sound from the rear. If a microphone has a cardioid pattern, such as a Shure SM58, place it so that the rear rejection point faces toward the speaker.
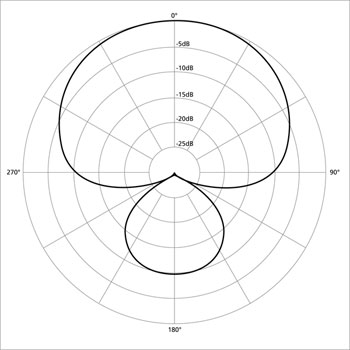
Supercardioid microphones, such as the Shure Beta 58a, have more directionality in the front, but less rejection at the rear. This graph shows a supercardioid polar pattern. You can see that supercardioid microphones pick up sounds from directly behind, but reject sound best at a slight angle. When using a supercardioid microphone on stage, place it so that the rejection points are facing the speaker.
3. Remove Problematic Frequencies with an Equalizer
Depending on the environment of the stage, the spacing of the microphones and speakers, and the types of microphones and speakers you are using, certain frequencies will feedback sooner than others. Using an equalizer, you can eliminate the problematic frequencies on stage without affecting the other frequencies. This will allow you to further maximize the gain before feedback.
High Pass Filter
Low frequencies are less directional than high frequencies. This means that, even if the speaker is pointing in a certain direction, low frequencies will radiate in all directions. For this reason, low frequencies are the first frequencies to feedback. Luckily a high pass filter can be used to reduce the chances of feedback from these frequencies.
For each instrument, set a high pass filter as high as you can without affecting the instrument’s sound. For example, the lowest frequency in a male voice is about 90Hz. Set a high pass filter on the vocal channels to remove all frequencies below 90Hz. Repeat this for each instrument.
To learn more about high pass filters and how to use them, you can read this article on the Audio University website.
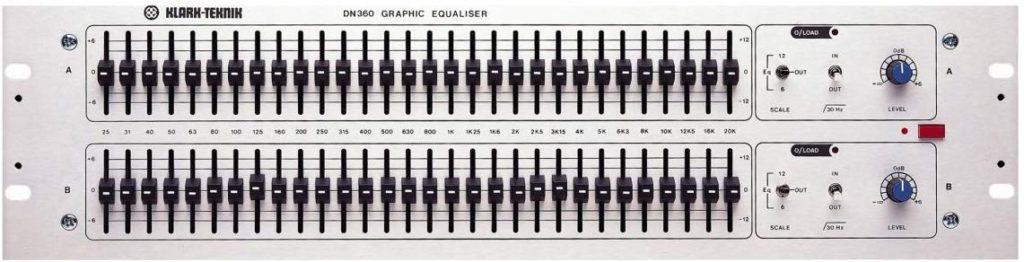
Graphic EQ
A graphic equalizer is a great tool for working quickly. In general, graphic equalizers provide 31 preset bands of EQ centered on the ISO third-octave frequencies. These tools allow you to quickly remove frequencies that feedback. You’re probably used to using a parametric equalizer, which is a bit different than a graphic equalizer. Check out this post I wrote on Parametric EQ vs Graphic EQ to learn the difference.
To learn how to become even faster at removing problematic frequencies, I recommend you check out this article I wrote on Ear Training for Audio Engineers. This method can help you to develop the ability to identify frequencies by ear, which is very useful when ringing out speakers.
“Ring Out” Speakers
Ringing out speakers is the process of finding and reducing problematic frequencies using an equalizer. It is important to realize that less is more when you are ringing out speakers on stage. If you use this method, you will ensure that you aren’t doing more harm than good.
First, ensure that the vocal microphone preamp is set as low as possible.
Next, send the vocal microphone to the nearest monitor at unity gain. This means that the auxiliary send to the monitor is set to 0dB.
Start to bring up the microphone preamp slowly. When you hear a frequency starting to feedback, reduce that frequency by -6dB on the graphic equalizer. Repeat this process for the next four frequencies that feedback.
Now do the same thing, but only reduce the next few frequencies by -3dB.
After you have found about 6 frequencies, reduce the microphone preamp gain by -6dB and speak into the microphone. Determine if the microphone is loud enough without feeding back.
It is important that you don’t overdo this. If you find yourself removing more than 8 frequencies, you are effectively turning everything down. Instead of removing more frequencies, remove fewer frequencies and apply less preamp gain. This “less is more” approach will yield better results for you and the musicians on stage.
4. Set Up Proper Gain Staging
One of the most important aspects of mixing monitors is gain staging. Proper gain staging requires the engineer to be aware of when gain is being applied to an audio signal throughout the signal chain. Using amplification unnecessarily might cause feedback to occur sooner. If you use these tips, you will maximize your system’s gain before feedback by using minimal amplification.
Monitor Signal Routing
There are two common methods for mixing monitors on stage. The first method is mixing monitors from the front of house mixing console and the second method is mixing monitors from a dedicated mixing console beside the stage.
In both cases, it’s most common to use auxiliary sends from the console to the speakers on stage. Microphones come into the mixing console and are sent to the speakers on stage using aux sends.
For example, Aux 1 of your mixer might be sent to the vocalist’s monitor wedge, Aux 2 might be sent to the bassist’s monitor wedge, and Aux 3 to the drummer’s monitor wedge. You will determine how much signal each musician gets in their monitor by using the auxiliary sends on each microphone’s channel strip.
Minimal Microphone Preamp Gain
Whereas in a recording studio preamp gain is set before anything else, this is not often the case while mixing monitors. Instead, it’s best to use as little preamp gain as is absolutely necessary.
To accomplish this, I recommend setting all auxiliary master faders to unity, or 0db. This will mean that the fader is neither boosting nor reducing the signal. If the fader is set to unity, it will simply allow the signal to pass.
Generally speaking, vocalists will need to hear themselves louder than anyone else will need (or want) to hear the vocalist. For this reason, I also recommend setting the aux send that feeds the vocalist’s monitor to unity on the vocal microphone channel before applying any preamp gain.
The reason I make these recommendations is so that amplification is not wasted. If you boost the signal with the microphone preamp and then attenuate, or reduce, the signal by only sending a tiny amount to the monitor wedge, the use of preamp gain was unnecessary.
Running a Sound Check
You will not usually have much time to set monitor levels before the show begins. This is why it is very important to have a systematic approach to mixing monitors. I have found this method to be the best for ensuring all musicians can hear themselves clearly on stage without wasting too much time during sound check.
First, start with the quietest instruments on stage: the vocalists. Send the vocal microphone to the vocalists monitor wedge at unity. Ask all musicians to raise their hand if they need more vocal microphone in their monitor and to only lower their hand when they have enough. The vocalist will raise their hand. Set their level using the vocal microphone preamp gain. When the vocalist drops their hand, your vocal microphone preamp gain is set correctly. Use the aux send levels to send adequate vocal microphone level to the other musicians on stage.
Next, repeat this process with the other microphones on stage. In general, each musician will want to hear their own instruments more than anyone else will. Start with the kick drum sent to the drummer at unity and set the preamp gain based on how much the drummer needs. Start with the guitar microphone sent to the guitarist at unity and set the preamp gain based on how much the guitarist needs, and so on.
5. Use Proper Microphone Technique
How you place the microphones on stage plays a large role in reducing feedback.
If you have any experience working with musicians, you know that you can only control this up to a certain point. The musician’s microphone technique on stage can make your job as an audio engineer much easier or much more difficult.
Microphone Proximity
The first part of good microphone technique is keeping the microphone as close to the sound source as possible. In a studio, it’s common to place microphones further away than you would in live sound. There is almost no chance of feedback in a studio and there is better separation between instruments. In live sound, there is a very high potential for feedback, and all the instruments are very close together with little separation between them.
Keeping the microphone in close proximity to the source will help maximize gain before feedback. The further a vocalist is from their microphone, the more gain you will need to use to get an adequate level. If the vocalist stays close to the microphone, less gain will be required, reducing the chances of feedback.
Microphone Directionality
The directionality of the microphone has already been discussed in this article. But did you know that the way you hold a microphone can change its polar pattern?
A common mistake in microphone technique is to cup the microphone. This image shows what cupping a microphone looks like. This mistake can turn a cardioid microphone that picks up sound from the front into an omnidirectional microphone that picks up sound evenly from all directions.
Directional microphone polar patterns rely on the principle of phase cancellation. In order for phase cancellation to be harnessed to reject sound from the rear, the microphone diaphragm must be unobstructed. Directional microphones will become omnidirectional if held at the diaphragm.

No matter how well you follow the previous steps, poor microphone technique can drastically increase the chances of feedback.
Set Yourself Up for Success
Although you cannot directly control the environment, the equipment, and the musicians on stage, you can use these steps with any system. Use these steps to set yourself up for success.