How do you set up a mixer in a studio?
There are many ways to use a mixer in a studio. Three of the most common ways to use a mixer in a studio are recording, routing, and mixing.
In this post, you’ll learn how to configure your mixer in your studio. Check out this post if you need help choosing a mixer: Audio Mixer Buying Guide: A Checklist Before You Buy!
Mixer Setup For Recording
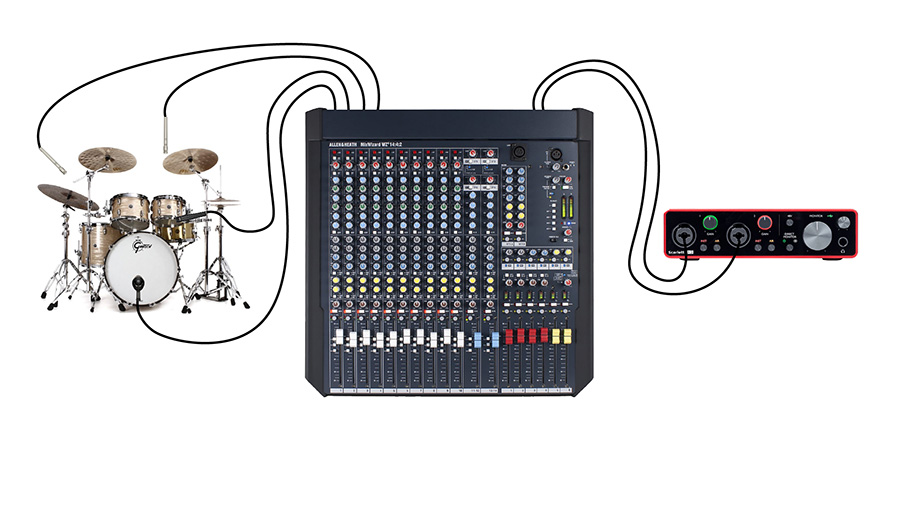
We’ll start off by setting up a mixer for recording into a DAW. Let’s say I’m going to connect a kick drum microphone, a snare drum microphone, and two drum overhead mics. Those four microphones will connect to the first four microphone inputs on my mixer.
Before moving forward, I’m going to set the preamp gain for each channel. I’ll engage the solo or PFL button on each channel and set the channel preamp so that the signal peaks at about +3 dB on the meter.
From here, there are a few options. Which option you choose depends mostly on the audio interface you’re using.
If you’ve got a 2-channel audio interface, you can ultimately only send two channels out of the mixer to be recorded.
If you’ve got an 8-channel audio interface, you can send up to 8 channels out of the mixer to be recorded, assuming your mixer has enough outputs for that.
Connect Mixer To Audio Interface (Stereo)
To connect your mixer to a 2-channel audio interface, I would suggest using the main outputs on the mixer. Your mixer most likely has XLR or 1/4-inch TRS outputs. Use two cables from the Main Outputs on the mixer to Line Inputs 1 and 2 on the audio interface.
The left and right signals that come out of the main outputs will include every channel on the mixer based on the fader and pan settings. The main fader or master fader will control the overall level of everything that is sent to the main outputs. I’ll usually have the master fader set to unity gain (or 0 dB).
The channel fader controls the level of that signal sent to the main outputs and the pan knob controls the balance between the left and right main output. All of my microphone channel faders will be set to achieve the appropriate balance for the desired mix.
As you’ll recall, I initially set the preamp levels on each channel, but some instruments may need to be louder than others in the mix. You can adjust the fader levels for the desired level of each instrument.
Remember… With this method, you won’t be able to adjust the level of the snare separate from the level of the kick drum once you record. All of the mixing needs to happen before pressing “record”.
In a moment, I’ll show you what you need to keep everything separated so you can mix later on after recording…
Since I’m recording a drum set with stereo overheads, I will pan the left overhead all the way to the left, the right overhead all the way to the right, and keep the kick drum and snare drum panned to the center.
In the DAW, I would set this up as a stereo track – Input 1 to the left, Input 2 to the right. Arm the track for recording and adjust the master fader on the interface preamps or mixer so that the meter in your recording software is peaking at about -12 dBFS.
That’s the way I’d do it if I was using a 2 channel audio interface.
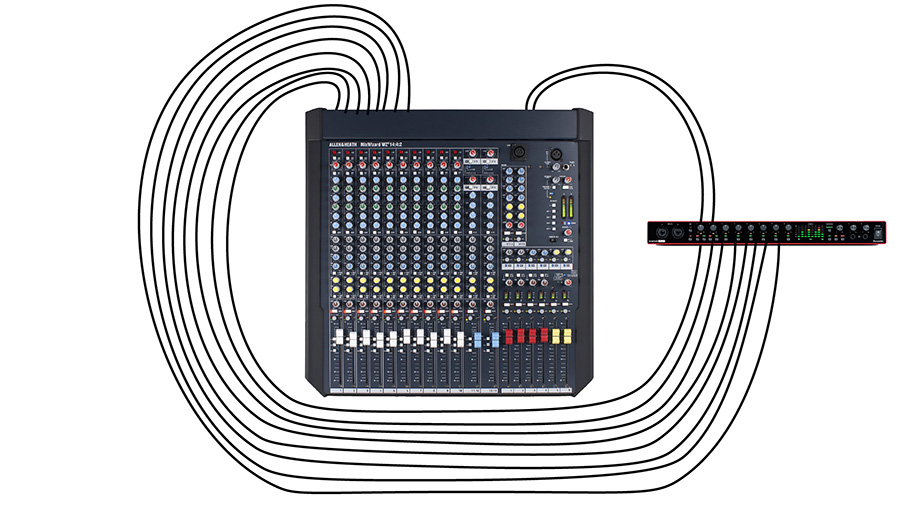
Connect Mixer To Audio Interface (Multitrack)
If you’ve got an audio interface with more inputs, you can record each microphone to a separate track and mix the microphones independently after recording.
In this case, I would connect the mixer to the audio interface using the direct output for each channel. Each of these direct outs would connect to an input on my audio interface.
Keep in mind that these are line level signals at this point, so you can use line level inputs on your audio interface – no need for a microphone level input.

Recording this way, using the direct output of each channel into a multi-channel interface, you’ll set up a separate track for each channel on your interface. That way, you can manipulate each microphone separately in the mixing process.
Once you’ve got your cables connected, your DAW configured, and levels set, you can press record.
Mixer Setup For Routing
In many cases, you’ll find a mixer to be very helpful for general routing needs. The possibilities are endless, but I’ll offer you a few ideas here. Let’s stick with the example from before…

Drummers need to hear themselves playing, so I will need to route the signal from the drum microphones to a pair of headphones that the drummer can wear while performing.
You could connect the headphones to the headphone output on your audio interface or the headphone output on your mixer to hear the mix as your recording. But sometimes the performer would prefer a special mix just for them – the best mix for the recording isn’t always the best mix for input monitoring.
Using the auxiliary outputs on my mixer, I can set up a headphone mix based on what the drummer needs to hear to feel most comfortable performing.
Keep in mind that the aux outputs don’t have a headphone amplifier, so you’ll need an external headphone amp or headphones that power themselves.
I can decide how much of each microphone is sent to the drummer’s headphones by adjusting the Aux 1 send on each channel. You could even create multiple headphone mixes for each performer in the band if your mixer has several aux sends.
Aside from creating headphone mixes, a mixer can also be useful anytime you need to route signals to multiple destinations, such as alternate speakers or a tape machine. A mixer and a patch bay will open the door to incorporating outboard effects like compressors, reverb, and delay. You gain the ability to scale your collection of outboard gear without the need to rewire everything.
Mixer Setup For Mixing
This brings me right into the final way to use a mixer in a studio, which is for mixing. For this, I think it’s helpful to look at how music was made before digital audio workstations (or DAWs) became mainstream…
Recording engineers would connect all of the mics to a channel on the mixing console, which would ultimately be routed to either a 2-track tape machine using the stereo recording method from the beginning of the video or a 4-, 8-, 24-, or 48-track tape machine using the multitrack recording method that I showed you. The main difference was that they used a tape machine in place of the audio interface. But they also didn’t mix in a DAW, of course.
Instead, they would play the multitrack tape back through the console, sending each track on the tape to a separate channel on the mixer. Then the engineer could use the console and patch bay to route signals to and from the outboard equipment in the studio and ultimately create a final mix that would need to be rendered or printed onto a 2-track tape.
Personally, I don’t use my mixer in this way, and that’s because my mixer doesn’t offer anything that I can’t do with my audio interface, patchbay and DAW. Running out of my DAW, through my mixer, and back into the DAW will add a lot of noise when I could’ve just used the EQ in the DAW. However, if you have a particularly high-quality mixer, you might want to run your music through the channel strip or bus compressor.
AIAIAI TMA-2 Studio Wireless+ Headphones
This post is sponsored by the AIAIAI Studio Wireless+ headphones. These headphones offer wireless, low latency audio and they have completely changed the way I record music.
From switching between instruments while creating, to setting up quick headphone mixes for your clients, the TMA-2 Studio Wireless+ headphones have proven that wireless music production is finally possible at a reasonable price.
You can get a free hard case with the promo code “AUDIOUNIVERSITY” when you order. Here is the pair I’ve been using: AIAIAI TMA-2 Studio Wireless+ Headphones
Thank you AIAIAI for sponsoring this post!