In this post, we’re talking about latency… What is it? When is it important? And how can you optimize your system for low-latency recording and playback.
By the way, this video is sponsored by RME. More on that in a moment…
What Is Latency?
First, what is latency?
Latency is the time it takes for an audio signal to travel from the input to the output of a system.
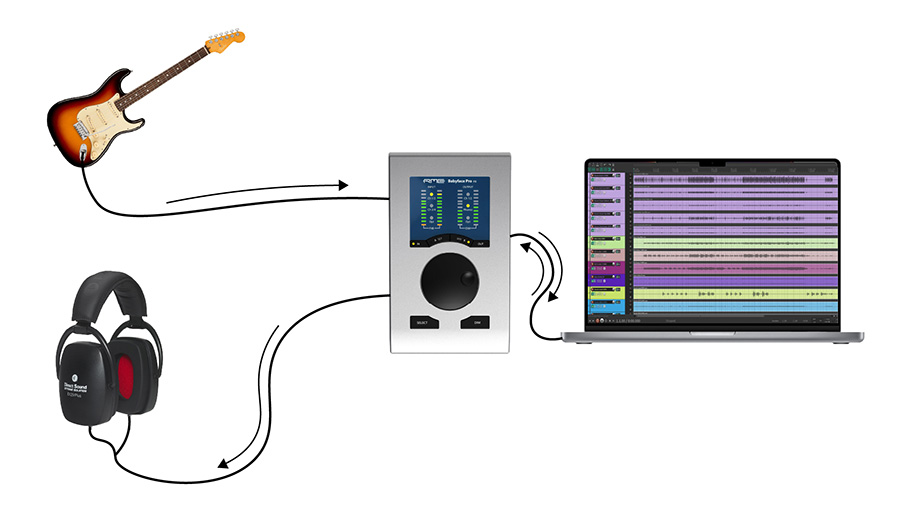
For example, let’s say I’m playing my guitar through a virtual amp plugin in my DAW and monitoring through headphones. The signal from the guitar needs to be converted from analog to digital, then it needs to be carried into the CPU, processed by the CPU, and carried back to the interface for digital-to-analog conversion to be played through my headphones.
All of these processes take time, which leads to a small time delay between the moment I strum my guitar string and the moment I hear the guitar through my headphones. The same thing happens when you sing into a microphone or monitor any instrument while recording.
When Does Latency Matter?
Latency is most important during time-critical tasks, such as monitoring an input signal live (especially during a musical performance). If there is too much latency in a musician’s monitoring system, it can dramatically affect the quality of their performance.
On the other hand, if you’re just playing back music for mixing, latency is far less important. Without the need to react in realtime to the input signal, it’s ok if the output signal is delayed.
I don’t mean to scare you here… As long as you’ve got a reasonably modern setup, there is almost certainly a way to record with an imperceptible level of latency. So, if you’re watching this video because the latency of your system is extremely noticeable, don’t worry. The problem can most likely be resolved by adjusting your settings.
That being said, some individuals have a lower tolerance for latency than others, so it’s best to optimize your system for as little latency as possible in tracking and live sound scenarios.
How To Reduce Latency In Your Studio
Let’s look at a few ways you can optimize your studio to reduce latency for recording. I’ll share the most important factors, settings, and techniques that you should know about.
Audio Interface & Drivers
First of all, your audio interface and drivers will have a tremendous impact on the latency of your system. So make sure that you’ve downloaded and installed the most up-to-date drivers for your interface.
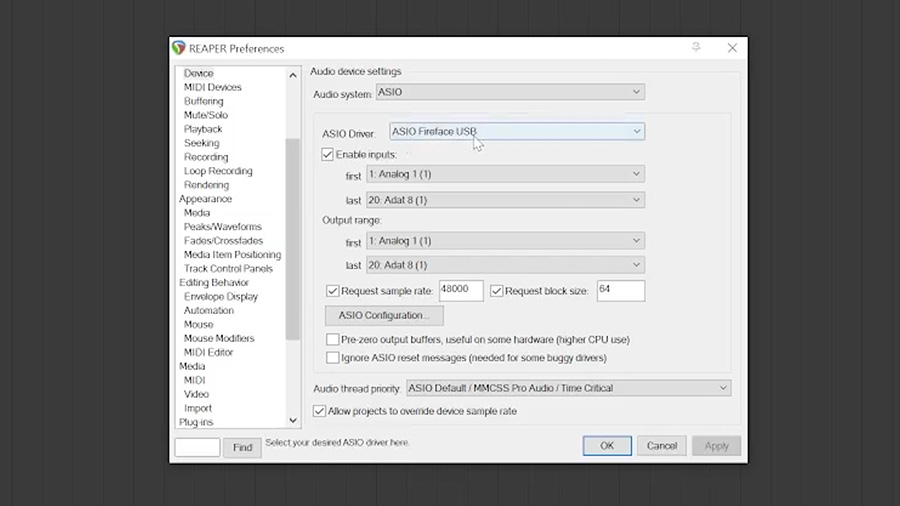
This is one thing that got me when I first opened my DAW, Reaper. By default, it had selected the incorrect driver, which caused a ridiculous amount of delay when monitoring through the DAW. So, make sure to also select the ASIO driver for your interface in your Audio Hardware settings within your DAW.
Even if you select the correct driver – some interfaces and drivers are just more efficient than others… That brings me back to the sponsor of the video, RME, a company that is known throughout the industry for creating some of the fastest drivers for their interfaces.
Using this free program from Oblique Audio, called RTL Utility, I can measure the input and output latency of various audio interfaces.
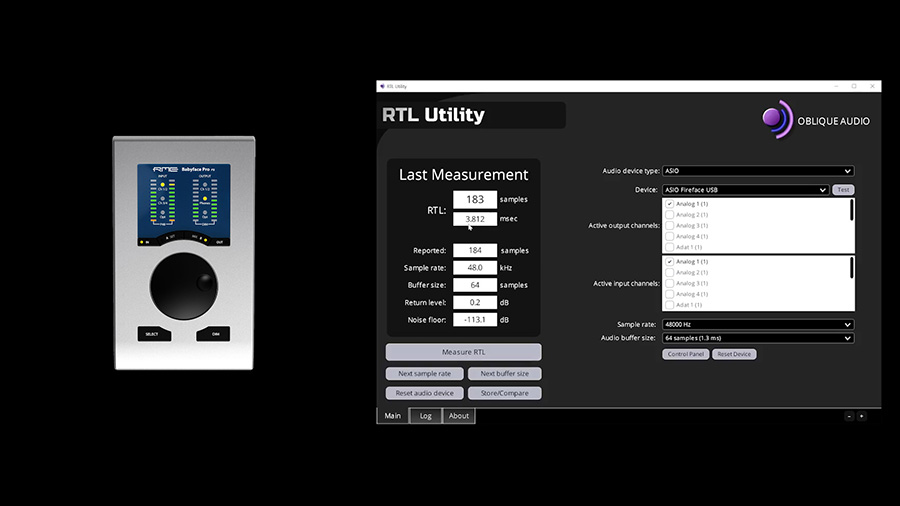
My RME Babyface Pro FS interface has a round trip latency of about 3 milliseconds. I’m going to get to some of these other settings in a moment, but keeping everything equal, let’s compare a few of the interfaces that I’ve got here in my test lab.
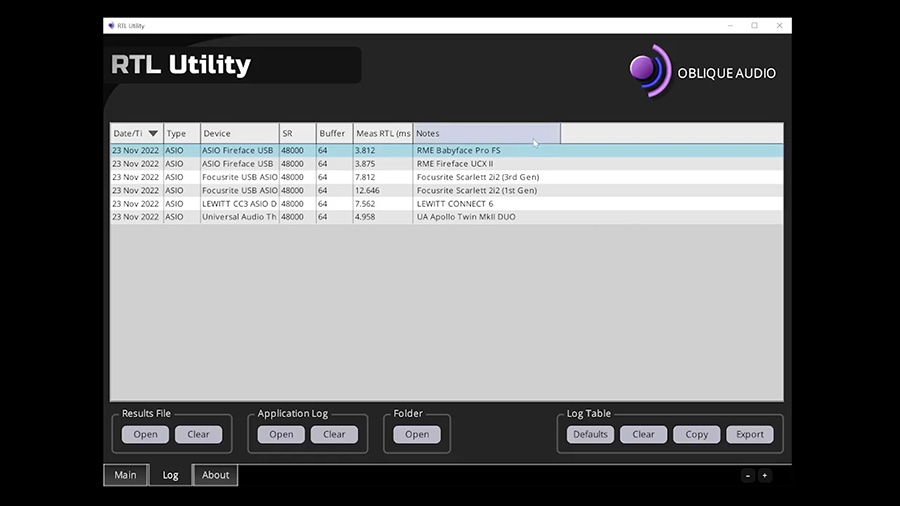
All of these numbers are relatively low when you put it into perspective… For rough math, let’s say that sound travels at around 1 foot per millisecond. The delay I will experience playing through a system with 10 milliseconds of latency is similar to the delay I’d experience placing my guitar amp 10 feet away from me on stage. Not bad at all.
However, there is more to it than that. Let’s take a look at these settings again…
Buffer Size & Sample Rate
These tests were performed with a buffer size of 64 samples. Rather than a serial stream of samples, the audio data will be stored in a buffer of several samples that will be transported between the CPU and the interface.
Because the buffer size is represented in “number of samples”, it can be converted to a time value so long as we know the sample rate. At higher sample rates, there are more samples in a given period of time. Therefore, the latency you can expect at a given buffer size will vary depending on the sample rate.
To calculate the latency associated with a given buffer size, divide the buffer size by the sample rate. For example, a buffer size of 64 divided by a sample rate of 48,000 (or 48kHz) is roughly 1.3 milliseconds. Remember – there are two buffers. An input buffer and an output buffer. So, the theoretical round trip latency at a buffer size of 64 samples and a 48kHz sample rate is roughly 2.6 milliseconds.
The buffer size is your primary tool for controlling the latency of your system. You can usually find your buffer size within the included software for your audio interface.
A lower buffer size will result in lower latency and a higher buffer size will result in higher latency. But there’s a catch…
The lower your buffer size, the less time your system has to process the audio. This means the system processor has to work harder at a lower buffer size than it would at a higher buffer size. At some point, you may begin to hear errors in the audio (in the form of clicks and dropouts), which indicates that the buffer size is too low for the amount of processing you’re demanding from your system.
That’s why it’s best to increase the buffer size when you’re mixing and using a lot of plugins and processing, while it’s best to decrease the buffer size while tracking. Of course, depending on the power of your computer, this may mean that you need to reduce the amount of plugins you’re running in order to reduce the buffer size without causing errors in situations where latency is a primary concern.
Close Non-Essential Programs
To maximize the amount of processing power available to you at a given buffer size, you should close programs that aren’t necessary.
The less processing power your computer needs to dedicate to other programs and tasks, the more it can dedicate to processing the audio.
Freeze Tracks
Of course, as you get deeper into the process of arranging and mixing your song, you may start to stack up a lot of virtual instruments and effects plugins within your DAW session.
If you just wanted to record everything at once with a low buffer size and then mix with a higher buffer size, this becomes less of an issue. But when I’m creating my own music, I find myself wanting to add parts as I go. For example, I may want to record a guitar overdub once I’ve got a lot of processing going on within my session.
In cases where you need to monitor through a DAW session with a lot of tracks and plugins, you may find it helpful to freeze some of the other tracks in the session. Freezing a track will render the audio or MIDI data to an audio file, including all of the effects on that track so that the plugins on that track can be disabled temporarily without altering the sound.
Managing the DSP usage in your session is an effective method that allows you to keep a low buffer size without sacrificing the ability to perform while listening to the mixed version of each instrument. However, it’s kind of annoying to freeze and unfreeze tracks, so you may prefer the following methods for streamlining your workflow.
Direct Monitoring
Many interfaces, even some of the most basic interfaces, have a direct monitoring feature that lets you monitor the input signal through the interface’s output with ultra-low latency. In these cases, the signal will be sent to your DAW for recording but the signal you’re monitoring won’t be sent through the DAW.
This, of course, means you won’t hear the virtual amp plugins or other effects you have loaded onto that channel. You’ll instead hear the dry signal as it is at the interface’s input.
While this can allow you to monitor with almost zero latency while keeping a larger buffer size in your project, you’ll definitely miss having the wet signal in your headphones while you record. But it’s a good option that is accessible on even the most affordable interfaces.
If you choose to use this method, make sure to mute the track within the DAW while recording or you’ll hear the processed signal as an echo.
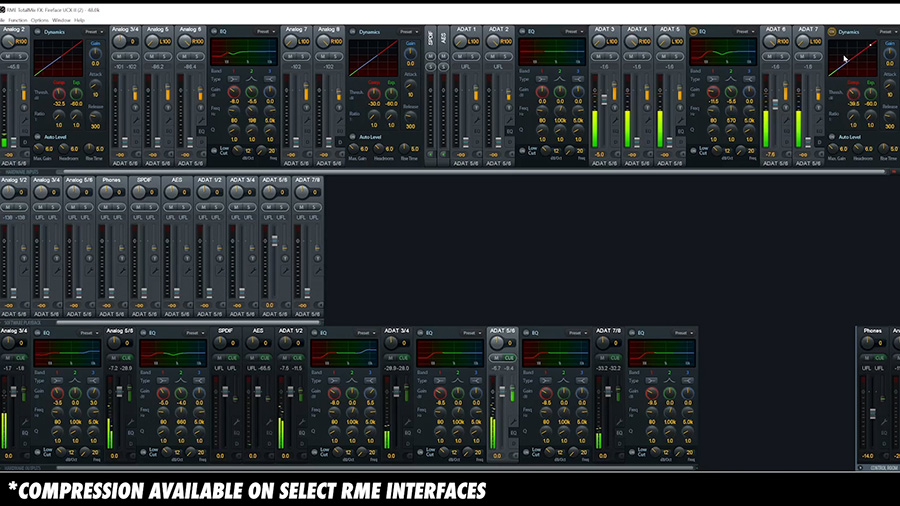
Audio Interface DSP
More advanced interfaces, such as the RME Babyface Pro FS and RME Fireface UCX II have built-in DSP that can be used to process audio in realtime without placing more demands on the computer’s CPU. This allows you to send the dry signal to the DAW to be recorded while using the DSP within the interface to process the audio that you’re monitoring.
Using the included TotalMix FX software, I can set up a monitor mix (or several monitor mixes) that consist of various input signals connected to the interface and run those signals through compression, EQ, and reverb without taxing my computer’s CPU. That allows for a larger buffer size without adding latency to the monitor mix in the headphones.
Dedicated Monitoring System
If your interface doesn’t have an internal DSP and mixer, another solution would be to use a separate console for creating headphone mixes. You could connect your microphones or preamps to the inputs on the mixer, which could split the signal to both the DAW inputs and a headphone amplifier.
This is definitely the most costly and complicated option, but it’s powerful once you get it set up.
Personally, I like to monitor through the DAW with a low buffer size when possible. If I can’t set the buffer size low enough, I use TotalMix FX for monitoring.