In previous posts, I’ve introduced you to my favorite ear training method for audio engineers. Here is a post that goes in-depth on the topic of Ear Training For Audio Engineers.
This post is all about how to improve your ability to EQ drums, vocals, and other instruments by harnessing the power of this simple ear training technique.
If this is our first time meeting, my name is Kyle. Welcome to Audio University.
Ear Training For Audio Engineers
If you haven’t seen my other posts on ear training, here is the basic concept: You can learn to identify frequencies by listening for the vowel sound associated with each octave frequency band.
Each of the ISO 1/3-octave frequencies can be identified by training the ear to recognize the unique vowel sound associated with each octave band!
This was a game-changer for me when I first learned it, and I hope it will help improve your mixing skills too. I put together a free quick start guide that will get you started with free software and instructions on how to use it.
I always demonstrate this technique using pink noise, because that’s the easiest way for beginners to recognize the vowel sounds. But you’ll rarely be mixing pink noise. In the real world, you’ll be mixing music made up of several different instruments – which is a bit more difficult.
Let’s take a listen to a few examples to get a feel for identifying the vowel sounds in a real mixing situation.
Exercise #1 – Drums
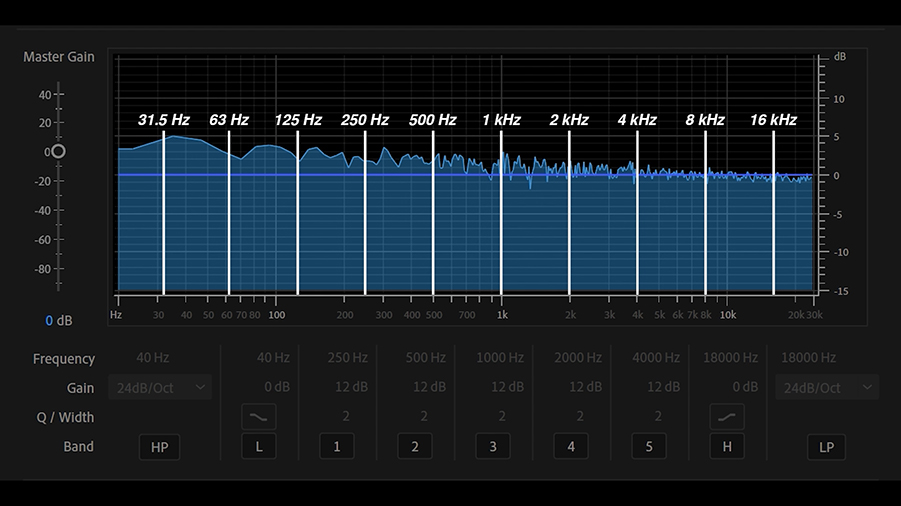
We’ll start by listening to drums. You’ll hear the drums with no filter and then I’ll turn on a filter that boosts a particular frequency band by 12 dB. I want you to listen for one of these vowel sounds:
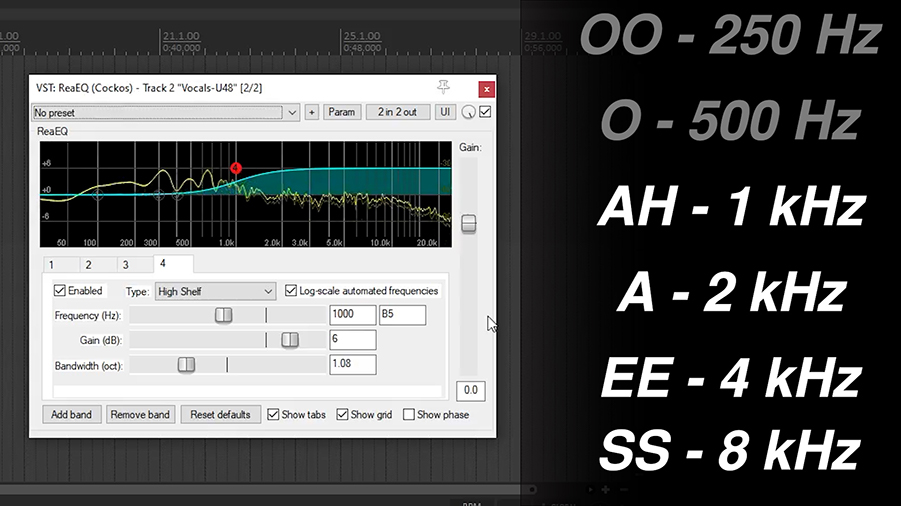
- “OO” – 250 Hz
- “O” – 500 Hz
- “AH” – 1 kHz
- “A” – 2 kHz
- “EE” – 4 kHz
Which vowel sound did you hear? You probably heard an “AH” sound when I switched on the filter.
Looking at the quick start guide I mentioned at the beginning of this video, I can see that “AH” corresponds to 1 kHz.
Exercise #2 – Drums
Let’s try another test with drums. Try to hear the vowel sound that pops out when I engage the filter…
Did you hear it that time? This time, 4 kHz was boosted, which corresponds to an “EE” sound.
Exercise #3 – Drums
OK. We’ll try one more with drums and then we’ll move on to another instrument. Again, see if you can hear which vowel sound cuts through when the filter is engaged.
This one is a bit more subtle, especially if you’re not listening through high-quality headphones or speakers. Listen to the low mid frequencies…
This time it was an “OO” sound, or 250 Hz. Did you get it right this time?
In this example, you were able to listen to the flat sound of the drums and the filtered sound. This makes it easier to hear the change when the filter is engaged.
In a real mixing situation, you won’t have that luxury. You’ll have to rely on what you think sounds good and listen for which changes at which vowel sounds will get you there.
Exercise #4 – Acoustic Guitar
Let’s listen to an acoustic guitar track that I just recorded in my office. This time, I just want you to listen to the recording as it is.
If you had to turn down a particular vowel sound, which one would you choose?
Now, everyone will hear this and have a different opinion of what could be improved. In my opinion, it sounds a bit boxy. In this case, I think there might be a bit too much “O” or 500 Hz. Let’s try removing some 500 Hz with an EQ.
Take a listen to what it sounds like before and after the filter here. I’ll play the first few measures flat and then I’ll switch on the filter. Do you think it sounds better or worse with the filter?
That sounds a bit better to me. Of course, if possible I’d just move the microphone until I found a placement that provided a good sound. However, sometimes re-recording isn’t an option, and that’s where a little EQ can be helpful.
Exercise #5 – Vocals
In both of these examples, we’ve been listening to a single instrument.
If you’re mixing a live band or a recording with several instruments, it’s probably best to listen to the mix as a whole. Sometimes, an instrument will sound terrible when soloed, but it will fit in perfectly with the other components of the mix.
Let’s try one more example to get a feel for how to make adjustments to a single instrument in the context of the mix as a whole.
I want you to pay extra attention to the vocal in this mix. What do you think could be better?
It sounds like the vocal is getting buried behind some of the other instruments.
There are several ways you could address this problem. You could use compression, you could EQ some other instruments to make space for the vocal, but for the sake of this video, let’s ask ourselves which frequency band we could boost to help the vocal track cut through.
I think if we added some more energy to the higher octaves, we would get a closer sounding vocal.
It doesn’t always have to be a single vowel sound. This high shelf will boost everything above 2 kHz. That includes “A” and “EE” and even some sibilant sounds like “SS” and “TS”.
Take a listen to the following clip. The clip will start with the flat version you heard above. Every few measures, I’ll switch between the flat version and the version that is filtered by this high pass filter.
You might notice that the consonants and breath are boosted, which results in a brighter vocal sound that is more articulate.
Again, there might be better ways to accomplish this, but I think the vocal sits better within the mix after making this simple change.
How To Train Your Ears For Mixing Music
If you want to get started learning this technique, download the free quick start guide.
In addition to practicing with the free tool you’ll find in that guide, I think it’s also very important to train your ears by simply listening to music as often as you can to establish a reference point of what sounds good.
Listening to songs you know will help you understand what sounds good and what doesn’t. Over time, you’ll start to automatically recognize when a frequency band is too prominent, too weak, or when it’s masking another frequency band.
You’ve just got to take it one step at a time and keep on practicing. Trust me – I’ll never claim to be the best mixing engineer in the world (or even the best mixing engineer in the room!), but I know that practice is the best way to get better. So, keep practicing!