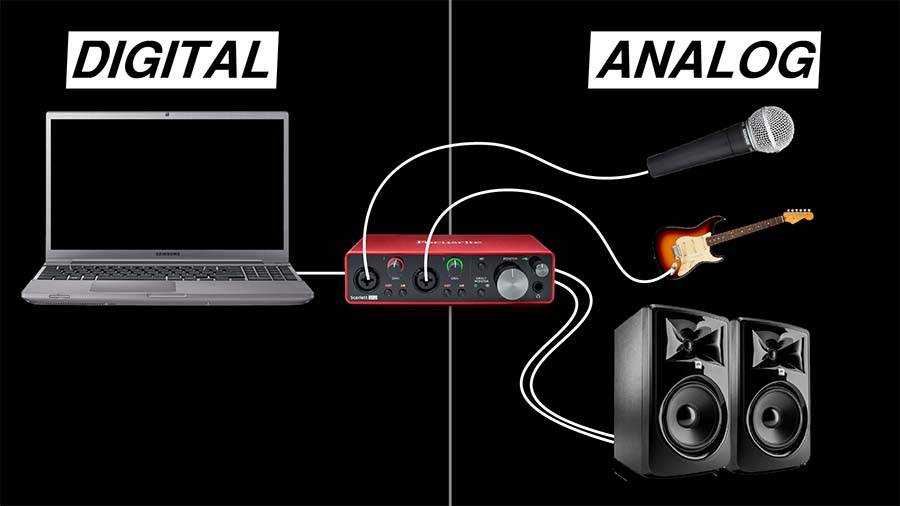
On the most basic level, an audio interface allows you to record microphones, instruments, and other sources into your computer.
But, if that’s all an audio interface does, then how can one 2-channel interface cost $200 while another 2-channel interface costs $1200?
As you’ll see in this post, there is more to an audio interface than this basic functionality. Let’s look at the features of budget and professional interfaces and listen to the difference in sound quality, so that you can decide which one is right for you.
By the way, I wrote another post about choosing the right audio interface for your specific needs. You may find that post helpful if you’re shopping for an audio interface. You can check it out right here: Choosing The Right Audio Interface
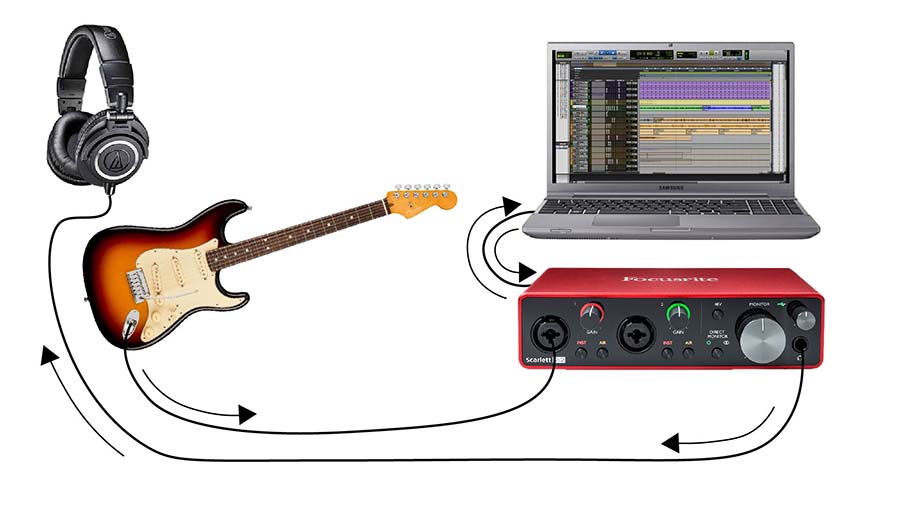
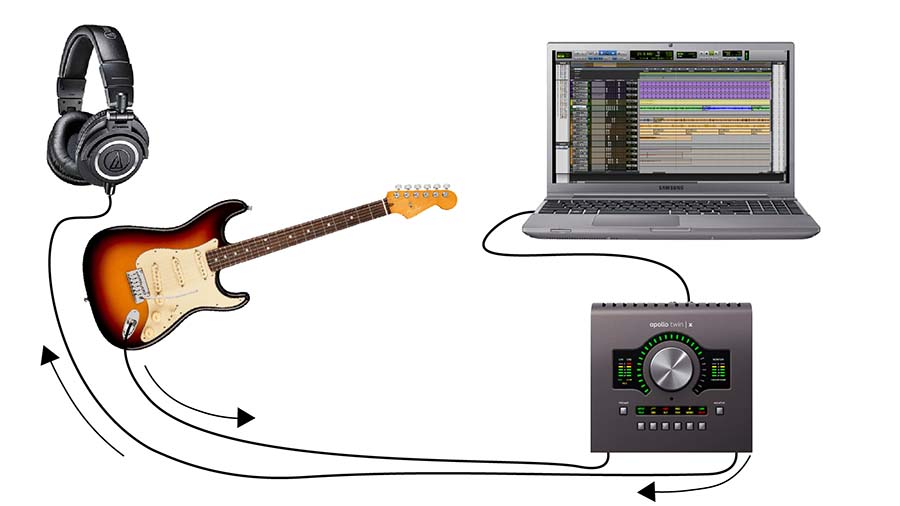
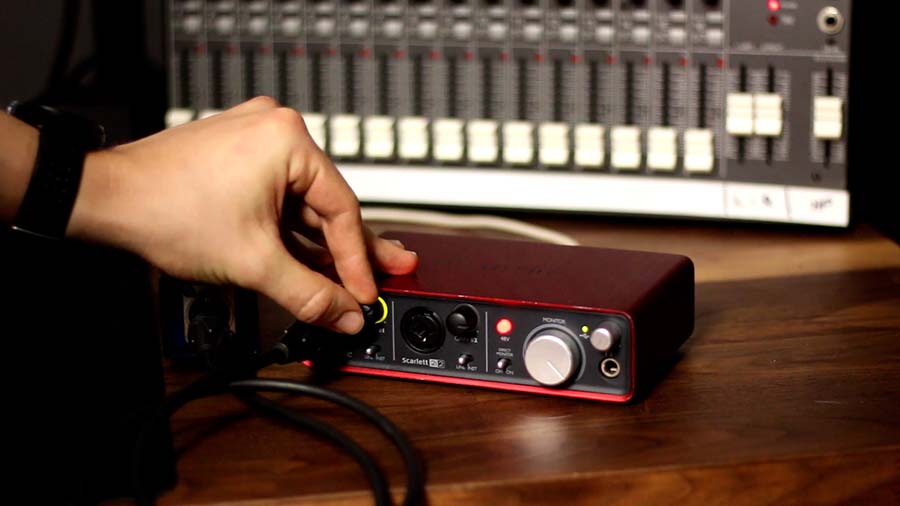
Through the course of this post, we will be comparing the interfaces that I use on a daily basis. The budget interface is the Focusrite Scarlett 2i2 and the pro interface is the Universal Audio Apollo Twin. I think these two interfaces are some of the best options in their price range.
Learn more about the Focusrite Scarlett interfaces here: Which Focusrite Interface Is Right For You?
Learn more about the Apollo Twin interface here: Universal Audio Apollo Twin Audio Interface Setup & Review
Inputs & Outputs
The most obvious factor in the cost of an audio interface is the number of inputs and outputs. If you’re searching for the perfect interface, this is where I recommend starting.
Number of Inputs
If you plan to record one instrument at a time (layering one instrument on top of the other), you can theoretically get away with one input.
However, sometimes you’ll want to record multiple inputs simultaneously. This could mean recording a guitar and vocal, recording a full drum kit (using a separate microphone on each drum), or recording several podcast guests.
If you decide how many inputs you’ll need to record at the same time, you’ll know that you should get an audio interface with at least that many inputs.
Types of Inputs
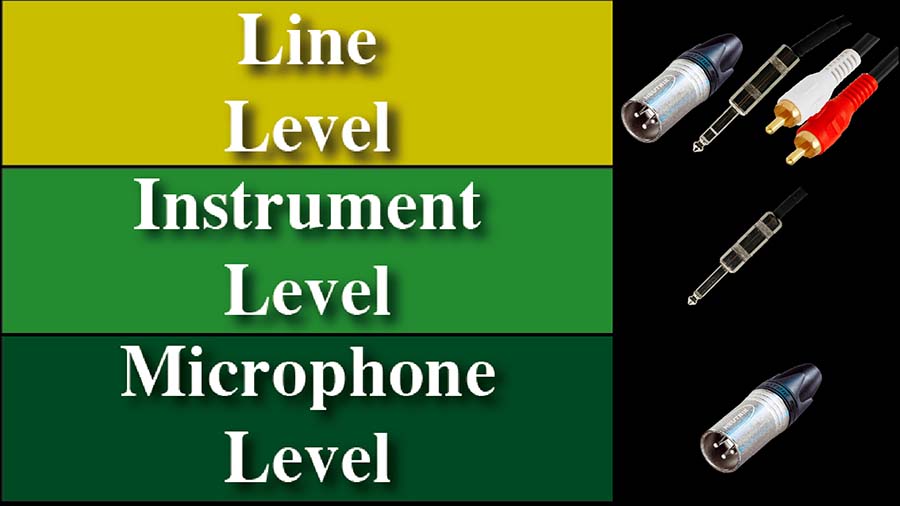
You’ll also need to consider the type of inputs you’ll need. The most common types of inputs are mic level, line level, and instrument level.
I wrote a full post on this subject that you can find right here: Audio Signal Levels
But here are the basics…
Line Level Inputs
A line level input is designed for connecting devices that output a strong signal level.
This could be a smartphone, a mixer, or outboard effects like compressors, gates, delay or reverb processors.
Instrument Level Inputs
Instrument level inputs are designed for connecting electric guitars, bass guitars, and keyboards.
If you try to connect an electric guitar to a line level input, the signal will be too quiet to work with. An instrument level input has a special preamplifier built in that brings the instrument level up to line level.
Microphone Level Inputs
Finally, microphone level inputs are for microphones.
The preamp in a microphone input is powerful enough to bring the very weak signal from a microphone up to line level.
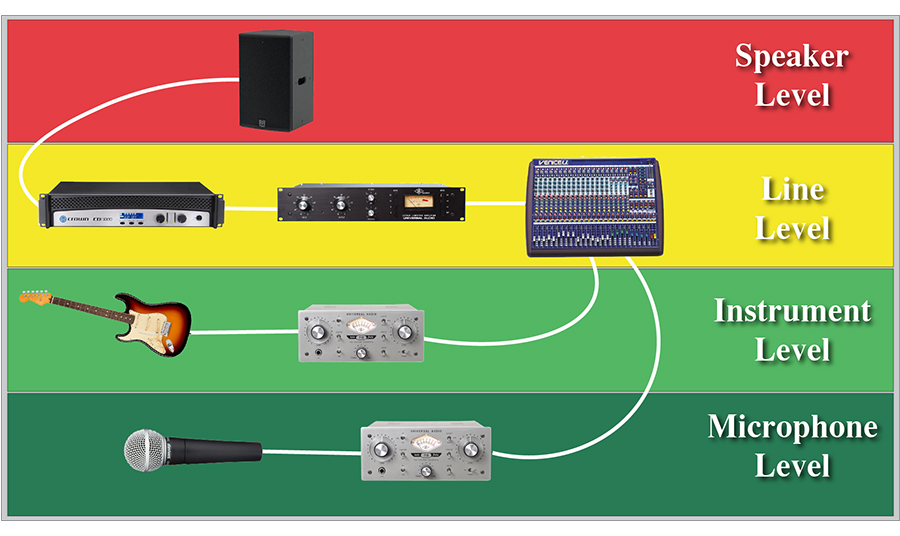
It’s important to look closely at the type of inputs on the interface you’re considering, because that will determine the type of source you can connect.
Generally speaking, line inputs are either ¼-inch, XLR, or RCA; instrument inputs are almost always ¼-inch; and microphone inputs are almost always XLR.
Some interfaces also have digital inputs that work with other devices that have digital outputs. The most common options are MADI, Dante, AVB, AES3 and Optical SPDIF or Toslink.
Number of Outputs
Most interfaces will have at least one pair of outputs for connecting to studio monitors. If you only need one pair of outputs, you’re probably covered by whichever interface you’re considering.
There are many situations where you might want to send audio studio monitors AND send audio to other destinations, like to a mixer, outboard effects, a second pair of studio monitors, or really anything you can think of…
Number of Headphone Amplifiers
Most interfaces will also have at least one headphone output. You can’t just connect headphones to a line output – to do that, you’d need a headphone amplifier.
If you plan to record more than one performer at a time, it might be a good idea to look for an interface that has multiple headphone outputs with separate volume control.
Alternatively, you could buy a headphone amplifier and use the line outputs to create more headphone mixes so that the musicians or podcast guests can hear themselves properly while recording.
Latency
Speaking of monitoring with headphones, one of the biggest differences between the $170 Focusrite Scarlett 2i2 interface and the $1000 Apollo Twin interface is latency.
You’ve probably experienced latency before. Latency is the subtle (or not-so-subtle) delay between the signal entering the input of your interface and the signal reaching your headphones. For me – this is a big problem when recording vocals or electric guitar.
It’s caused by the path the signal has to take from my guitar, through my interface, into my DAW, through the digital signal processing, and back out of my interface into my headphones.
Anything below 7-10 milliseconds isn’t that big of an issue, but if you’ve got a slow interface and a slow computer, the latency can be very distracting, making it really difficult to get a good take.
The latency of an interface is determined by a few main factors. For the purposes of this post, I want to mention software drivers, connection type, and onboard DSP.
Drivers
The latency of an audio interface is dramatically impacted by the driver that is being used.
That’s why it’s so important to download the best driver for your interface when getting it set up for the first time.
Connection Type
You might also see differences in latency between various connection types, like USB and Thunderbolt.
USB interfaces can be extremely low latency if they have well-written drivers – don’t get me wrong here. Thunderbolt interfaces tend to be extremely fast, just because the data transfer rate of Thunderbolt is much higher than that of USB 2.0.
Check out this Audio University YouTube video to learn the benefits of each: USB vs Thunderbolt Audio Interfaces
Direct Monitoring & Onboard DSP
By far, the most effective way to cut down latency is to use an interface that has direct monitoring.
You can find direct monitoring on a lot of interfaces – even budget interfaces like the Focusrite Scarlett 2i2. However, you only hear the dry signal when using direct monitoring with a Focusrite Scarlett 2i2. That means you won’t be able to listen to any amp simulators, reverb, or compression while recording – making the performance feel way less natural. You could run through your DAW and use an amp modeling plugin, but that might cause excessive latency. Results will vary here based on your computer’s speed and the specific interface you’re using.
On the other hand, interfaces like the Apollo Twin have built-in DSP. That means that you can use onboard amp simulators and other effects that are on a processor inside the interface. This means the signal you’re listening to doesn’t need to pass through your computer, resulting in nearly 0 latency monitoring WITH effects!
It also allows you to offload some of the processing off of your computer’s CPU and into the interface, which is very useful if you find yourself running out of processing power while mixing.
My opinion is that this feature alone justifies spending the extra money. However – the truth is that simply couldn’t always afford an interface like the Apollo Twin.
If you’re working on a budget, don’t worry. Just make sure that you choose an interface that has direct monitoring like the Focusrite Scarlett 2i2 and that should be sufficient to get you started.
Microphone Preamps
Another difference between budget and professional interfaces is in the microphone preamps. All microphone preamps are not created equal.
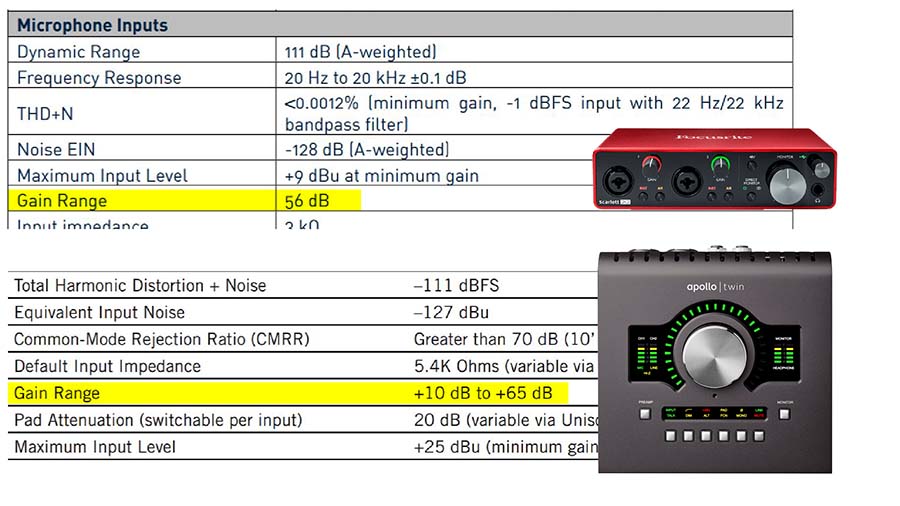
For one, the preamps in my Apollo Twin give me 9dB more gain than the preamps in the Focusrite Scarlett 2i2.
That extra gain is often necessary when using low-sensitivity microphones, like the Shure SM7B. If you are using an SM7B and don’t have the budget to buy an interface with powerful preamps, you might want to consider using a Cloudlifter or another inline preamp. Check out this post to determine if you need an inline preamp.
More expensive audio interfaces also generally have less noisy preamps with better characteristics. That’s to say that you will get a better signal-to-noise ratio in your recordings and generally a better sound.
In the professional recording world, preamps are highly sought after based on their unique tonal quality.
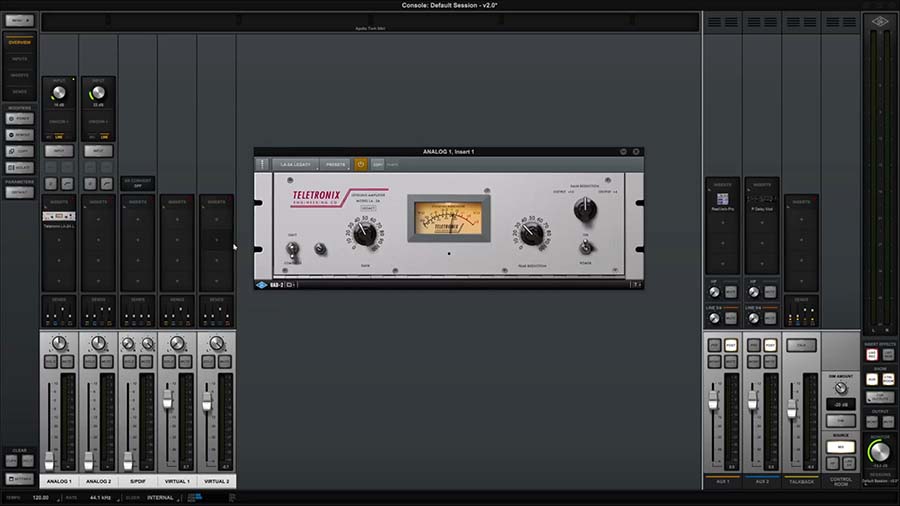
If you spend a little extra on the interface, part of what you’re getting is higher quality preamps. That’s especially true with the Apollo interfaces, because you can actually load plugins that emulate vintage preamps known for their iconic sound!
In the video at the top of this page, we run some comparisons so that you can hear the difference for yourself.
Included Plugin Bundles
I think it’s important to quickly mention that it’s worth considering what plugin bundles (if any) are included with the interface you choose.
Even budget interfaces like the Focusrite Scarlett interfaces will often come with plugins that can get you started building your arsenal of mixing tools.
My Apollo Twin came with the standard bundle of Universal Audio plugins, which are some of the best in the world! That alone really helps to justify the extra money spent on the interface.
Routing Capabilities
In addition to plugins, many interfaces come with software that effectively turns the interface into a mixing console.
The Focusrite Scarlett interfaces (with the exception of the Scarlett Solo and Scarlett 2i2) come with the Focusrite Control app, which lets you control the routing from various sources through the outputs of the interface.
The Apollo interfaces come with the Universal Audio Console app, which allows me to route the inputs to the outputs or even create virtual outputs for routing audio from software and create headphone cue mixes.
Meters
Something that often goes overlooked is the quality of the meters built into audio interfaces.
The only meter on the Focusrite Scarlett interfaces is this little LED ring that changes to red when clipping.
The Apollo Twin meters are much more useful, because they allow you to fine tune the level to ensure you’ve got a healthy signal without clipping.

One of the most impressive meters I’ve seen are actually found on some relatively affordable interfaces – the MOTU M2 and MOTU M4. If metering is especially important for you and you’re working on a budget, these might be good choices!
Analog-To-Digital Converters
Sound quality is one of those things that becomes very subtle the better it gets. When we test the interfaces in the video at the top of this page, you may find that you can’t hear the difference between them at all. Don’t worry – it can be difficult if you’re not sure what to listen for.
I can tell you that most interfaces these days are capable of recording with at least a 96kHz sample rate (or greater) and 24-bit depth.
However, there are definitely differences in the quality of analog-to-digital and digital-to-analog converters that convert the audio signals from your microphone to your computer and then back through your speakers.
This goes hand-in-hand with the internal word clock, which leads to a higher quality conversion with a minimized noise floor. These small factors can add up to take your productions and recordings to the next level.
Build Quality
Of course, the build quality varies as you increase the cost of an interface.
I won’t lie – the knobs and connections on my Focusrite Scarlett 2i2 feel kind of cheap, while the Apollo Twin feels really robust.
However, I’ve had this Focusrite interface for almost 6 years and it still works! So, while it might feel cheap, it’s still pretty robust, itself.

Who Needs An Expensive Audio Interface?
Who needs an expensive audio interface? In my opinion… everyone, and no one.
The truth is that even the cheapest audio interfaces today sound incredible. You can certainly make professional-quality recordings with just about any audio interface on the market.
The other truth is that it’s a lot easier to make professional-quality recordings if you’re using professional equipment.
Everything from the reduced noise floor, to the world-class plugins, to the tone of nice preamps are working together to push your productions to the next level.
Is it necessary? Absolutely not. Please, don’t let anyone tell you otherwise!
Is it pointless? Absolutely not!
If you want some help making sure you’ve got everything you need for your home studio (including the 6 home studio essentials), be sure to check out this checklist: