Depending on where you look, you’ll find conflicting information surrounding speaker cables. Some people say all speaker cables are the same, others say that premium speaker cables are worth every penny.
I want to offer you a simple guide for choosing the right speaker cable for your system. This post includes tips for choosing the right speaker wire gauge, as well as the right cable type and connectors for your specific application.
Understanding how simple this topic really is will help you avoid being tricked by marketing hype (which could save you money to invest in the more important components of your sound system).
If you’re designing a speaker system, make sure to check out these two guides that you can download for free. First, the Speaker Specifications Guide that will help you understand the most important technical specifications to consider when choosing speakers. Plus, the Speaker Placement Guide with diagrams for speaker placement in stereo, 5.1, and 7.1 formats.
Choosing the Right Speaker Cable
You’ve probably noticed that speaker wire is available in a vast range of prices. You can buy a 500-foot reel of speaker wire for less than $30. Alternatively, you can choose to buy a pair of 10-foot speaker cables for $1400! What a bargain! Please, don’t buy $1400 speaker cables. But how much should you spend?
Let’s take a look at what makes a good speaker cable and the different types available for different applications.
Speaker Circuit Basics
All speaker cables are not created equal. On a basic level, however, all speaker cables function on the same principle.
No matter which speaker cable you choose, the wires in that cable will create an electrical circuit between your amplifier and your speaker (or speakers).
Each amplifier channel will have a positive and negative terminal. There is a voltage (or electrical potential) between these two terminals, meaning that the electrons in one terminal “want” to rush to the other terminal. The electrons will flow from one terminal to the other through the path of least resistance.
A basic speaker cable contains two conductors. One conductor connects the positive amplifier terminal to the positive speaker terminal and the other conductor connects the negative speaker terminal back to the negative amplifier terminal. The electrons now have a pathway from the negative amplifier terminal to the positive amplifier terminal (albeit through the speaker).
Remember – the electrons “want” to travel to the opposite terminal. In a speaker circuit, they can travel from one terminal to another. There’s just one catch… In order for the electrons to be transferred from one terminal to the other, they need to pass from the amplifier, through one speaker wire, through the voice coil of the speaker, and through the other speaker wire back to the amplifier.
As the electrons pass through the speaker, the speaker harnesses some of that energy to create sound throughout the room.
If you need help pairing your speakers with a suitable amplifier, check out this post I wrote on choosing an amplifier for your speakers.
Types of Speaker Cables
Choosing the right speaker cable depends on how it will be used. Although all speaker cables technically do the same thing, each cable on the market is designed for a specific application, such as installation in walls, installation in equipment racks, studio production, live production, or consumer use.
Let’s take a quick look at the most important differences between the various types of speaker cables that are available.
Speaker Cable for Installation
If you plan to install speaker wire in the ceiling or in the wall, it’s safest to use plenum-rated cable. This is cable with special insulation around the wires that helps protect against the fire hazards associated with electrical cabling.
Plenum-rated cable is often significantly more expensive than non-plenum rated variants. If you won’t be running the cable through walls or ceilings, you may be able to save some money going with non-plenum cable. Be sure to check the local safety codes in your area when choosing between these two types of cables.
For consumer use, you can usually go with a basic spool of speaker wire that consists of two insulated conductors without an outer insulator. This is what I recommend if you are on a budget and just need something to run a short distance along the floor or on-wall cable management.
Speaker Cable for Production
Speaker cables designed for installation are often not very flexible and are far more difficult to work with than cables made for live audio production. That’s because they are made to be installed, rather than used again and again in different environments.
If you will be setting up systems temporarily for live events or studio recording, you should choose speaker cables that are flexible and rugged. This will allow you to easily set up and tear down systems without your cables getting tangled or damaged.
Production-grade speaker cables are often equipped with thick rubber insulation.
Speaker Wire Gauge (AWG)
Speaker wire gauge is probably the most important feature of a speaker cable. No matter which of the above types of speaker cables you choose, the speaker wire gauge recommendations in this section will remain the same.
What Is Speaker Wire Gauge?
Speaker wire gauge refers to the thickness of a speaker wire. Most specifications are based on the American Wire Gauge (AWG) system.
The AWG system is a bit counterintuitive. The higher the gauge number, the thinner the wire. The lower the gauge number, the thicker the wire.
The most common gauges of speaker wires are 12 AWG, 14 AWG, 16 AWG, and 18 AWG.
Why Is Speaker Wire Gauge Important?
Speaker wire gauge is very important! It will directly affect the power transfer from the amplifier to the speaker.
Speaker Wire Gauge and Resistance
By far, the most important variable that is affected by speaker wire gauge is resistance.
The resistance of a wire varies depending on its length and its thickness. A longer, thinner wire will have greater electrical resistance than a shorter, thicker wire of the same composition.
It’s especially important to consider speaker wire gauge for long distances, because the length of the cable run will already increase the resistance of the circuit.
For getting the best power transfer and sound quality possible, 12 AWG speaker wire is preferred when compared to 18 AWG, from a technical standpoint. The lower the gauge, the thicker the wires – the thicker the wires, the lower the resistance.
Which Speaker Wire Gauge Should I Buy?
You should make your decision based on the length of the cable run and the impedance (and power requirements) of your speakers.
Measure the distance from the amplifier to each speaker in the system, and give yourself approximately 4 feet of extra cable at each end. You’ll be glad to have a bit of slack if you need to repair or test connections later!
Once you’ve determined the length, choose the speaker wire gauge. For most 8-ohm speaker circuits up to about 50 feet, 16 AWG speaker wire is a great choice. If you’re on a budget, you can even go with 18 AWG speaker wire in almost every case.
For speaker wire runs beyond 75 feet, it’s worth considering at least 16 AWG, if not 14 AWG or 12 AWG. At this distance, the resistance of the cable will already be increased, so you will want to keep the cabling as low-resistance as possible.
If your speaker has a nominal impedance of 4 ohms or lower and it requires a lot of power (such as a large subwoofer cabinet for live sound reinforcement), you should stick to 14 AWG or 12 AWG, despite the distance.
Speaker Wire Gauge Chart
This speaker wire gauge chart will help you quickly determine which speaker wire gauge to choose based on the length of the cable run and the impedance of your speaker.
| System Type | Speaker Impedance | Cable Length | Recommended Gauge | Notes |
|---|---|---|---|---|
| Low-Impedance Audio | 8 Ω | 0-50 ft | 16 AWG | Standard for most home & studio setups |
| 8 Ω | 50-100 ft | 14 AWG | Use thicker wire to minimize resistance | |
| 8 Ω | 100+ ft | 12 AWG | Long runs benefit from low resistance | |
| Low-Impedance Audio | 4 Ω | 0-50 ft | 16 AWG | 4 Ω speakers draw more current than 8 Ω |
| 4 Ω | 50-100 ft | 14 AWG | Higher current = more voltage drop risk | |
| 4 Ω | 100+ ft | 12 AWG | Consider relocating amp or using 70V system | |
| 70V / 100V Systems | High-impedance line | 0-100 ft | 18 AWG | Thin cable is fine due to low current |
| 100-250 ft | 16 AWG | Still low current; size up for high wattage | ||
| 250+ ft | 14 AWG or thicker | Consider total speaker load when sizing |
Speaker Cable Connectors & Terminals
There are several types of connectors used for speaker connections. Ultimately, the type of connectors you need will either be based on preference or based on the type of terminals on your amplifier and the type of terminals on your speakers.
Let’s take a moment to go through the common types of speaker and amplifier terminals and connectors that are available.
Types of Speaker Cable Connectors
First, we will look at the various types of speaker cable connectors. These connectors will either come preinstalled on the speaker cables from the factory or can be installed on any speaker wire at home.
Make sure to read the next section to make sure that the terminals on your amplifier and speakers are compatible with the connector type you choose.
If you plan to install the connectors yourself, I highly recommend using a good pair of wire strippers. There is a vast difference between a good and bad pair of wire strippers. This pair of Klein Tools wire strippers are by far the best I have ever used! They make installing speaker wire 100 times easier.
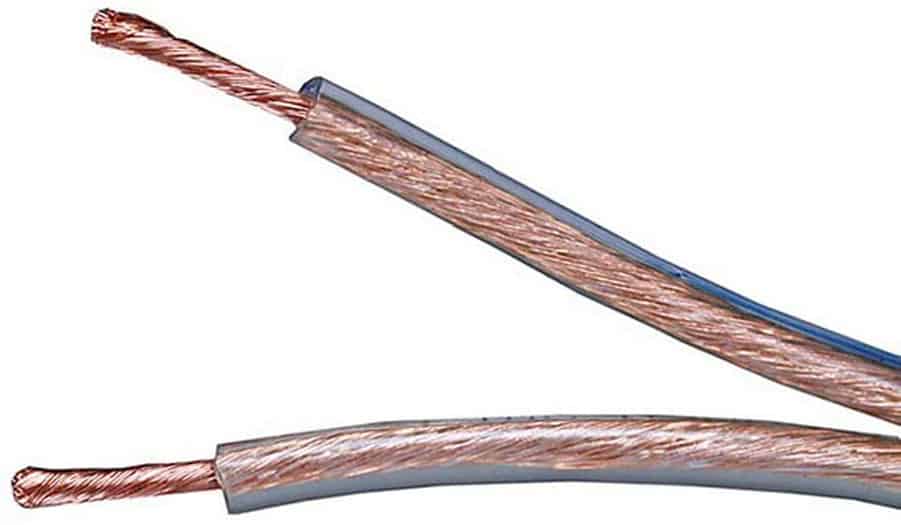
Bare Speaker Wires
Bare wire is the most basic connection type. You simply cut the speaker wire to the appropriate length and then strip the wire back to expose about a ¼-inch of bare wire.
I find it useful to twist the wire a few times in one direction to make sure the individual strands of copper don’t fray in every direction. This makes it much easier to insert into the amplifier and speaker terminals.
If there are frayed strands of copper, it’s possible that they could cause an electrical short to a nearby piece of metal which can cause damage to the amplifier. For this reason, it’s best to use a different type of connection.
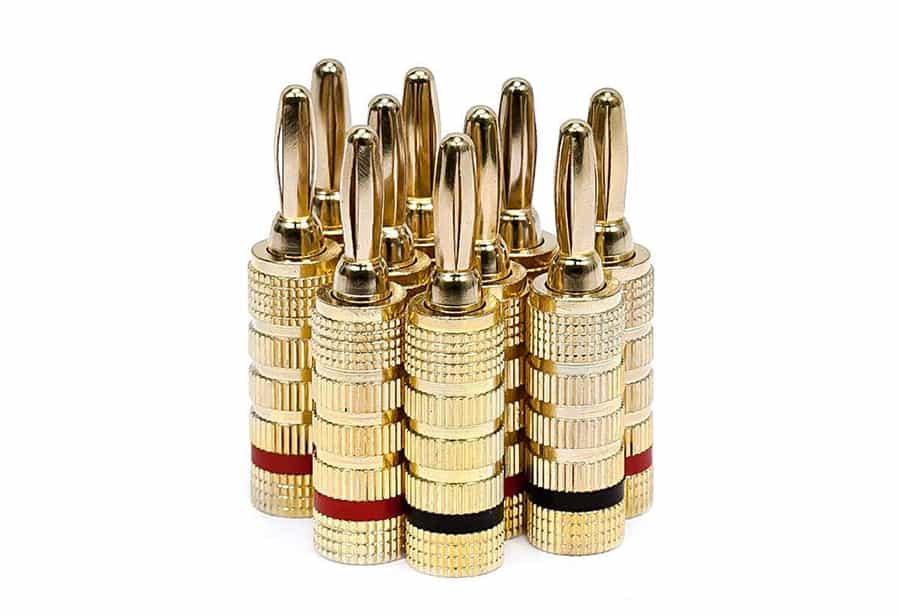
Banana Plug Speaker Cable Connectors
Banana plugs are a much more reliable method of securing your speaker wire to the amplifier and speaker terminals. These connectors are very inexpensive and will work with any speaker wire you buy.
It’s easy to install banana plugs on your speaker wire. You simply strip the wire to expose a bit of copper and follow the simple instructions that come with the connectors. It usually requires no special tools beyond what you’ve already got at home.
You can pick up a set of single banana plugs like these Monoprice banana plugs for less than $1 each.
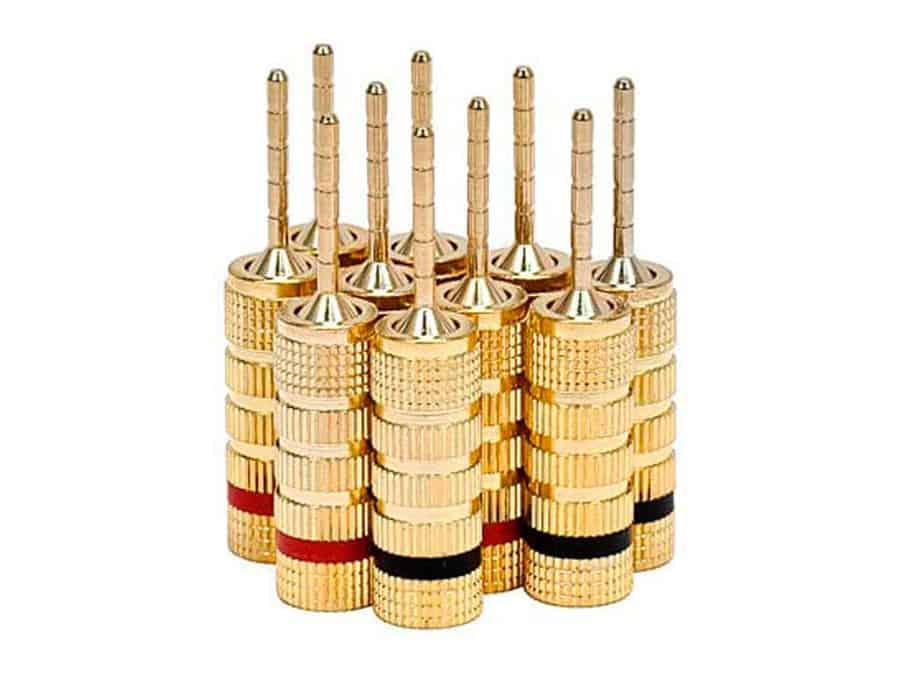
Pin Speaker Cable Connectors
Pin connectors are similar to banana plugs, but slightly thinner.
They are also very simple to install and prevent the problem of fraying that is associated with bare wire. This will make installation easier and will look cleaner. Plus, they tend to stay in place much better than bare wire connections.
They’re also very inexpensive. I like these Deadbolt Flex pin connectors because they are flexible and accommodating for installation in tight areas behind a speaker or amplifier.
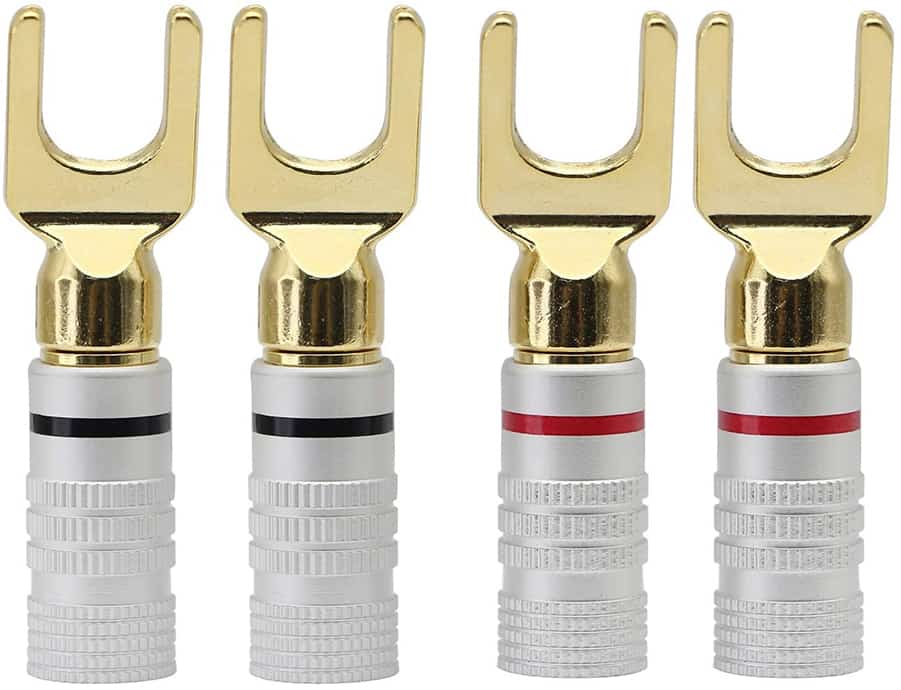
Spade Speaker Cable Connectors
Spade connectors are designed to be held in place by a thumbscrew. They are installed by sliding the spade portion of the connector at the base of a post and tightening a nut to clamp the spade in place.
These are my least favorite of all of the speaker connector types, because they exit from the side, which can make it difficult to find enough space depending on the layout of your amplifier terminals.
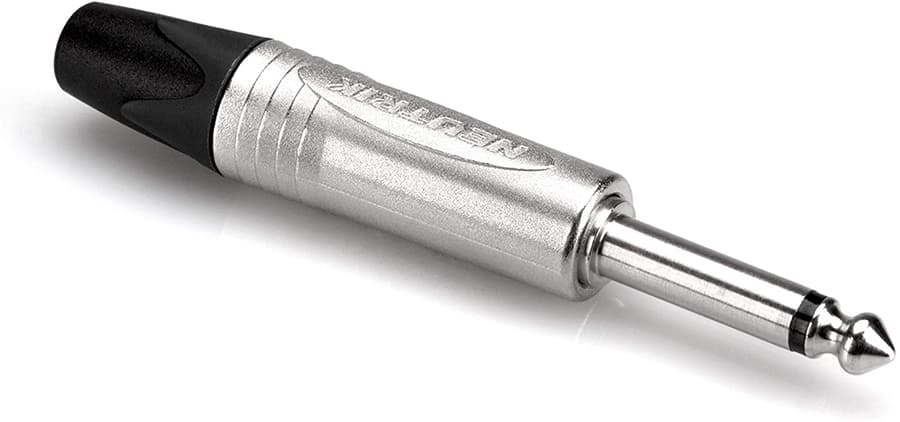
¼ inch Speaker Cable Connectors
Quarter-inch connectors are common on guitar amplifier heads and guitar speaker cabinets. They can also be found on some PA systems.
These connectors are a bit tricky to solder, so I don’t recommend making them yourself. Instead, pick up a good premade cable like this ¼-inch speaker cable from Rapco Horizon.
Keep in mind that there is a BIG difference between a ¼-inch instrument cable and a ¼-inch speaker cable! You can read all about the differences and why it’s important in this article I wrote on ¼-inch TS Speaker Cables vs ¼-inch TS Instrument Cables.
Quarter-inch speaker cables are sort of dangerous. That’s why you don’t see them on PA systems as often as you used to. The fact that it is so easy to touch both the positive and negative portion of the connector makes it very easy to shock yourself.
If you do choose these connectors for speaker level connections, make sure to always connect the speaker end first and then the amplifier end.
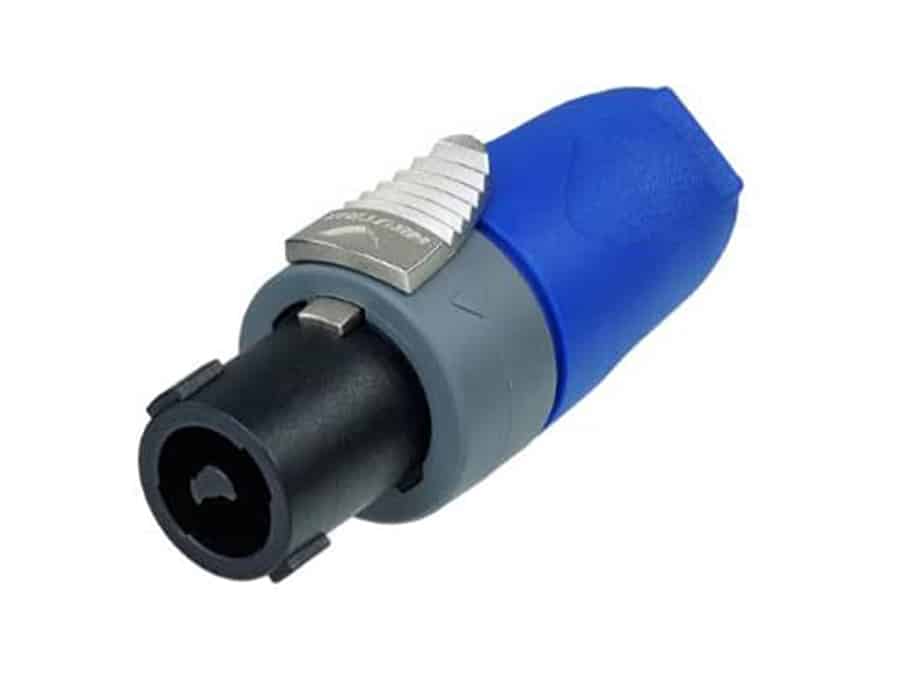
SpeakON Speaker Cable Connectors
SpeakON connectors are typically only found on professional amplifiers and speakers. These address the dangers of electric shock by keeping the conductive points of the connector inside a plastic enclosure.
They are also superior to ¼-inch connectors because they lock in place! You simply insert the speakON connector and turn it clockwise to lock it in place. To disconnect a speakON connector, you pull back on the spring-loaded release switch with your thumb and twist counter-clockwise.
SpeakON connectors come in a few variations: NL2, NL4, and NL8.
NL2 speaker cables have one pair of wires for connecting one speaker circuit to a single amplifier channel.
NL4 speaker cables have two pairs of wires (four wires total) and NL8 speaker cables have four pairs of wires (eight wires total). These cables allow you to connect multiple amplifier channels to multiple speaker circuits using only a single cable.
NL4 and NL8 connections are most often used for single speaker cabinets that require power from multiple amp channels, but they can also be used as a “speaker snake”, running several amplifier channels over a single cable and then breaking out into different speakers at the other end.
If you are using professional gear with SpeakON connectors, I recommend going with something high-quality like these GLS NL4 cables.
Types of Speaker/Amplifier Terminals
The best option between these connector types will depend on which type of terminals are on your amplifier and speakers. So, let’s go through the different types of terminals that are available.
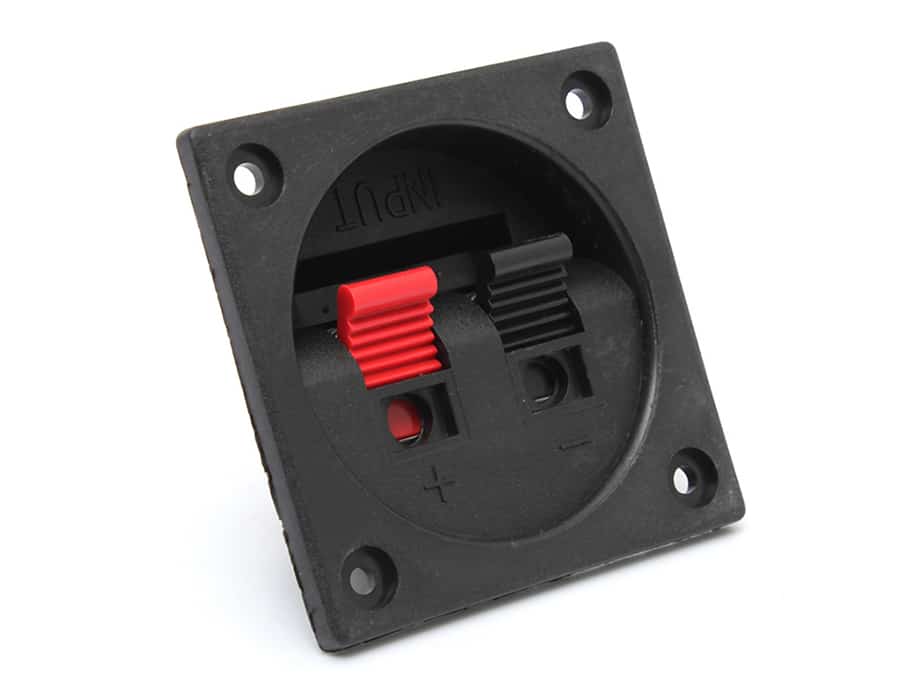
Spring Clip Speaker/Amplifier Terminals
The most common type of terminals on consumer amplifiers and speakers is the spring-loaded clip terminal. These are small, spring-loaded clamps that hold bare speaker wire or pin connectors in place.
There is usually a small hole above or below a red or black button. The red terminal is positive and the black terminal is negative. By pressing the button, you can insert the bare speaker wires or pin connectors into the small holes. Releasing the button will hold the speaker wire in place.
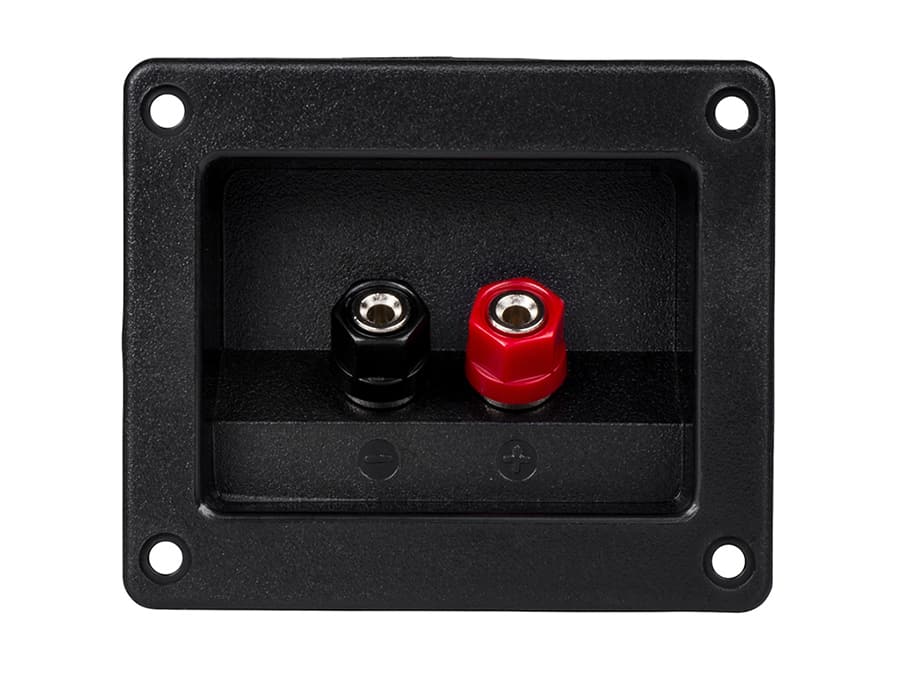
Binding Post Speaker/Amplifier Terminals
Binding posts can be found on a variety of amplifiers and speakers – professional and consumer. A binding post is a terminal type that holds the speaker wire in place with a threaded post and a nut. There is a hole in the side of the post (perpendicular to the post) and a hole at the end of the post.
When tightened, the nut clamps down on a bare speaker wire or pin connector inserted into the hole on the side of the post.
Spade connectors can be used at the base of the post, clamped in place by the nut.
If you are using banana plug connectors, you can get a more secure connection by inserting the connectors into the hole at the end of the post. Tightening the nut will hold the banana connector in place.
Are Expensive Speaker Cables Worth It?
As you have probably gathered from this article so far, all speaker cables are not the same. The construction of the cable is very important – especially the speaker gauge. However, you can buy 100 feet of 12 AWG speaker cable for less than $30. What could possibly justify the extraordinarily high prices of some of the “premium” speaker cables on the market?
Truthfully, I personally don’t think the prices of “premium” speaker cables are justified. Science backs me up on this, too. Any measurable benefit of “premium” speaker cables is far outside of the human range of perception. If it’s 0.5 dB of attenuation at a frequency far beyond the human range of hearing, it still doesn’t justify the prices that some companies are demanding.
From a person who has been in the business for over 15 years, take it from me – the markup on cables is already astronomically high. Don’t waste your budget on something that yields such small results. You can almost certainly find a better way to invest that money that will have a bigger impact on your sound system’s performance.
As long as you buy cables that abide by the guidelines in this post, you will be covered. You can invest that extra money on more meaningful upgrades, like speakers, amplifiers, and acoustic treatment.