If you’re buying a microphone for podcasting or streaming, you should definitely consider the Shure SM7B. It’s one of my favorite microphones and, when it comes to broadcasting, it’s somewhat of an industry standard.
But make sure you read through the whole post, because this microphone is not for everyone! It has some serious drawbacks that you should be aware of before spending your whole budget on this mic only to discover that you need to buy more accessories to get the most out of it.
While this is NOT a sponsored video, using the links in this post is a way to support Audio University at no extra cost to you.
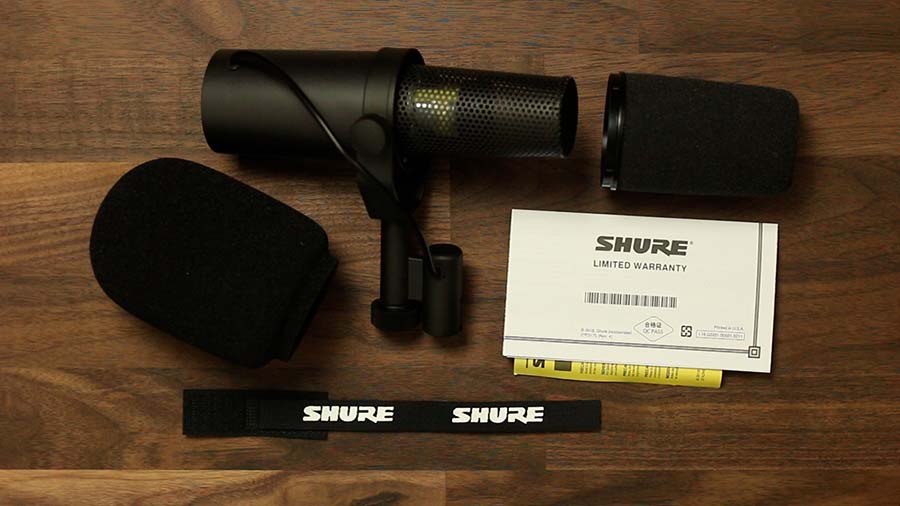
Unboxing
Let’s take a look at what comes in the box.
Inside, you’ll find:
- (1) Microphone
- (1) Microphone Stand Adapter (5/8″ to 3/8″)
- (1) Rear Panel Cover Plate
- (2) Windscreens
- (1) Instruction Manual
Build Quality
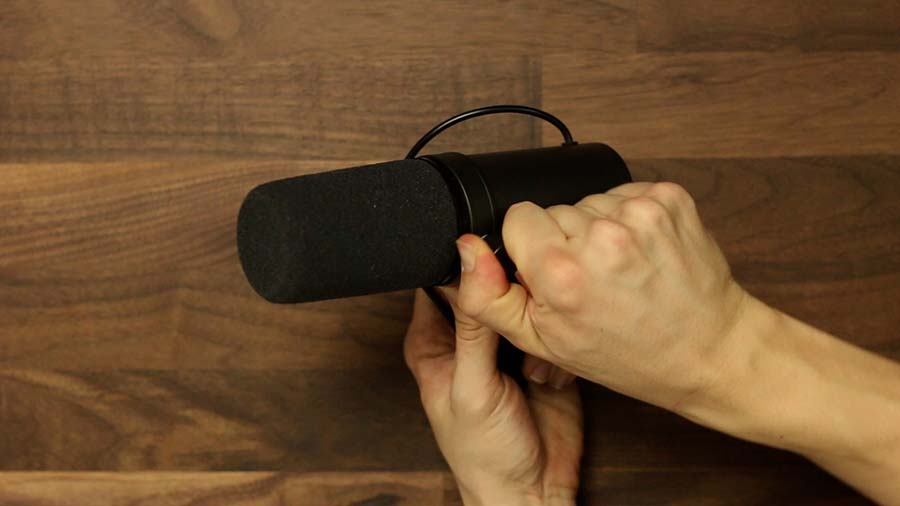
This microphone is one of those things that you pick up and instantly feel the build quality. It’s got a nice weight to it and feels really rugged with its metal construction.
There is a built-in shock mount that reduces the handling noise when readjusting the mic, which is really handy for podcasting and streaming.
The adjustments make it possible to fine-tune the position of the microphone on the fly so that you and your guests can move around more comfortably.
Frequency Response
This microphone has a frequency response tailored for a speaking voice, but it is actually very versatile.
The frequency response ranges from 50 Hz to 20kHz with the option for a low rolloff and a presence boost in the high mid frequencies.
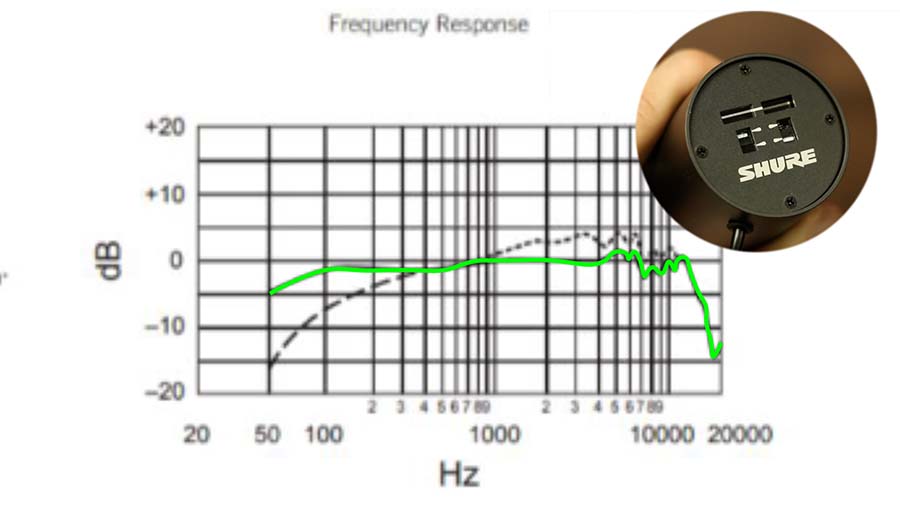
Default Settings
The frequency response with the default settings is drawn with on the graph below.
There is a small dip in the low mids that reduces some of the mud as well as a unique response in the high mids and highs that improves the intelligibility of the signal without causing harsh “s” sounds and accentuating the sibilance too much.
I’ll usually start with the default settings, listen to a test recording, and adjust accordingly.
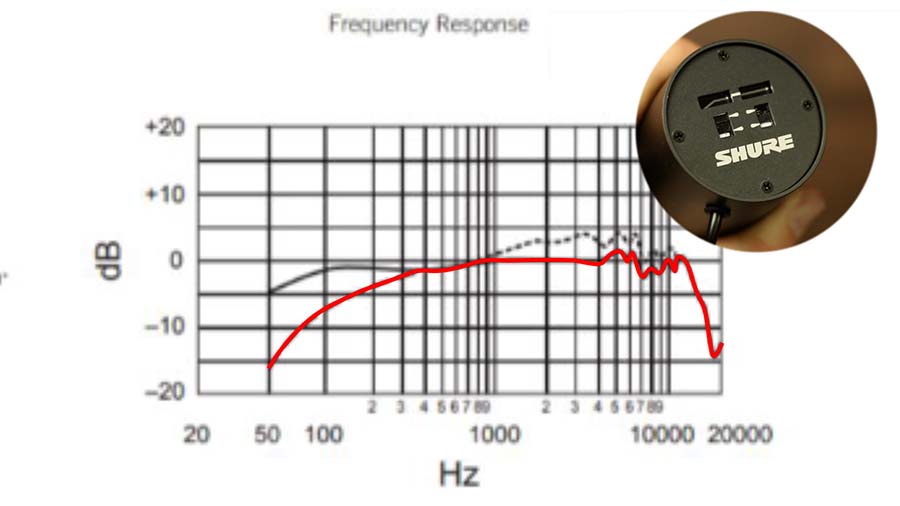
Low Roll-Off
If you find that there is too much low-frequency energy or your voice sounds boomy, you can engage the low rolloff on the back of the microphone.
The frequency response with the low roll-off engaged is drawn on the graph below.
In addition to taming a boomy signal, this also helps bring out the higher frequencies which can help the signal cut through the mix for music and commercial spots with music beds.
Mid-Range Emphasis
The mid-range emphasis switch or presence boost gives you yet another way to bring out the most important frequencies of the human voice.
With this switch engaged, you will hear the frequency response outlined in the graph below.
This will help accentuate the mid and high-mid frequencies, which improves the articulation of the voice and adds an airy quality.
Take a listen to the microphone in each mode in the video at the top of this page.

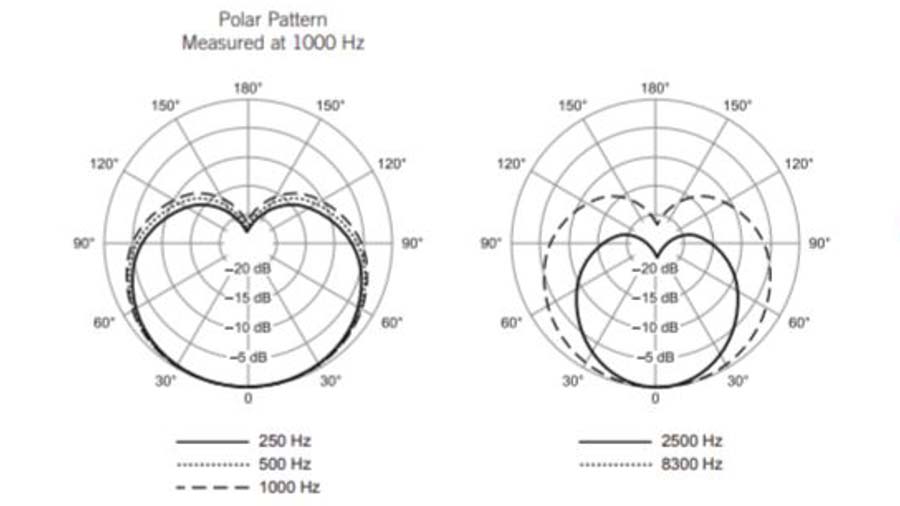
Polar Pattern
When recording or streaming voice, it’s really important to keep the noise level as low as possible. To help with that, you can use the polar pattern of the microphone to your advantage.
The SM7B has a cardioid polar pattern, which means that it rejects sounds coming from behind the microphone.
Using the polar pattern to your advantage, you can point the microphone toward you and away from any noise sources. For example, this could help to reduce the noise from a notebook as you turn the pages or the noise of a keyboard or a video game controller.
It can also help reduce the amount of reverb and echo from your room.
Plosives (P-Pops)
Sometimes plosive sounds, like P’s, B’s, and T’s will create a burst of air that hits the microphone capsule and results in a pop.
Luckily the SM7b is really good at preventing those pops from ruining your recording.
Without the windscreen, you’ve really got to pay attention to your microphone technique, but with the windscreen you don’t really need to worry about it.
If you still get pops even when using the windscreen, try using the larger windscreen that’s also included.
Handling Noise
While you’re streaming or podcasting, you and your guests are sure to be moving around and changing positions. Because of that, it’s important to use a microphone that can be adjusted without causing a bunch of noise. The shockmount that comes with the SM7B makes this really easy.
These mics are designed to be used with microphone arms, so I would definitely recommend using a microphone arm instead of a regular microphone stand.
As you can hear in the video at the top of the page, the handling noise is kept to a minimum when I move the microphone. That’s not the case with all microphones.
Proximity Effect
With any directional microphone, you’ll get a bass boost when you move closer.
This can be a good thing in broadcasting if you’re going for that radio DJ sound, but if you don’t want that sound, you can always keep some distance between you and the microphone or use the low rolloff switch on the back.
In the video at the top of this page, you can listen to the sound quality at various distances.
Pros & Cons
Like I said in the beginning, this is one of my all time favorite mics for recording voice.
It’s got a natural sound out of the box and can be adjusted to tailor the sound to your unique voice. It also has excellent noise rejection and handling isolation – two essential qualities of a broadcast mic.
All in all, this is one of the first microphones I would recommend for streaming and podcasting, but there are some things you should be aware of before spending your whole budget on just the mic, itself.
First, this mic is definitely better with a microphone arm instead of a regular boom stand, so save some room in your budget for the microphone arm.
Second, the XLR connector sometimes gets in the way, depending on the stand you’re using, so it might be worth picking up a microphone stand extension adapter.
Lastly, and most importantly, this mic is notorious for needing a lot of gain from your microphone preamp. You should probably consider pairing this mic with an inline preamp like a Cloudlifter.
If you’re unsure if you need an inline preamp or not, check out this Audio University post that will help you decide: Do You Need A Cloudlifter?