Let’s look at 5 ways to use outboard audio gear in your studio for recording and mixing.
Sweetwater just sent me a Cranborne Audio 500ADAT and a few 500-series modules. As we go through my outboard setup and signal flow, I’ll show you some of the features that make this thing so powerful.
But no matter what outboard gear or patchbays you’ll be using, you’re going to find the principles in this video very helpful so let’s get started…
Microphone Preamps
One of the first pieces of outboard gear that many add to their studio is an outboard microphone preamp.
When you’re first getting started, you might use the preamps that are built into your audio interface. But, outboard preamps are a good way to improve sound quality and introduce some variety to your tool kit.
Before analog-to-digital conversion, the signal from your microphone needs to pass through a preamplifier to bring it up to line level. This means the mic needs to connect to the preamp before being converted to digital by your audio interface.
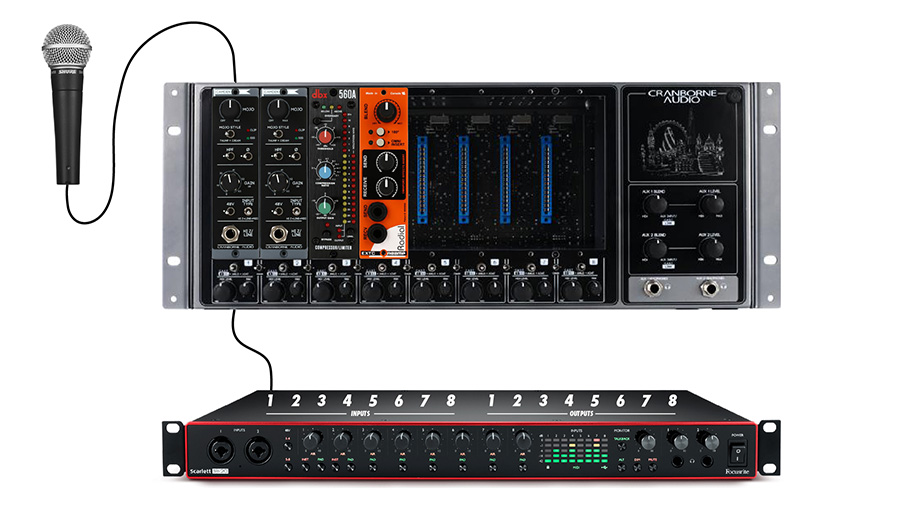
In my studio, the microphone lines are connected to the first patch points on my Samson 48-point TRS patchbay, just above the microphone inputs to my Focusrite Scarlett 18i20 interface.

The reason I’ve arranged the patchbay like this is so that the mic input plates are “normalled” to the mic inputs on my audio interface. This simply means that when nothing is connected, the signal from the top jack will flow down to the bottom jack. This saves me the time of patching the microphones every time I want to use them. With this patchbay setup, the mics are connected to the interface preamps by default.
But I want to use the Cranborne Audio Camden 500 preamp instead of the preamps built into my interface. So, using a patch cord, I’ll connect Mic 1 to the input of the Camden preamp and connect the output of the preamp to input 1 of my audio interface.

You may have noticed that the output of the Camden microphone preamp is directly above its input. In this case, these patch points are not normalled. Otherwise, it would create a feedback loop when nothing is connected. Instead of normalling these jacks on the patchbay, I’ve set them up in “Thru” mode so there is no default connection.
With the microphone connected to the outboard preamp and the outboard preamp connected to the audio interface, I’ll set the input of the track in my DAW to Input 1, I’ll arm the track, and I’ll set levels on the outboard preamp until the meter in the DAW peaks at about -12 dBFS.
Input Signal Chain
Many engineers will pass the microphone through an outboard preamp and through a few effects before sending the signal to the audio interface to be recorded.
Remember – alterations to the signal made before recording cannot be undone. But, that might be a good thing, as it forces you to make a decision now rather than saving it all for the mixing process.

If you’re recording a vocalist, you could use a compressor or limiter to provide a zero latency monitor mix for the vocalist and cut down the dynamic range before recording. This usually leads to a better performance because the vocalist will be more comfortable hearing a compressed signal rather than hearing the dry input signal.
The setup process is similar to setting up an outboard mic preamp. I’ll take the microphone to the input of the outboard preamp just as I did before. This time, instead of connecting the output of the preamp to the audio interface, I’ll connect the output of the mic preamp to the input of my dbx 560a compressor. Then I’ll connect the output of the compressor to the audio interface.

If you’ve got an unresolved fear of commitment, no need to worry. The Cranborne Audio 500ADAT chassis makes it possible to create a signal chain like this for the vocalist’s headphone mix while recording the dry signal from the mic preamp. That way, you’ll have a clean slate when you start mixing.

Inserts
There are even more ways to use outboard gear once everything is recorded in your DAW and you’ve entered the mixing phase.
Let’s say I want to use the dbx 560a compressor/limiter from before, but this time I want to compress a signal that has already been recorded.

In my DAW, I’ll create a hardware insert with the ReaInsert plugin within Reaper. Most DAWs have this capability, though the setup method varies. I’m going to create a send with output 3 on my audio interface and a return with input 3 on my audio interface.
This means I need to patch output 3 of my interface to the input of the compressor and connect the output of the compressor to input 3 of my interface.

Each time you create an analog insert like this from your DAW, a digital to analog conversion is required. The interface converts the digital signal to analog and sends it to the analog compressor. The compressor sends the signal back to the interface where it is converted from analog back into digital.
So, if you plan to use more than one piece of hardware, I’d recommend patching them together with analog patching rather than creating several inserts in your DAW to minimize the conversion stages needed.
You can even bypass the patchbay with the Cranborne Audio 500ADAT by using these “Chain” switches, which will route the signal from one module directly to the next within the chassis.

With either method you can string together several effects on the same hardware insert from your DAW. Just patch the interface output to the first hardware device input and the last hardware device output to the interface input.
One of my favorite hardware insert chains is my guitar pedalboard. Because my pedalboard is made up of high impedance devices designed for instrument level signals, I use this Radial EXTC module in my 500 Series rack. It allows me to connect my pedalboard to my patchbay for sending pre-recorded DI guitar tracks through my pedals.

FX Sends
Another common method for using outboard gear is an FX send and return. The insert method you just learned works well for compressors, gates, EQs, or other processors that will be placed inline on a channel or a bus. An FX send and return is more suitable for time-based effects like delay and reverb. That’s because it allows you to send multiple inputs to the same processor at various levels.
I don’t have any outboard reverb plates or spring reverbs in my studio, but I do have a Strymon BlueSky reverb pedal, which sounds great. It’s a part of my guitar pedalboard, so I’ll use the Radial EXTC again. If you’ve got a chamber, spring, or plate reverb, you can follow these same steps.

To set up an FX send, let’s create a hardware send on the vocal channel to output 4 on the audio interface. I can control how much of the vocal is sent to this output, which will be helpful for dialing in the sound later on.
With an effect like reverb, we will create a send on each channel that routes to the input of the reverb and the output of the reverb will return on a new track. Let’s create a new track and set the input to input 4 of the audio interface.

Over on the patchbay, we will connect our FX send (output 4 on the interface) to the input of the reverb, which is connected using the Radial EXTC. Again, I’m only using the Radial EXTC because this is a guitar pedal. I’ll connect the output of the reverb to the FX return channel (input 4 on the interface).
Adjusting the send on our channel determines how much of the vocal is sent to the reverb unit and we can even put a send on multiple tracks. The wet sound of the reverb comes back on the FX return track, which can also be level adjusted using the fader.

Another cool feature on the Cranborne Audio 500ADAT is that you can create an analog headphone mix from right here on the front panel, using these mix and pan knobs.
I can add the vocal mic compressor that we set up before and also mix in some reverb. All of this will be routed to the headphone output on the 500ADAT or on a Cranborne Audio C.A.S.T box, which I might cover in a future video.

Analog Summing
Once your mix is nearing completion, you’ll need to sum all of the individual tracks into a 2-channel left and right, stereo file.
If you’ve been in the recording industry for a while, you may have dealt with the summing issues that were associated with digital audio in the early days. The issues are far less severe in modern systems, but many still use analog summing amplifiers when printing their mixes to stereo.
Instead of using your computer’s processor to crunch the numbers and create a stereo track out of the individual tracks, analog summing amplifiers will take the stems for each instrument or instrument group and sum them in the analog domain.

There are plugins that emulate this, such as the Waves NLS Non-Linear Summing plugin, but the Cranborne Audio 500ADAT lets you do the real thing with top-notch converters and analog gain!
First, I’ll create a hardware output for each group of instruments. I’ve got eight channels with the 500ADAT, so I’ll divide the instruments into four stereo groups.

The first group will be the drums – I’ll route the drum bus in my DAW to outputs 1 and 2 on my audio interface. I’ll route the next group, bass and guitars, to outputs 3 and 4, vocals to outputs 5 and 6 and FX to outputs 7 and 8. You can split these channels up however you’d like.
On the patchbay, I’ll connect each of those eight outputs to the eight inputs on my Cranborne Audio 500ADAT. Then I’ll patch the main outputs of the 500ADAT to input 1 and 2 on my audio interface so that I can record the stereo mixdown.

I’ll dial in a final balance with these mix and pan knobs at the bottom of each channel, getting some last-minute analog warmth and character along the way. In my DAW, I’ll need to create a new track for the mixdown recording, and I’ll set the input to 1 and 2, because that’s where the outputs of the 500ADAT are connected.
I’ll arm that track and press record. The tracks will play out of their designated outputs, they’ll be summed to stereo by the 500ADAT and recorded into this stereo track in the DAW.
Cables & Connections
As you can imagine, it took me a lot of time and a lot of cables to set this up. In fact, I spent hours soldering my own cables until I finally decided to buy a few multichannel snakes, but they aren’t cheap! I wanted to show you how to connect outboard gear with analog cables, but there is another way that is far easier to set up.
With the Cranborne Audio 500ADAT, I don’t need any of these analog cables to the interface. All I need are a few optical ADAT connections. These four cables allow me to patch digitally using the control app for my audio interface – no patchbay or analog cabling required for inserts, FX, or analog summing!
