A mix-minus is essentially a mix that includes all sources, minus the signal from the person you’re sending the mix to. This is useful when you want to avoid microphone feedback or echo, especially when dealing with long latency or delay.
Let’s say you’re setting up a live show, where the people on stage will be having a conversation with someone joining remotely via a Zoom call. Or, imagine you’re setting up a livestream that features a remote guest.
The signals from all of the guests will be mixed together and sent to the audience. But the people on stage need to hear the person on the Zoom call and the person on the Zoom call needs to hear the people on stage.

If you simply sent the main mix to the person on the Zoom call, that person would hear the other participants. But they would also hear themselves with a very distracting delay.
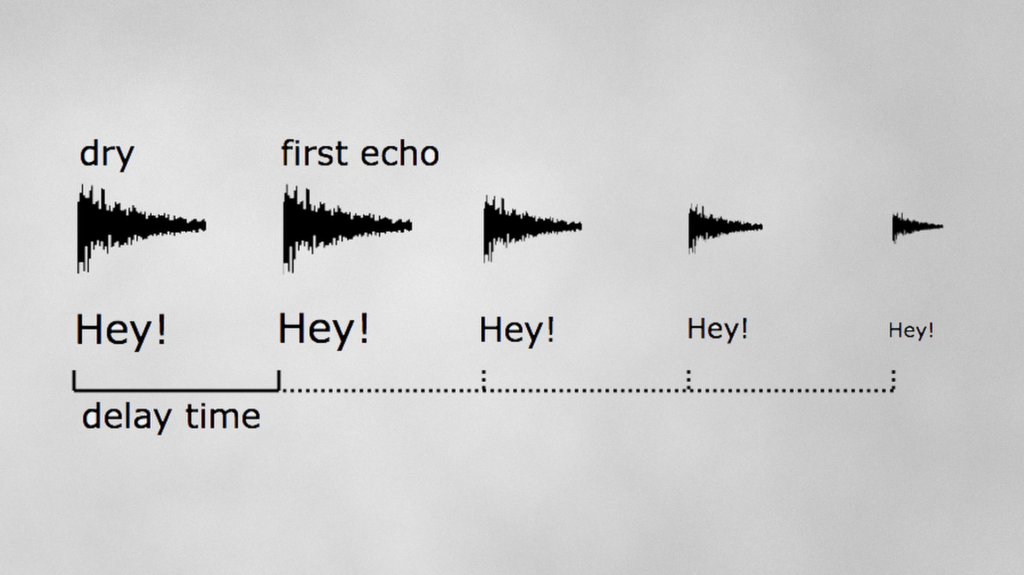
If you’ve been on a lot of Zoom calls, you may have experienced this, where you hear an echo of yourself during a video call. It’s very difficult to speak in such a situation, so we need to fix this and send the person on the Zoom call a mix that includes all of the audio, minus their own audio. This is where a mix-minus comes in.
In this post, I’ll show you how to set this up. First, we will set up a mix-minus with a mixer and then I’ll show you how you can do the same thing within your computer or audio interface.
For these examples, I’ll be setting up a livestream on YouTube with two in-person hosts and one remote guest on Zoom.
How To Set Up Mix-Minus (Mixer)
To keep things simple when using a mixer, we will use two separate laptops: one laptop for streaming to YouTube and one laptop that will host the Zoom call. And to make it easy to get audio in and out of each laptop, let’s connect a simple 2-in/2-out audio interface to each.

Later in this explanation, you’ll learn how to do all of this with one computer using a more advanced audio interface.
Setting up the main mix for the YouTube livestream audience is easy… I’ll just connect the main outputs on the mixer to the inputs on the livestream audio interface. We can decide what is sent to this mix using the faders on each input channel.
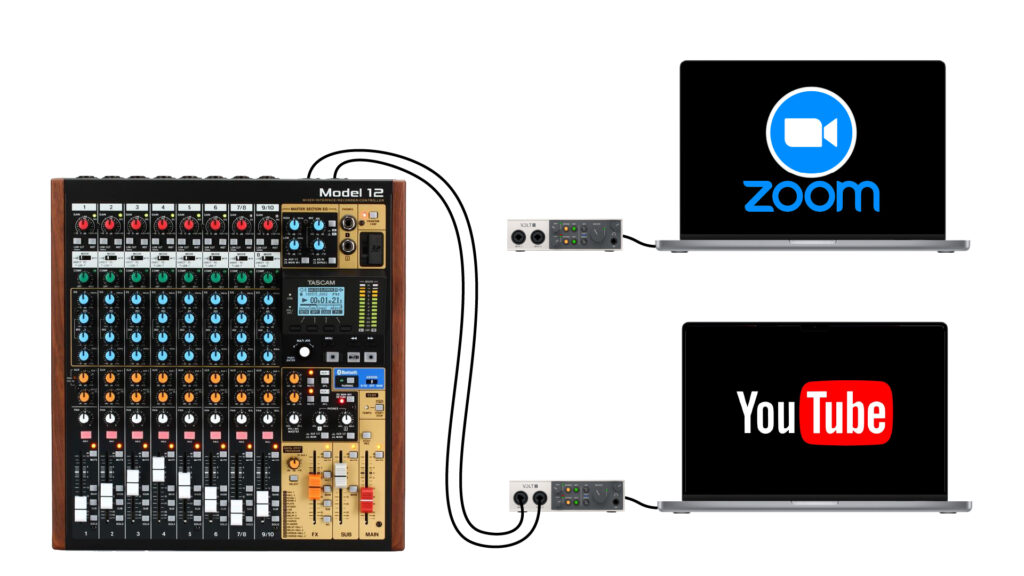
Within the livestream computer, we just need to ensure that the audio interface connected to it is selected as the audio input device within YouTube.
I’ll connect my microphone to channel 1 on the mixer and my co-host’s microphone to channel 2 on the mixer. Then I’ll send each of these sources to the main mix using the channel faders. Some mixers, such as the one I’m using, require that you assign the input channel to the main mix. So, I’ll go ahead and do that by pressing the “Main” button on each of these channels.

To get the audio from the remote guest into our system, I’ll select the interface connected to the Zoom laptop as the output device within Zoom. This will send the remote guest’s audio out of output 1 and 2 on that interface, which I will connect to stereo input 7 and 8 on the mixer. Again, I’ll use the channel fader to send the remote guest’s audio to the main mix.

The audience can now hear the local microphones and the remote guest. The in-person co-hosts can hear the remote guest using the headphone output on the Zoom audio interface. But the remote guest can’t hear anything yet. So we need to set up a mix for them.

Remember – sending the Zoom guest the main mix will result in an echo on their end… So, let’s use an Aux output on the mixer to create a mix-minus for the guest.
I’ll connect Aux Output 1 on the mixer to input 1 on the Zoom audio interface and select this as the audio input within Zoom. Then, I’ll decide what goes to that mix using the Aux 1 sends on each channel. Let’s send the two in-room microphone channels to Aux 1, but NOT the Zoom guest channel. A complete mix, minus the remote guest.
I’ll admit – it’s a bit complicated to do this with 2 laptops and a mixer. But here is what the signal flow looks like in the end.

Luckily, many audio interfaces have virtual mixing and matrixing capabilities built-in and this makes the setup a lot simpler.
How To Set Up Mix-Minus (RME TotalMix – Windows)
For example, an RME interface like this Fireface UCX II is perfect for this type of setup because of the flexibility built into the included Totalmix software. If your interface has a virtual mixer, you can determine which physical inputs or software outputs are routed to each physical output mix.

Thanks to the driver capabilities on Windows, this is very simple as you will see in a moment. But if you’re using a Mac, this setup will require a few extra pieces of software. So stick around if you’re a Mac user and I’ll help you get set up.
On Windows, we see all of the possible mixes show up within the setup page of our YouTube livestream. This is also the case when choosing the input and output within Zoom on Windows – every possible input and output on the RME interface shows up as an option.
This gives us a ton of flexibility compared to Mac, where we will only see one option within YouTube and Zoom. Again, I’ll show you the workaround in a second, but let’s first do this on Windows so it’s easier to understand the mechanics of how to set up a mix-minus.
First, we need to decide what output to use for our main mix. I’m using Analog 1 and 2 to feed my studio monitors, so let’s use Analog 3 and 4 to feed the livestream. That means we will select Analog 3 and 4 as the audio source within YouTube. These are audio inputs though, so we need to use the Loopback feature within Totalmix to route output 3 and 4 back into input 3 and 4.

RME’s Totalmix software is extremely flexible. I just click the mix I want to control and then all of these faders for the physical inputs and software outputs become sends to that mix. So, I can go ahead and route my two in-room microphones to the livestream mix, which are connected to analog input 1 and 2.
We also need to route the remote guest’s audio to the main mix. Within Zoom, we can simply select which software output we want to use as the audio output device. This is useful if you want to keep all of the audio from different software separated (which is a big benefit of using Windows for this type of streaming application). But to keep it simple, let’s just choose the standard software output 1 and 2.
Within Totalmix, we see that signal coming in from the remote guest and we can route that to the main mix as well.
Now that our main mix is set up, we need to set up a mix-minus for the remote guest. Let’s do this on another mix – I’ll choose Analog output 5 and 6 this time. I’ll send that back in as an input using the Loopback button. And we will send only the in-room microphones to this mix – not the software output from Zoom, meaning that the zoom guest will hear everyone’s audio minus their own.
How To Set Up Mix-Minus (RME TotalMix – Mac)
On Mac, you’re going to need additional software. I’d recommend downloading two free pieces of software – LadioCast and Blackhole. There are some other options, but these will get you started for free.


Once these are installed, we will go through a similar process as we did within Windows. But this time, we will need to work within the limitations of Mac OS.
Within the YouTube livestream setup page, we only see one option for our audio interface. So, let’s go ahead and select this option. This corresponds to input 1 and 2. That means we need to set up our main mix on mix 1 and 2.
Unfortunately, this is what most people use for their studio monitors… But it’s the only option on Mac, so we will need to either turn off the monitors or use a different mix to feed the monitors to avoid creating a feedback loop.
Then, we can use the loopback feature and route our in-room microphones to the main mix.
Next, let’s set the Zoom audio output to the audio interface, which again corresponds to software output 1 and 2 within Totalmix. At this point, the audience can hear both the in-person mics and the remote Zoom guest.

But in order to set up a mix-minus for the Zoom guest, we need another mix. The problem is that we only see mix 1 and 2 show up within Zoom when using a Mac. And this is already being used for our main mix.
However, Blackhole acts as a virtual input to Zoom when we select it as the microphone source. We can route things to Blackhole using LadioCast. Within LadioCast, I will select BlackHole as the main output. Then, I’ll select the RME interface as Input 1 and select the channels I want to use here. Let’s use 3 and 4.
To feed these input channels with a custom mix-minus, we will first use the loopback button on output 3 and 4. Then send the in-room mics only to that mix-minus mix. And we see these input signals coming in on input 1 within LadioCast. So, let’s send that to the Main output, which is BlackHole.

I know this is kind of complicated. But this is a workaround that we’ve needed to use up until recently. There is luckily a new feature within Zoom that simplifies this process greatly – but I wanted to teach you the workaround in case you’re using a video conferencing software that doesn’t yet have the new feature built into Zoom.
In the latest version of Zoom, you can make it all work without LadioCast and Blackhole. Just scroll down to the option called “Use specific audio input channels”. First, use the checkbox to enable this feature and then click the audio input channels button.
This now allows us to bypass the limitations of most Mac applications and select any of the outputs we’d like to use. Instead of input 1 and 2, we can now tell Zoom to only listen to input 3 and 4. Our mix-minus is already set up on input 3 and 4, so this is the option we want.

Again, if your video conferencing software doesn’t have this option, you’ll need to use LadioCast and BlackHole. I know it’s annoying, but it will get you up and running.