ADAT, MADI, and Dante… These are three of the most powerful ways to expand the number of inputs and outputs on a studio, broadcast, or live sound system. In this post, I want to help you gain a bit of experience with these tools and teach you how (and when) you might use them.

I’ve teamed up with RME for this video, as they have products and software that make setting up ADAT, MADI, and Dante very straightforward and easy-to-understand. But if you have one of these connections on your own interface or console, the information you’ll learn here will still apply.
ADAT
The most common way to expand the inputs and outputs of an audio interface is ADAT. ADAT allows you to send up to 8 channels of audio from one device to another through a single optical cable. Here’s a common scenario where ADAT can be used:
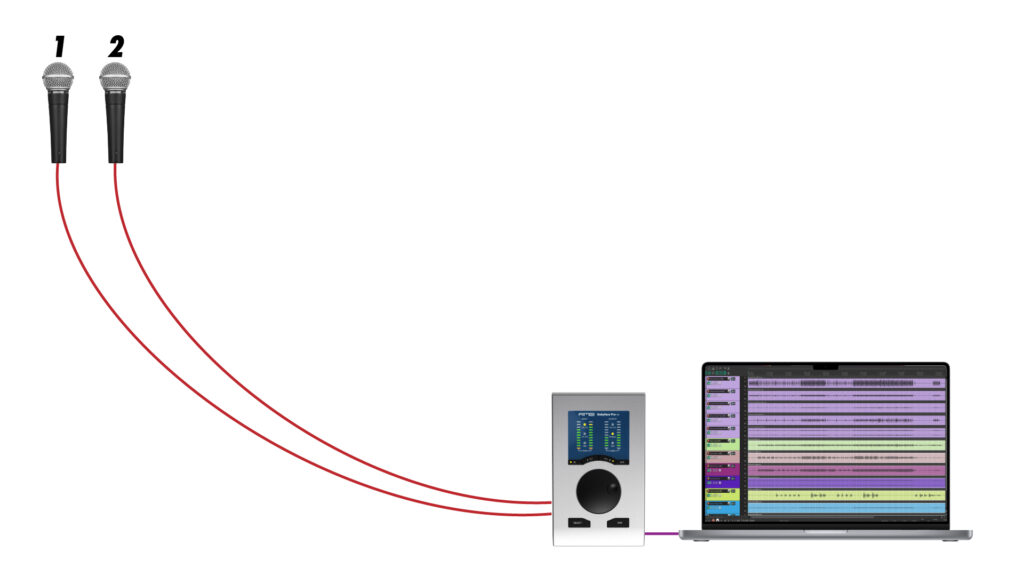
Let’s say I’m using this RME Babyface Pro FS… It’s a USB audio interface that has two mic/line inputs, two instrument/line inputs, and two line outputs.
In a scenario where I’m recording a vocal and guitar performance, two mic inputs are usually sufficient. But in scenarios where I need to record more than two microphones, I’ll need to figure out a way to add some microphone preamps to my system.
I could buy a standalone microphone preamp with analog outputs which would go between the microphone and one of the line inputs on the side of this interface. Alternatively, I could use the ADAT input on the interface. Many standalone mic preamps have ADAT outputs, including this RME 12mic Dante.
The ADAT output on the back of this microphone preamp sends the audio signal through the optical cable, encoded as a series of light pulses. You can see the reflection of the optical signal by shining it against a dull surface.
Encoded in these pulses of light are 8 channels of up to 48kHz digital audio. If I wanted to use a higher sample rate, I could configure the system for 4 channels of audio up to 96kHz, and 2 channels up to 192kHz.

Opening up the TotalMix software that comes with each RME interface, I can see these microphone signals are coming in on ADAT channels 1-8. But when I listen to these signals through headphones, it is clear that something isn’t right…
ADAT is not a bidirectional format when using only one cable. That means the signal and the word clock information only flow in one direction. And that’s the problem we are hearing – the sample rate on my microphone preamp is 48kHz while the sample rate on my audio interface is 44.1kHz.
The solution is to change the clock source on my interface from “Internal” (where it uses its own clock) to “Optical” (where it uses the clock it receives through the ADAT port – in this case, the clock within the microphone preamp).
Now, my clocks are locked and all of my 8 additional ADAT inputs sound crystal clear. All I need to do is open my DAW, select the inputs of my tracks to the appropriate ADAT inputs on the audio interface, and start recording.
You can also use ADAT to add outputs or inserts to your system. In this demonstration, I have a 500-series chassis with ADAT inputs and outputs. I’ll configure the system to utilize this compressor in slot number three.
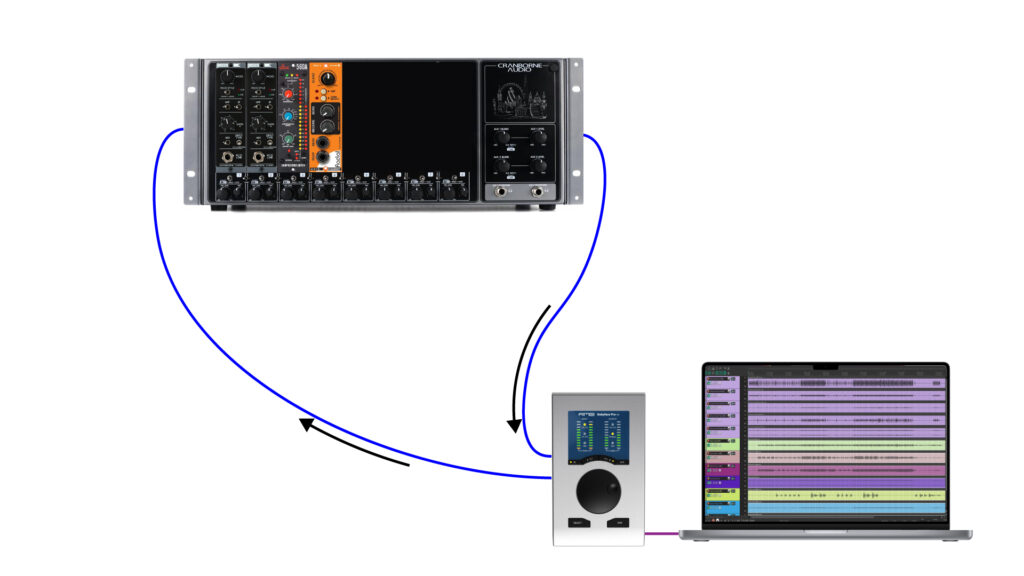
I’ll connect the ADAT output of my audio interface to the ADAT input of the 500 chassis so that the audio can be sent to the compressor. And I’ll also connect the ADAT output of the 500 chassis to the ADAT input of the audio interface so that the audio can return after being processed.
In this scenario, there is data being transferred in both directions. This means I can send up to 8 channels from my interface to the rack and up to 8 channels from the rack to my interface. It also means that we can use the clock in either device. I just need to choose which one I want to use and configure each device accordingly.
In the DAW, I can now create an insert on the track I wish to send through the outboard compressor. I’ll select output ADAT 3 as the hardware send (sending audio to slot 3 on my 500-series chassis) and I’ll select input ADAT 3 as the hardware return.
Limitations Of ADAT
Three of the main limitations of ADAT are:
- (1) It only supports up to 8 channels.
- (2) It’s limited to a 5 meter distance (16′).
- (3) The connections are point-to-point (which means signals can only be sent between two devices per ADAT connection).
That’s why we could only use 8 of the 12 mic preamps on the 12mic Dante and that’s why we needed to disconnect the 12mic Dante in order to set up the 500-series insert.
There are, however, devices with multiple ADAT inputs and outputs. In some cases, this is strictly used for sending the full 8 channels of audio at a higher sample rate. But in the case of this other RME interface, the Digiface USB, each ADAT connection is independent from the others. That means this tiny bus-powered USB interface is capable of 32 channels in and 32 channels out via ADAT.

Swapping out the Babyface Pro FS for the Digiface USB, I can now send audio to and from all 8 slots of my 500 chassis AND make better use of the 12mic Dante preamp.
With one optical ADAT connection between the 12mic Dante and the Digiface USB, I can receive 8 channels. With two optical ADAT connections, I can receive 16 channels. And with three, I can receive 24 channels! But, there are only 12 preamps on the 12mic Dante. So, where do those other 12 channels come from?

This is where the power of this particular preamp becomes even more apparent, because it allows you to route MADI and Dante channels through the ADAT connections. But in order to really understand how powerful this is, we first need to better understand MADI and Dante.
MADI
MADI allows you to send up to 64 audio channels at a 48kHz sample rate, and similar to ADAT you can use higher sample rates for lower channel counts.

MADI really shines in its distance capabilities. You can run signals up to 100 meters with coaxial cable, up to 2000 meters with multimode fiber, or up to 10 kilometers with single mode fiber.


MADI ports are found on many digital live sound consoles, and it’s commonly used for sending signals between a stage box and a FOH console at a live show. Also, the fact that MADI connectivity is built into many live consoles makes it a great choice for creating a multitrack recording at a live show. You just need an audio interface that is MADI-capable.
For this setup, I’ve got yet another USB interface, the RME Digiface Dante. It happens to have word clock ports that can be used as MADI ports. If I connect this interface to my computer via USB, it would allow me to connect a MADI-enabled console with a single coaxial cable and record up to 64 channels straight off of the board.

Similarly, I could connect my 12mic Dante microphone preamp to the MADI input on the Digiface Dante interface and record all 12 channels. But MADI isn’t just a point-to-point protocol.

You can also create a MADI loop, where we could string together several 12mic Dante units or any other MADI-enabled devices that we might be working with. Input or output devices could be used in a MADI loop, where all 64 channels are available to each unit. This is a very powerful and stable workflow for broadcast, live sound, or high-end studios.

MADI can also be used as a bridge between different protocols. I hinted at this when discussing the 12mic Dante and the Digiface USB. Imagine the 12mic Dante being a part of a MADI loop with several other MADI devices connected. You could configure the 12mic Dante to output up to 24 of those MADI channels through the 3 ADAT outputs on the 12mic Dante into the ADAT inputs on the Digiface USB to record into a DAW or a stream.

MADI is also powerful as an interface to audio over IP protocols, like AVB or Dante. This could be useful if your device is MADI-enabled, but you want to connect to an AVB or Dante network. Using a tool like the 12mic Dante and a MADI USB interface (such as the RME MADIface USB), you could receive up to 64 channels and send up to 64 channels over a Dante network even though your interface isn’t Dante-enabled. In this way, the 12mic Dante could act as a bridge between a Dante network and a MADI connection to your audio interface.

Dante
In my opinion, the most exciting of any of these protocols is Dante. The reason for this is that Dante is an IP protocol, meaning that it operates on an IP network. This, of course, means you need a network switch to connect all of the devices together. But once you’ve got them connected, the power and flexibility of Dante is astounding.
In the video, I setup a simple Dante network to demonstrate this. I connect the RME 12mic Dante and the RME Digiface Dante using a simple managed switch and a couple of ethernet cables. I’ll also connect my laptop to this network and open up the free Dante Controller software.

Once all of these devices are on the network and have proper LAN settings, I can see each Dante transmitter on the x-axis and each Dante receiver on the y-axis. All I need to do now is expand the available channels of the devices I want to connect and click the crosspoint where I’d like to make an audio connection. It’s that simple – and the flexibility, monitoring, and redundancy offered by the Dante protocol is amazing.
If the devices are disconnected, the audio routes will be restored automatically when the devices are reconnected. And when any new device is connected, the Dante network will automatically elect a source clock that all devices on the network will adhere to.
You can even run two separate networks using the Primary and Secondary ports on each device to create redundancy in the event of a network failure. Should one network be interrupted, the devices will switch to the secondary network so quickly and seamlessly that it’s not even noticeable.
This is all true for a standard Dante setup, no matter which equipment you’re using. But the RME Digiface Dante in particular has a couple of features that make this setup even easier.
First, the Digiface Dante allows you to access Dante Controller through the USB connection between your computer and interface, rather than through a dedicated LAN connection between your computer and network switch.

Second, you may have noticed that the Digiface Dante has four network ports. This device can function as a Dante network switch, which means you can connect Dante devices directly to the Digiface Dante rather than to a dedicated network switch. It can act as a 2-port switch in redundancy mode, when utilizing a primary and secondary network. Or it can act as a 4-port switch when redundancy isn’t needed.

While ADAT requires a point-to-point connection between devices and MADI requires a point-to-point or loop connection, Dante can operate on a much more flexible star topology where each device connects back to a central network. This means that I can add devices with a simple network connection and easily expand your system overtime.
Example
Let’s say I want to record Ernesto’s drums. I could connect the 12mic Dante directly to my Babyface Pro FS for 8 inputs, or I could connect the 12mic Dante to the Digiface USB for up to 12 mic inputs.
But I’d prefer to put the drum kit in another room so I can monitor the audio more easily in an isolated room upstairs. The distance limitation of ADAT is 5 meters, or about 16 feet. So ADAT won’t accommodate this setup.
Instead I could put the 12mic Dante next to the drum kit and run a pair of coaxial cables to the Digiface Dante connected to my computer via USB in the isolated room upstairs.

This is well within the distance limitations of MADI and would allow me to receive all 12 mic channels and even send Ernesto a headphone mix with the built-in headphone amp on the 12mic Dante over MADI.
I could do a similar thing with Dante, using a single ethernet cable between the 12mic Dante and the Digiface Dante interface.

With everything connected to the network switch, I can open up Dante Controller and route the 12 channels from the 12mic Dante to the first 12 input channels on the Digiface Dante interface. And then route Dante output channels 1 and 2 from the Digiface Dante to input 1 and 2 on the 12mic Dante, selecting those channels as the source for the built-in headphone amplifier. I just need to create a headphone mix for Ernesto in the DAW (or in Totalmix) and send that mix to Dante output 1 and 2.
You may have noticed that some of these RME interfaces have USB 2.0 connections, some have USB 3.0 connections, and some even have Thunderbolt connections. In the next video, you’ll learn how they decide which one to use for each interface.