If you want your audience to watch your live stream, it’s very important that you have professional-sounding audio. In this post, you’ll learn the steps you can take to optimize the audio in your next live stream – whether it’s a podcast, an event, or a concert.
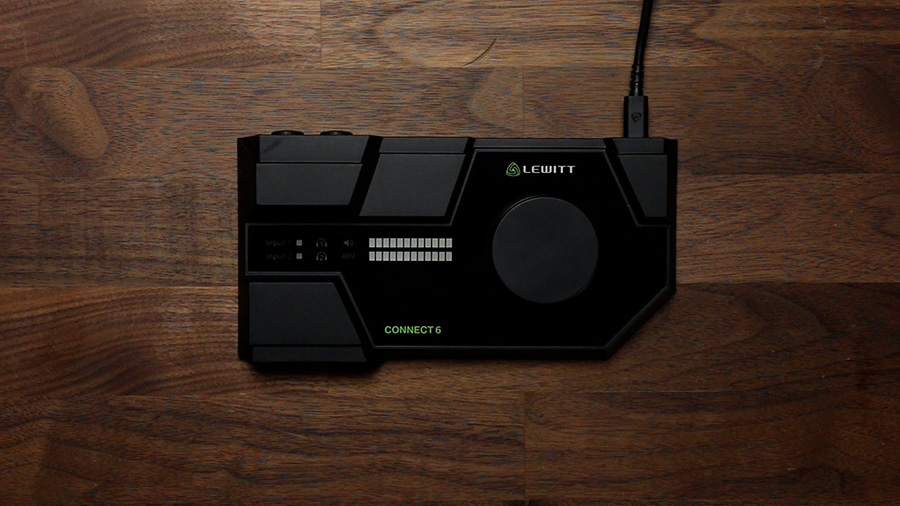
I’ll be using the CONNECT 6 audio interface that was sent to me by the sponsor of today’s video, LEWITT. The CONNECT 6 audio interface has some very powerful features for live streaming that I’ll show you along the way, but the steps in this video will help you no matter which interface you’re using.
Step 1: Audio Interface & Drivers
The first thing you should do, no matter which interface you’re using, is download the drivers and control software that are available for that interface. This can usually be found with a quick search or by exploring the “Downloads” section on the manufacturer’s website.
I will download the CONTROL CENTER app that comes with the LEWITT CONNECT 6. Once it’s downloaded and installed, I’ll connect the interface to my computer using the included USB cable.
One of the most unique features of the LEWITT CONNECT 6 interface is that it has two USB-C connections and can be connected directly to a Mac, PC, or iOS device like an iPhone or iPad! So if you’re streaming to YouTube, Instagram, TikTok, Twitch, etc., you can provide professional audio to your audience even on your mobile device.

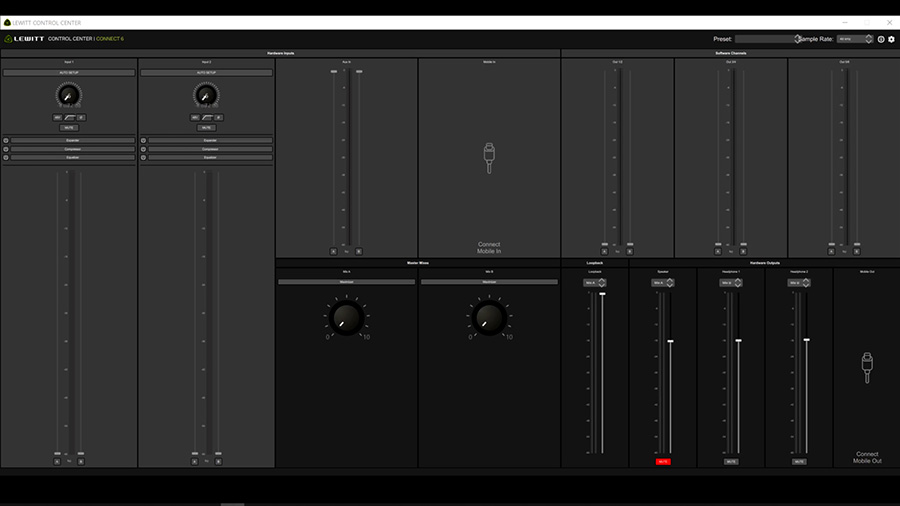
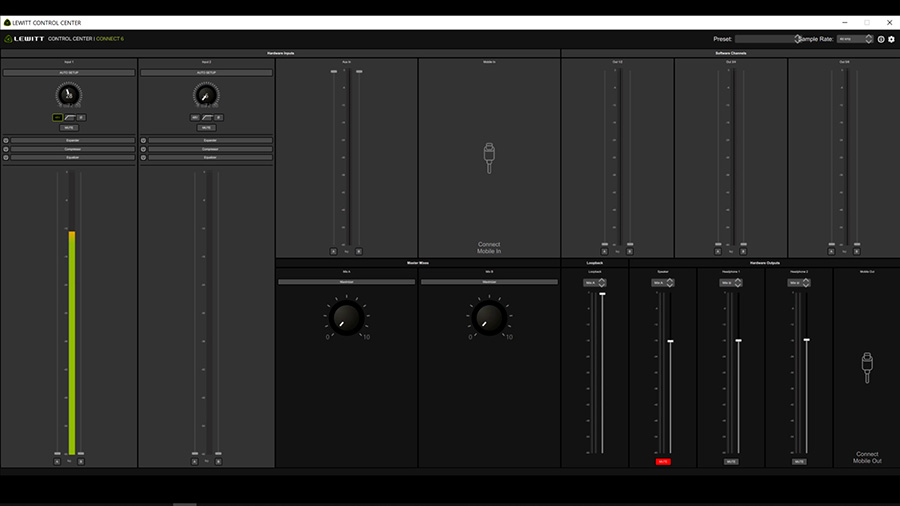
With the control software open and the interface connected to my computer, I now have the ability to control the interface settings either on the interface itself or using the control app on my computer. Keep in mind – not all interfaces have a control app like this, but as you’ll see in a moment these apps can be very useful!
Step 2: Connecting Microphones
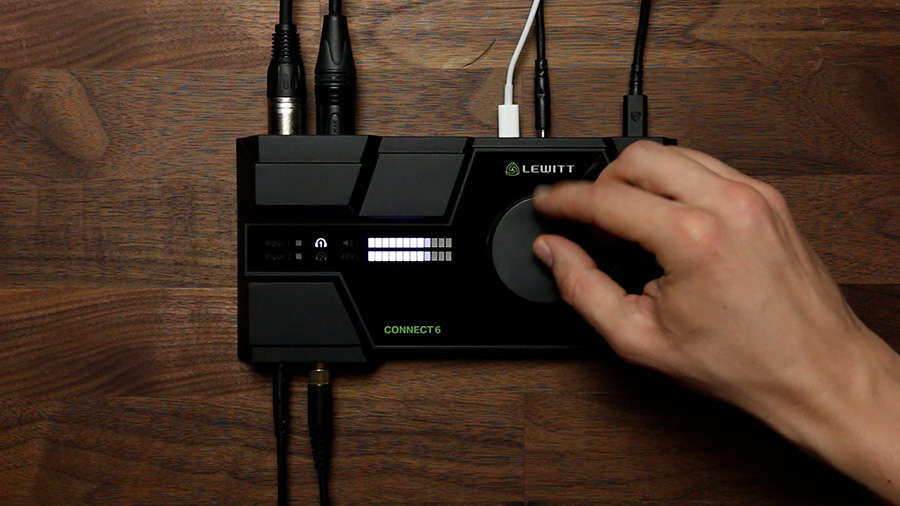
Whether you’re setting up a live stream for gaming, a podcast or a virtual concert, you’ll likely be using at least one microphone. The CONNECT 6 allows you to connect up to two microphones, using these combo jacks on the back.
If you need to connect more microphones, you’ll either need an interface with more microphone preamps or you’ll need a mixer that mixes several microphones into two line level outputs that can be connected to the two line level inputs on your interface.
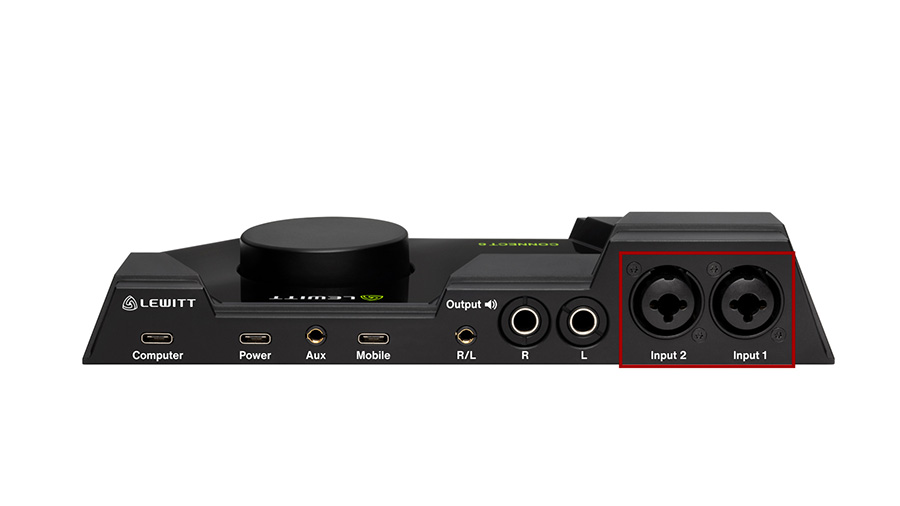
I’ll connect two microphones with XLR microphone cables. One of these microphones is the LEWITT LCT 640 TS, which is a condenser microphone and the other is the Shure SM7B, which is a dynamic mic.
The condenser microphone requires phantom power, which can be engaged either by clicking the “48V” button in the CONTROL CENTER app or on the interface itself. A dynamic microphone doesn’t need phantom power, but phantom power won’t hurt a dynamic mic if it’s accidentally turned on.
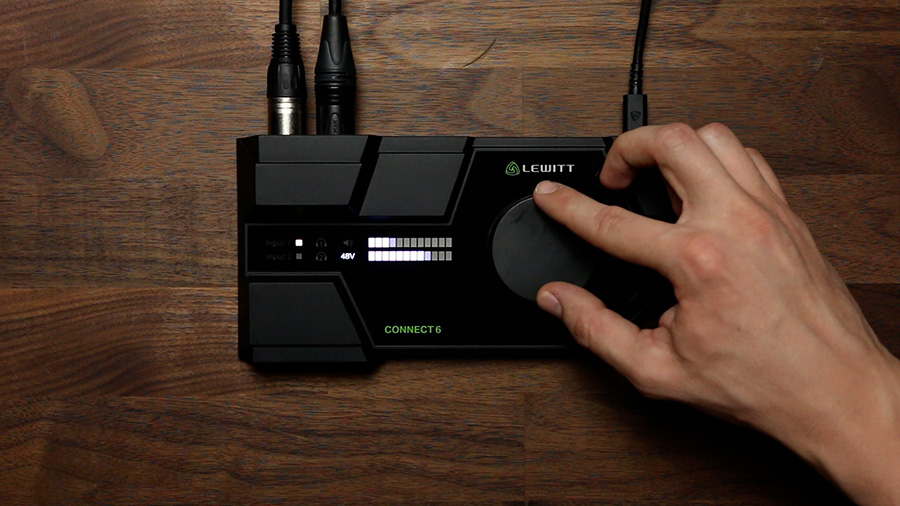
Next, let’s set the input preamp gain levels so that the signals from these microphones are at a usable level. Again, this can be done within the CONTROL CENTER app or on the interface by selecting the appropriate input and turning the knob up until the input meter shows about -12 dB.
If there are no decibel markings on your meter, aim for a strong signal level without going into the red. Going into the red will mean your signal is clipping which sounds terrible and will greatly impact the listening experience.
It’s worth mentioning here that many microphones, such as the Shure SM7B, require a lot of preamp power and often require a Cloudlifter to achieve an adequate signal level with many interfaces. However, the preamps in the CONNECT 6 give you 72 dB of gain, which is more than most interfaces at this price point and enough for most microphones out there.
Step 3: Audio Processing
Have you ever listened to a podcast and the voices were too loud one minute and too quiet the next? This can be annoying to the listener, and it sounds unprofessional. To fix this problem, you can use a compressor or limiter that will level out the differences between the quiet and loud parts and bring everything to the ideal level. This isn’t an absolute requirement, but it really helps.
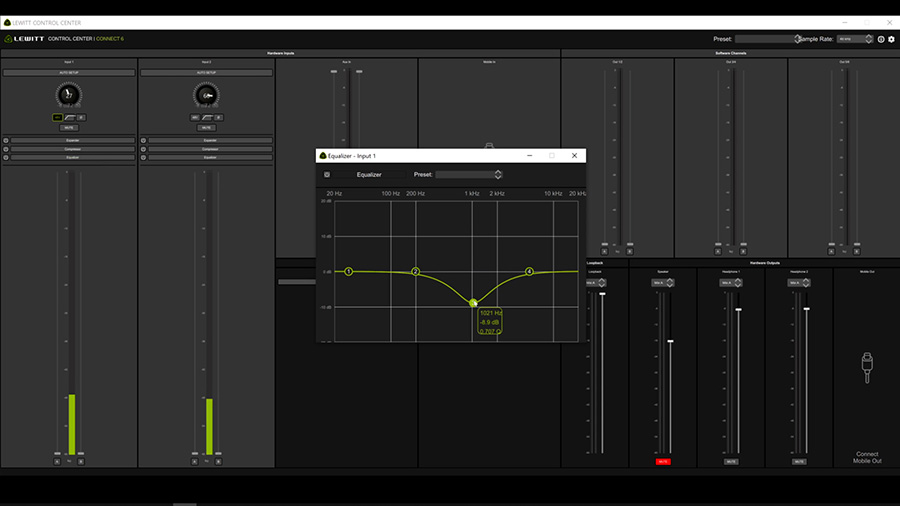
While setting up a hardware compressor or a compressor within your DAW software is possible, it’s a bit too complicated for the scope of this post… However, I want to point out that several interfaces (including the CONNECT 6) have a built-in DSP for processing the audio signal live. The DSP in the CONNECT 6 includes a compressor, an EQ, and an expander on each mic channel.
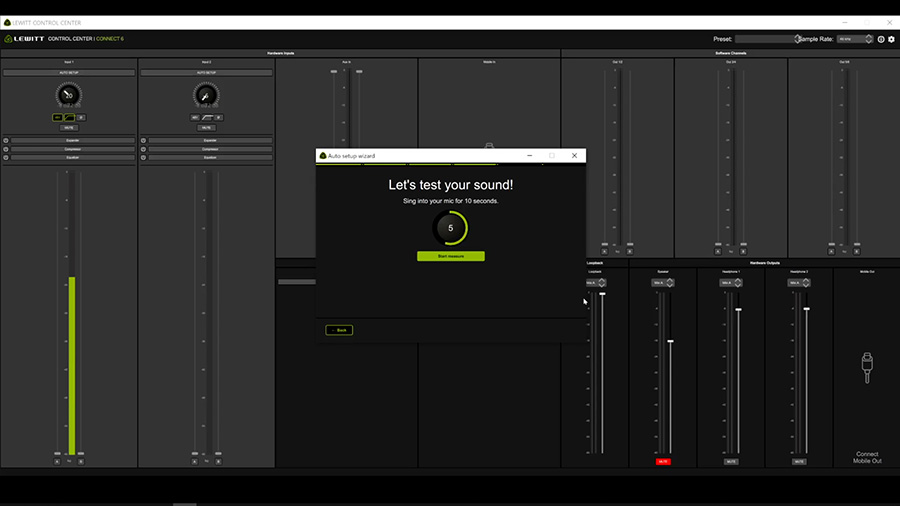
Not only that, but it’s incredibly simple to set up using the “Auto Setup” feature in the CONTROL CENTER software. When you click the “Auto Setup” button at the top of the mic channel, it asks you a few questions about the setup and content. Then it will run two tests – one test for setting the input gain level automatically and another test for removing the room noise.
Once the auto setup is complete, you’ll be ready to go… The system has automatically engaged phantom power, because it knows I’m using a condenser microphone, and the preamp gain is already optimized for my voice level. It has also set me up with a high pass filter to remove low-frequency rumble as well as a compressor for smoothing out the level of my voice and an expander that reduces the level of room noise when I stop talking.
If I want to tweak any of these settings manually, it’s very easy to do so. I think it sounds good here, though. So let’s continue with the setup.
Step 4: Connecting Line Level Sources
If you want to bring in a line level signal from a phone, a mixer, or another source, there are a few ways you might be able to do it, depending on your audio interface.
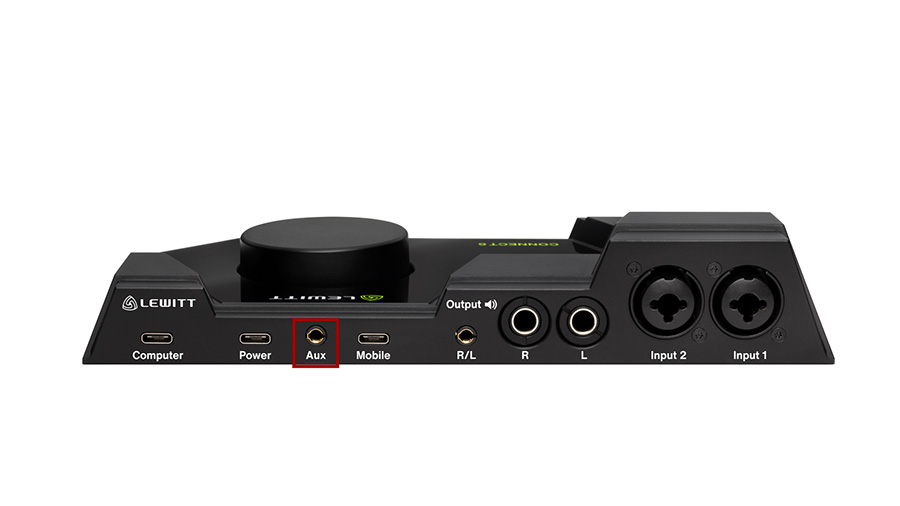
On the CONNECT 6, there are two ¼-inch / XLR inputs on the back, but those are already occupied by my two microphones. Fortunately, there is a stereo 3.5mm (or ⅛-inch) input labeled “Aux”. Using an aux cable or an adapter, I can connect basically any analog line level source with this connection.
I’m going to connect the output of my mixer to this input using a dual ¼-inch to stereo ⅛-inch adapter. That way, I can route various instruments and other sources to the output of the mixer, which will come in on the Aux input in my control software.

Step 5: Routing Audio From Other Programs
If you want to bring in audio from another program on your computer, there are a few options… Depending on your interface, you may simply need to run a cable from the output of your interface and back in through its input. However, this is a waste of an output and an input if there is another way.
Some interfaces give you access to virtual channels for capturing the output of your software. Let’s go through a few examples of how to route audio from a program on your computer into your live stream.
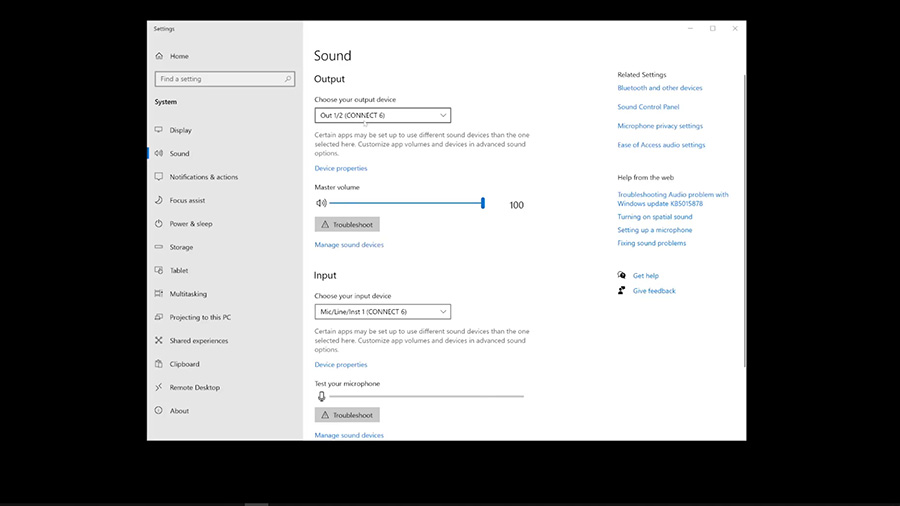
First, say you just want your desktop audio to be routed to your live stream. To do this, change the output device in your system settings to output 1 and 2. Now you’ll have access to the audio that plays from a web browser, a music library, and most other programs installed on the computer.
If I want to output my DAW audio to the stream, I could choose output 1 and 2 there as well. However, I will choose output 3 and 4 instead so that I’ll have independent control of the system audio and my DAW audio.
Step 6: Routing Audio To The Live Stream
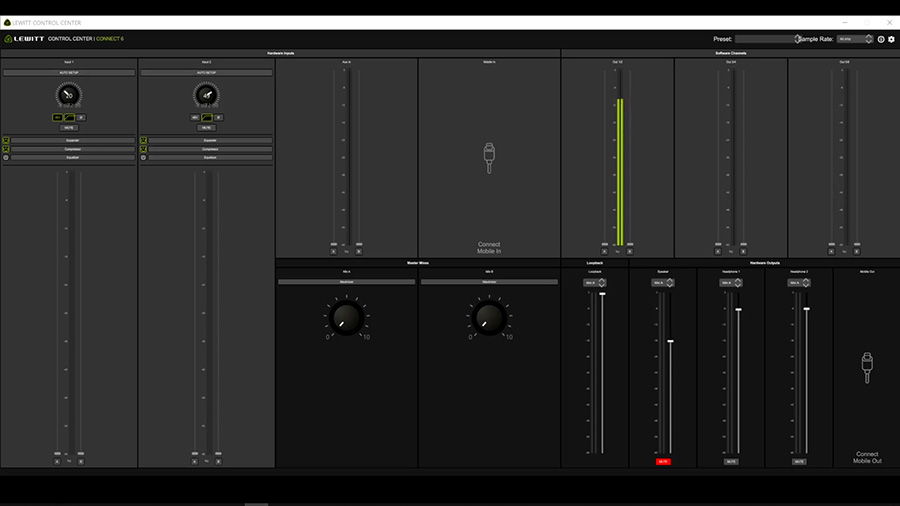
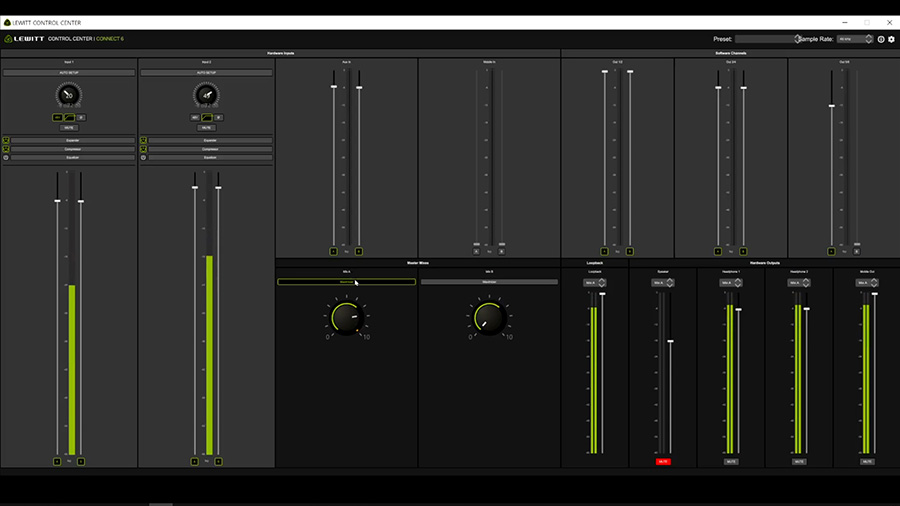
All of these sources still need to be routed to the live stream. The method for doing this will depend on your interface. The CONNECT 6 gives you the ability to create two mixes – Mix A and Mix B. You determine what is sent to each mix using the Mix A and Mix B fader on each input channel.
Let’s use Mix A for feeding audio to our live stream… When setting up the stream in OBS, YouTube, Twitch, or whatever streaming software you’re using, select “Mix A” as the microphone device.

If you’re feeling lost at this point – I want to let you know that not all interface drivers allow you to select individual inputs or virtual channels and mixes within streaming software…
If only one option shows up for your interface, you can select that option and the microphone connected to your interface will be routed to your stream. However, these more advanced options won’t be possible without a more advanced interface like the CONNECT 6.
With Mix A selected as the microphone source in my streaming software, I will create a mix in the CONTROL CENTER app to decide what gets routed to that mix. I’m going to route my two microphones, my mixer audio coming in on the Aux input, my system audio, and my DAW audio. Now all of these signals are mixed together and are sent to the streaming software.
The CONNECT 6 also provides a way to stream with a mobile iOS device or a separate computer using the dual USB-C feature. All I need to do is connect my iPhone or iPad to the “Mobile” USB connection on the back of the interface and it will automatically create an input channel for audio coming from my mobile device and an output channel for sending audio to my mobile device.
I will select Mix A as the source for my mobile device so that the live stream mix is sent to the mobile stream as well.

Step 7: Monitoring Audio With Headphones
We also need to set up a way to monitor the audio while the stream is happening.
Instead of using speakers or studio monitors to listen to the guests, system audio, and DAW audio, it’s much better to use headphones. Using headphones will reduce the risk of creating a feedback loop, where the microphone is routed to the speakers, then the sound from the speakers is picked up by the microphone, and routed to the speakers again…
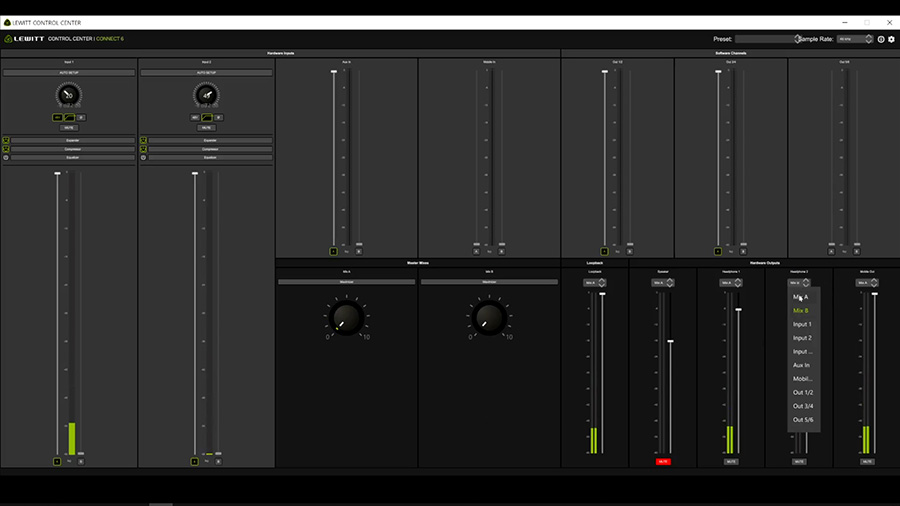
Some interfaces have only one headphone output, some have more than one. The CONNECT 6 has two headphone outputs and each one can play its own unique mix.
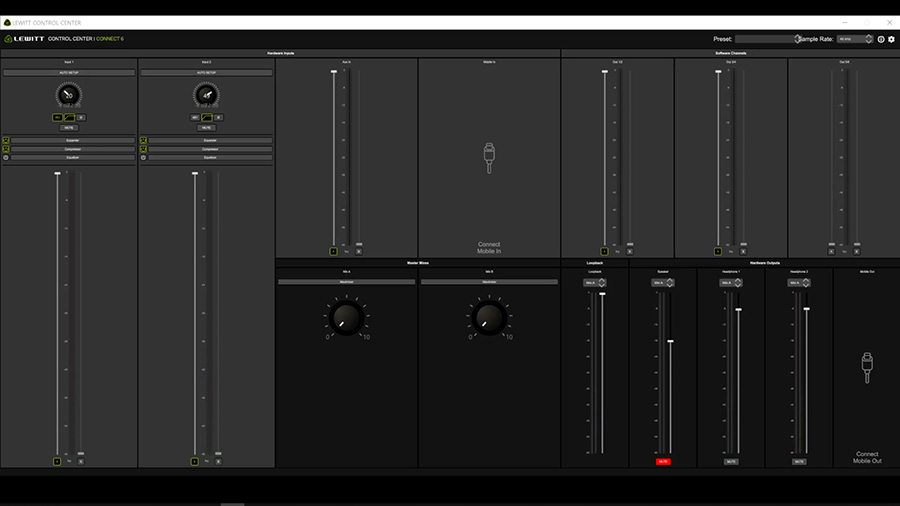
To set up separate headphone mixes, I could utilize the Mix A and Mix B built into the CONTROL CENTER app. If I wanted to have separate headphone mixes, I’d select Mix A as the source for Headphone output 1 and Mix B as the source for headphone output 2. Then, I’d use the Mix A and Mix B fader on each input source to determine what plays through each set of headphones.
Rather than doing that, I’m just going to select Mix A (our broadcast mix) as the source for both Headphone 1 and Headphone 2. That way, my headphones will play the signal that is being sent to the stream.
Step 8: Routing Audio From Remote Guests
Let’s say there will also be a remote guest joining via Zoom or another conferencing platform. We will need to route the audio from the far-end caller (our remote guest) into the live stream as well.
To do this, I will select output 5 and 6 as the speaker device within my video call software, and I can see that level come in on this meter within the CONTROL CENTER app.
I’ll add the sound from the Zoom call to Mix A, which is already set up to feed our live stream. Here, we encounter a common obstacle in live streaming… The far end caller (our remote guest) needs to hear the microphones, the system audio, and the DAW. All of these are routed to Mix A, the mix that feeds the live stream.
The problem is that the audio from the remote guest is also routed to Mix A, so sending Mix A back to the remote guest will cause them to hear themselves as an echo which can be very distracting as they speak. We need to create a mix-minus for the remote guest that includes all sources, minus the remote guest audio.
Let’s use Mix B to do this. I’ll route the microphones, the mixer audio, the system audio, and the DAW audio to Mix B, leaving the Mix B fader on the Zoom audio channel muted. Then, I can select our microphone source within Zoom as Mix B, which includes everything except the far-end caller’s voice and avoids the echo problem.
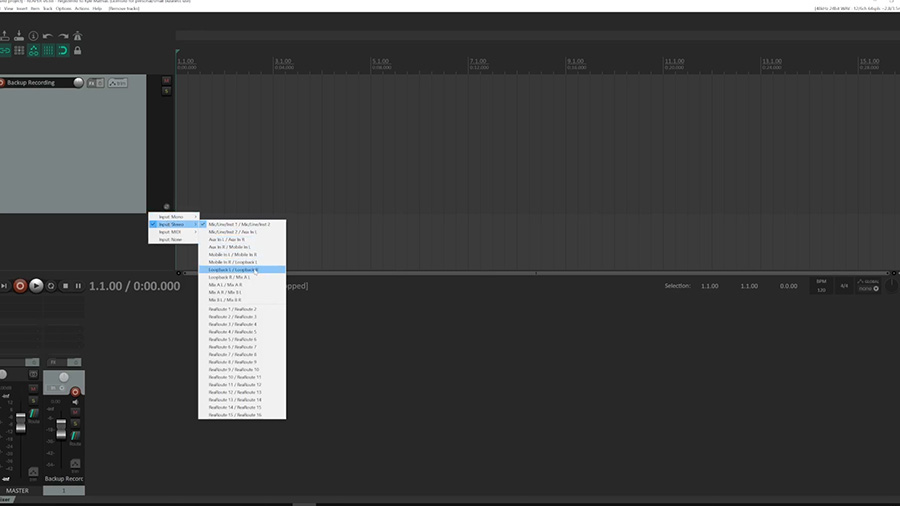
Step 9: Routing Audio With Loopback
Another common audio interface feature that you should know about is “Loopback”, which can be used to route audio from any of these sources back into a program on your computer.
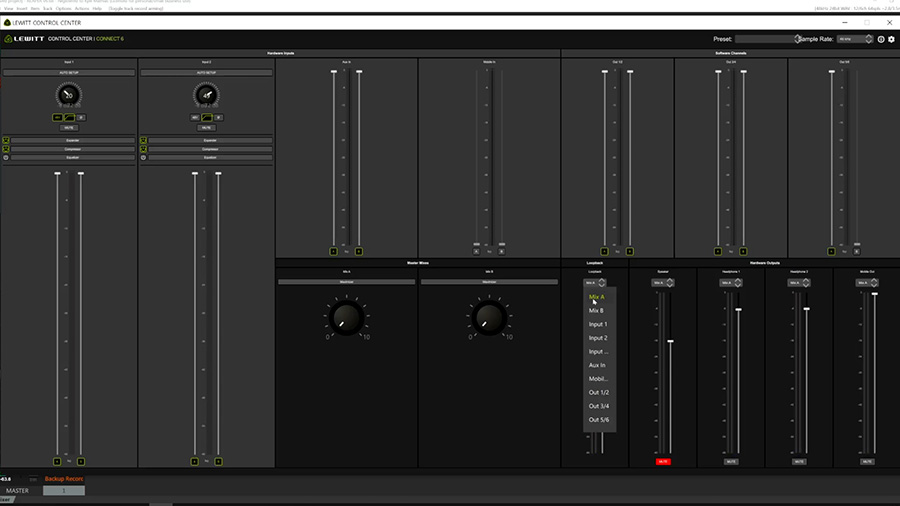
For example, you may want to create a backup recording in your DAW. You can choose the “Loopback” input as the source for your DAW track and then choose what is sent to the “Loopback” just like we chose what was sent to each headphone output before.
If I choose “Mix A” as the source for “Loopback”, it will send the broadcast feed to the DAW track to be recorded as a backup. There are lots of ways to use the “Loopback” channel, so just know that it is there and it may help you solve a problem down the road.
Step 10: Balancing The Mix
Once I’ve got all of my sources connected and routed to the appropriate destinations, I’m going to dial in the levels before starting my stream. I’ll test each input and adjust the fader levels until everything sounds even and balanced.
Then, I’ll use another compressor or limiter to make sure that the overall mix sounds nice and loud without clipping. The CONTROL CENTER app gives me two “Maximizer” knobs for this exact purpose – one for Mix A and one for Mix B.
I’m going to turn this knob up while audio is playing through it until I start to see some slight gain reduction. My goal isn’t necessarily to crush the audio, but instead to maximize the signal level and remove any unnecessary headroom.
Step 11: Start Streaming
Your audio should sound great at this point! You’re ready to start your stream.
I want to thank LEWITT for sponsoring this video and sending me the CONNECT 6 for this demonstration!