Let’s get your music production software set up so you can start recording music.
What You’ll Need
You will of course need a DAW (or Digital Audio Workstation), which is the software that allows for recording, editing, and processing audio. There are many DAWs available and each one has a slightly different workflow. I’ll use Reaper in this demonstration. but these basic steps should apply to whichever software you’re using.
You’ll also need an audio interface, which is used to connect audio inputs (like microphones and instruments) and audio outputs (like studio monitors and headphones) to your computer. I’ll be using the Universal Audio Volt 2, which connects to my computer via USB. I’ve already downloaded and installed the drivers for my interface from the manufacturer’s website. You should go ahead and do the same for your interface. Check out this post on Choosing an Audio Interface on the Audio University website.

The microphones, instruments, and cables will vary depending on what you’re recording. If you want to record vocals or an acoustic instrument, you’ll need a microphone. It’s also possible to simply connect an electric guitar or bass into the instrument input on your interface or use a MIDI controller to control virtual instrument software on your computer. I’ll get into the specifics of each of these techniques later in the video.
I’ve created a full list of the essentials for a home studio that you can download here: Home Studio Essentials
Audio Device Settings
First, let’s set up the DAW to recognize and utilize the physical inputs and outputs on the audio interface. With the audio interface connected to the computer and the drivers installed, go to the settings or preferences menu within your DAW software.
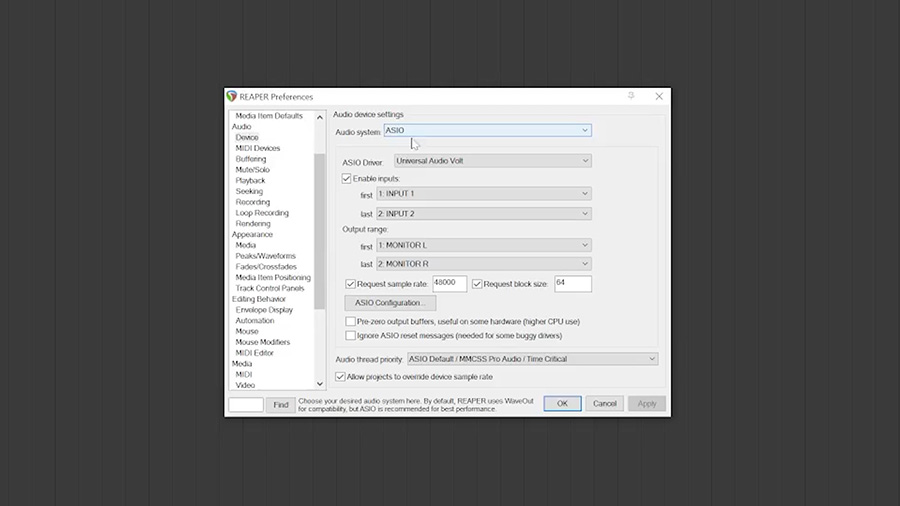
Here, we want to make sure the interface is selected as the audio device for both input and output. Also, check that the ASIO driver for that interface is being used.
You may see the option to select a range of inputs and outputs, depending on the software and interface. I’m going to select all of the inputs and outputs available on my interface so that I can access all of those inputs and outputs within the software later on.
We also want to check that the sample rate matches the sample rate of our audio interface. This should happen automatically. To double-check, I’ll pull up the Universal Audio Volt control panel and verify that the sample rate is set to 48kHz, just like it says here in the DAW settings.

I’ll also select a low buffer size to minimize latency while recording. If you experience clicks and errors in your audio as we go, you may want to increase this buffer size to give your computer more time to process the audio. But, a relatively modern computer should be able to handle a buffer size of 64 or 128 samples, so let’s start there. By the way, I go more in-depth into the topic of ‘latency’ in this post: How To Fix Audio Interface Latency for Recording
I’ll finalize these settings by clicking “Apply” and closing out of the preferences menu.
Create A Project
Now that our software knows the device we want to use for recording and playing back audio, let’s create a project or a session.
Rather than beginning to record with this blank session, I’m going to click “File” – “Save As”. I’ll create a folder for the project on my hard drive. And within that folder, I’ll save the session. Let’s give the session a name.

This is a really important step to do in the beginning so that the audio files and project files stay together. Otherwise, you may find yourself searching all of the folders in your computer for the audio recordings the next time you open up the software.
Recording A Microphone
Let’s create a new track in the software for recording an instrument with a microphone. I’m going to label the track before moving any further, so that the file name of my recordings will be easier to identify later on.

It’s important to use headphones and turn down my speakers for this step so that the audio from my speakers doesn’t get into my recording.
There are two inputs on my audio interface, so I need to tell the software which one I want to assign for this particular track. Let’s choose input 1 as the input for this track. That means I will need to connect my microphone to input 1 on my audio interface.

Because this is a condenser microphone, I will engage phantom power on this input by pressing the “+48V” button on my interface. Phantom power isn’t necessary for dynamic microphones, only condenser mics.
We don’t see any activity on the track meter yet and that’s because the track isn’t armed for recording. This red button is called the “record arm”.

I’ll press the record arm button for this track, which means audio will be recorded to the track when I press the record button below. This is helpful when recording and layering several tracks, because you may want some tracks to record while others simply playback existing audio. After pressing the record arm button, the software will show us the input level meter.
Using the preamp knob on my audio interface, I will increase the gain while playing my guitar or singing into the microphone until the signal level peaks at about -12 dBFS on the track meter.

If input monitoring is turned on for this track, you may already hear the sound of your microphone in your headphones. In this case, I’ll be listening to the sound of the microphone after it has passed through the DAW. If you are using the direct monitoring feature on your interface, you will want to turn off input monitoring within the software. Otherwise you’ll hear an echo.

Once you’ve got a good level on the meter and you can hear the signal in your headphones, go ahead and press record… After recording, you can press play to listen back to the audio region you’ve just created.
If you make a mistake while playing, you can simply select the region and press “delete”. Now you can repeat the recording process until I’ve got a good take.

Recording An Instrument
If you’re recording an instrument like an electric guitar or bass, you don’t necessarily need a microphone. In many cases, you can connect the instrument directly to an instrument input on your interface.

I’m going to connect my bass to input 2 on my interface and make sure that it’s in “Instrument” mode. If your interface doesn’t have instrument inputs, you may need to use a DI box between the instrument and interface. Learn more about DI boxes here: What Is A DI Box (Direct Box)? | When & How To Use One
The steps from this point are the same as recording a microphone. Create a track and label it, select the correct input, arm the track, set the preamp gain level, and press record.
Recording A MIDI Track
You can also use a MIDI controller and a virtual instrument for recording. Some DAWs have built-in virtual instruments and most allow you to use third-party virtual instrument plugins installed on your computer.
I’ll be using this AKAI MPK mini keyboard that is connected to my computer via USB. I will need to go to my DAW settings, select my keyboard within the MIDI Device settings, and enable it for input.

Now, I’ll create a track for the keyboard and select my MIDI controller as the input to that track. Some DAWs have special virtual instrument tracks, others have only one type of track (which is the case for Reaper).
With the MIDI track armed, you may see MIDI inputs on your meter, but you don’t hear anything quite yet because MIDI isn’t audio. MIDI is just control data for triggering audio in a virtual instrument.

I need to add a virtual instrument to my track by clicking one of the inserts and selecting the instrument plugin that I want to use. I’ll select this piano plugin. Now, I can hear the sound of the virtual piano when I trigger the notes with my MIDI keyboard. So, I can press record…
The cool thing about MIDI is that we are recording the MIDI data, not the audio. So, if I want to experiment with different instruments, I can swap them out while maintaining the same performance data. That means I can experiment with playing different instruments without the need to perform the song again.
Mixing with Plugins
Once you’ve got a recording within your session, you can start to process that audio with EQ, compression, and endless other tools. Most DAWs will have the basics built-in. You can also download and install third-party plugins.

To load a plugin on a track, you just need to click one of the insert slots and select the tool you want to use. I’ll choose this EQ.
Now, when I playback the recording, I can hear the effect of this EQ plugin in real time so that I can dial in the sound that best suits the project or song.
Saving Your Project
You can save your project by clicking “File” and “Save” just like you would in any software program. Now, you can close the program and come back later.

If you want to open the session on another computer, it’s important that the project file and all of the audio files are saved to the project folder you created in the beginning. If not, you may get an error message telling you that some files are missing.
You also need to ensure that the plugins and instruments you used in your project are also installed on any other computers you wish to open the project with.
Exporting Your Song
When you’ve reached the point where you want to render your project to an audio file that can be listened to and shared without the DAW session, you will need to export your song.
This can be done by selecting “File” and then “Render”, “Export”, or “Bounce to Disk” depending on your software.
This will prompt you to select a folder to save the file to your hard drive. Then the software will render all of the tracks, instruments and effects that you’ve used to one stereo .wav file that can be played back and shared.
