If you want to get the best performance from your speakers, there are a few key principles to keep in mind.
In this post, I’ll help you determine the optimal placement of your speakers and I’ll show you a few different ways to connect your monitors to your computer, depending on the type of inputs and outputs you might have. I’ll also help you find the best settings on your audio interface and studio monitors.
Studio Monitor Placement
When it comes to the placement of studio monitors, there are a few simple things that have a huge effect on sound quality. Getting these things right will go a long way…
Spacing
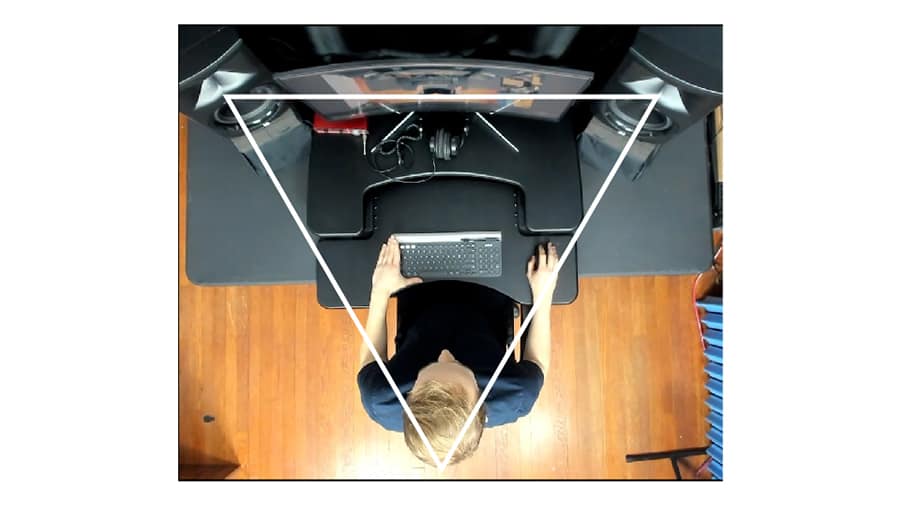
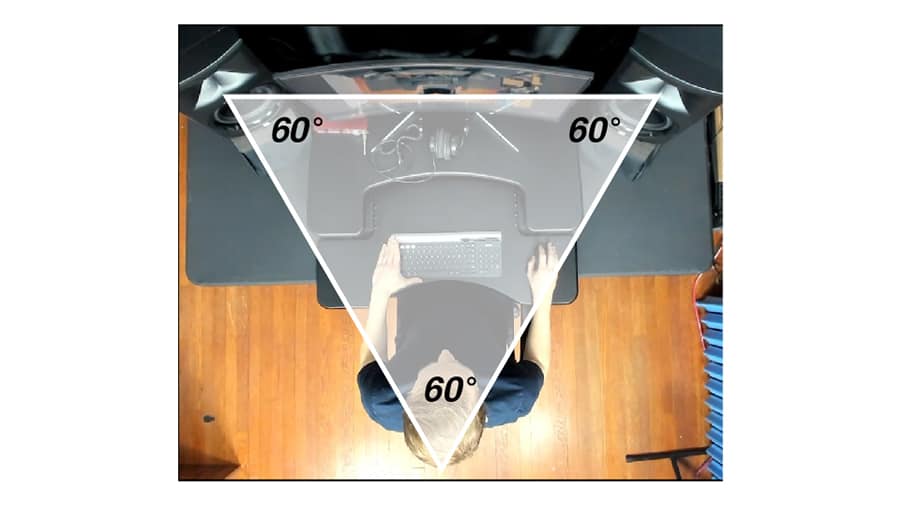
The first is spacing. We want the location of each speaker and the location of your listening position to be equally distant, forming an equilateral triangle.
If you’ve got a tape measure, that will work. I prefer to use a laser distance measure like this one on Amazon (affiliate link).
Sit in your chair normally where you will be when you are listening. You want the point of the equilateral triangle to be just behind your head.
I recommend marking that location with a stationary object, like the chair or a microphone stand.
Adjust the spacing of the speakers until they are equal distance from one another and your listening position.
Angle
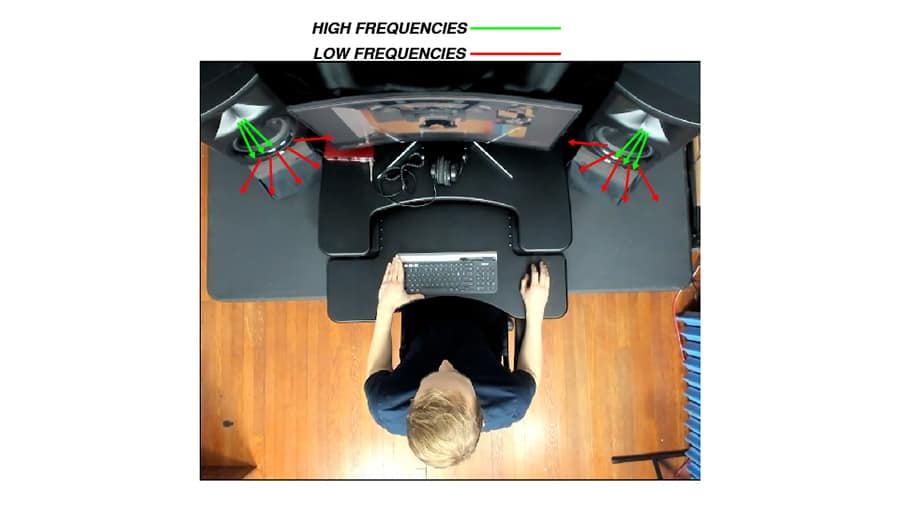
You’ll also want to angle the speakers to face the listening position.
The high-frequency tweeters of your speakers are much more directional than the woofer, so it’s important to be on-axis with the speakers for the best frequency balance.
Height
Not only do you want to be on-axis with the tweeter side-to-side, but you also want to be on-axis vertically.
This can either be done by angling the speakers up or down with foam wedges on a desk, or propping the monitors up to a height even with your ears.
Connecting Studio Monitors to a Computer
Before connecting the speakers or turning them on, make sure that the monitor knob on the interface and the volume knobs on the speakers are turned all the way down. This will protect you from accidentally playing loud signals through the speakers and possibly damaging them.
You could theoretically connect headphone output of your computer to the inputs of the monitors with a 3.5mm-to-Dual ¼-Inch or XLR adapter, but I would not recommend it.
It’s much better to use a USB audio interface that provides higher-quality audio outputs and a volume control knob.
I’m using the Focusrite Scarlett 2i2 audio interface and a pair of JBL studio monitors. Luckily, the interface has ¼-inch outputs and the monitors have ¼-inch inputs. This means I can easily connect them using a ¼-inch TRS cable.

Read this post to learn more about the differences between TRS connectors and TS connectors.
There are three connector types that you might find on your interface and monitors – ¼-inch, XLR, and RCA.
You may need to use adapters to connect the interface outputs with the speakers’ inputs – here is a list of possible cable options:
Studio Monitor Settings
Your studio monitors are in the right place, they are plugged into a power outlet, and they are connected to your audio interface. With the volume knob on each speaker down, the next step is to turn them on.
Gain Settings
Let’s set the gain level first.
Play something through the interface out to the speakers.
Adjust the interface volume up to about halfway or two-thirds of the way up. Then start to adjust the speaker volume until it reaches a comfortable level.
Doing it this way will ensure that you’ve got room to turn it up and room to turn it down.
HF / LF Trim Settings
Your studio monitors might have settings for LF- and HF- Trim. These will boost or cut the low frequencies and high frequencies.
Choose whichever settings suit your taste, but make sure that these settings are the same on both speakers.
Input Sensitivity Settings
You may also find an Input Sensitivity switch on your studio monitors.
This has to do with the line level voltage of the interface you are using. You can read this post to learn more about +4dBu vs -10 dBV.
Next Steps
If you get these things right, you’ll be most of the way there. To further optimize the performance of your studio monitors, consider acoustic treatment and a correction software like Sonarworks.
Download this FREE Speaker Specifications Guide to help you pick the right speakers for your room!