If you want to record acoustic guitar, there are a few things you should do and a few things you should avoid. In this post, I’m going to help you get the best acoustic guitar sound possible in 5 simple steps.
If you are just getting started with recording your own music and you’re looking for a list of the essential items you need for your home recording setup, you’ll want to download a free guide I made. You can download the 6 Home Studio Essentials Checklist absolutely free. It’s got my recommendations for someone just getting started in recording.
Step 1: Connect Audio Interface to Computer
The first thing you’ll need to do is set up your audio interface. If it’s your first time setting up your audio interface, take a look at the Quick Start Guide I’ve created for you.
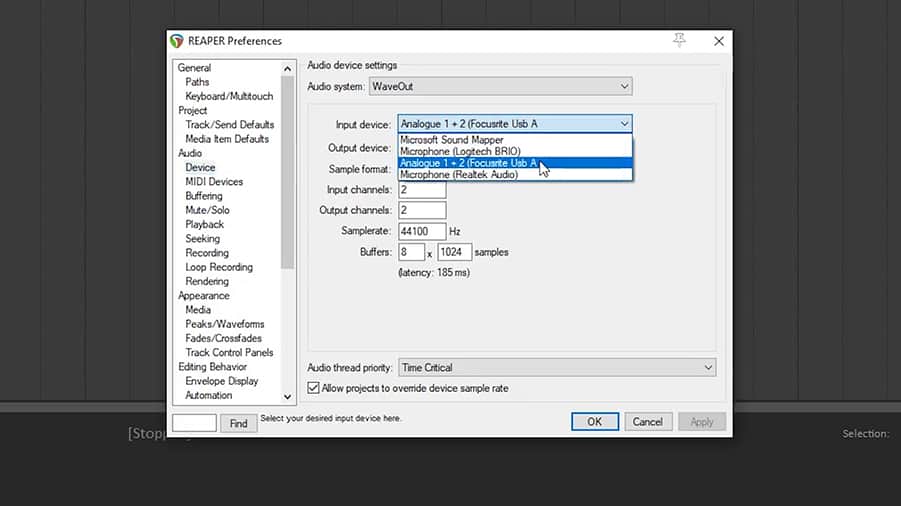
Once you’ve connected your interface to your computer with the included cable, you’ll need to set up your DAW (Digital Audio Workstation). This step is more or less the same in any DAW, whether it be Pro Tools, FL Studio, Logic, or whatever you’re using.
In Reaper, you click “Options” in the toolbar and then click “Preferences”. I want to change the Audio Hardware settings so that both the input and output are set to my interface.
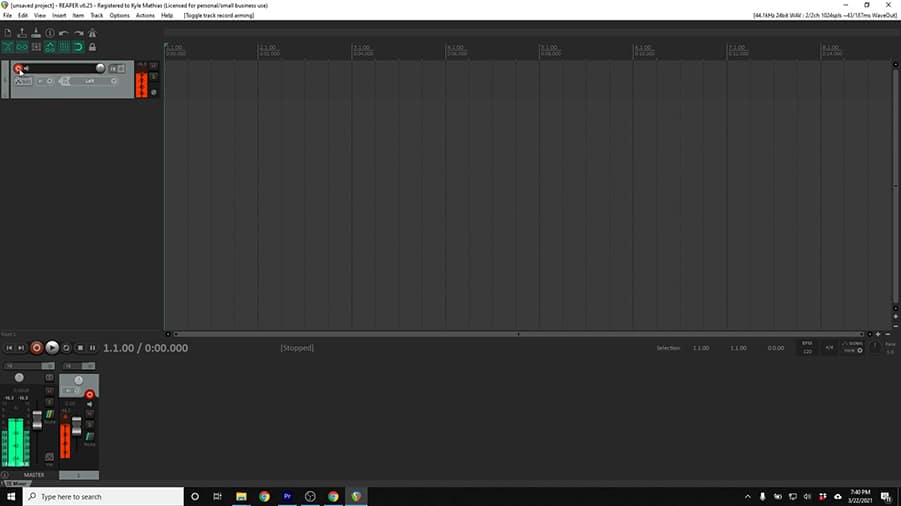
Step 2: Set Up a New Track
Now, let’s create a track in the DAW. I’ll set the input of this track to be Input 1 on my audio interface.
Some DAWs allow you to choose between creating a stereo or mono track. Watch closely here, because this is a common mistake…

If I set up the track for stereo, I’ll only be recording to the left side. That’s because there is nothing plugged into input 2, which would feed the right side. In this case, because I’m using one microphone, I’ll create a mono track.
If you’re only hearing sound on one side in a different DAW, check out this post I created to how to fix this problem.
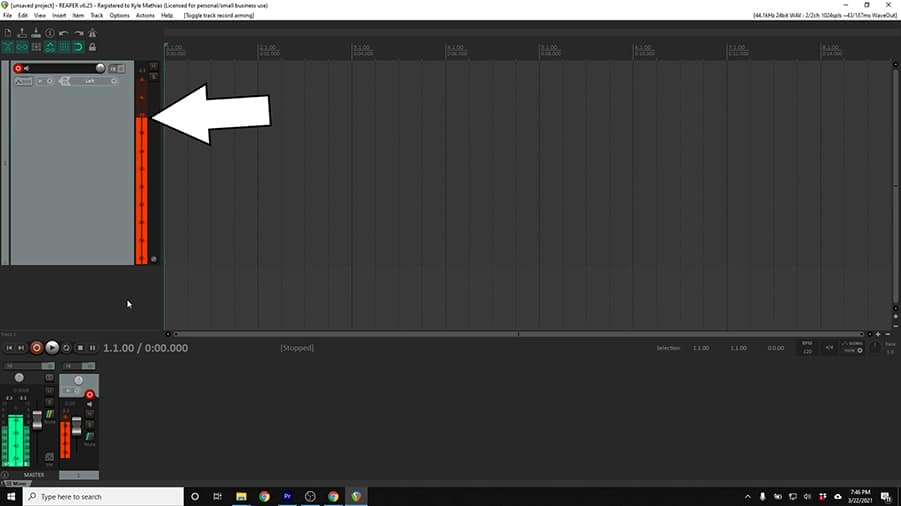
In order to see levels, you’ll probably need to click the record arm button on this track.
Be sure that the speakers are turned all the way down and you’re listening through headphones. Otherwise, you’ll get a feedback loop, where the sound from the speakers is captured by the microphone and sent back to the speakers.
Step 3: Setting Levels & Microphone Placement
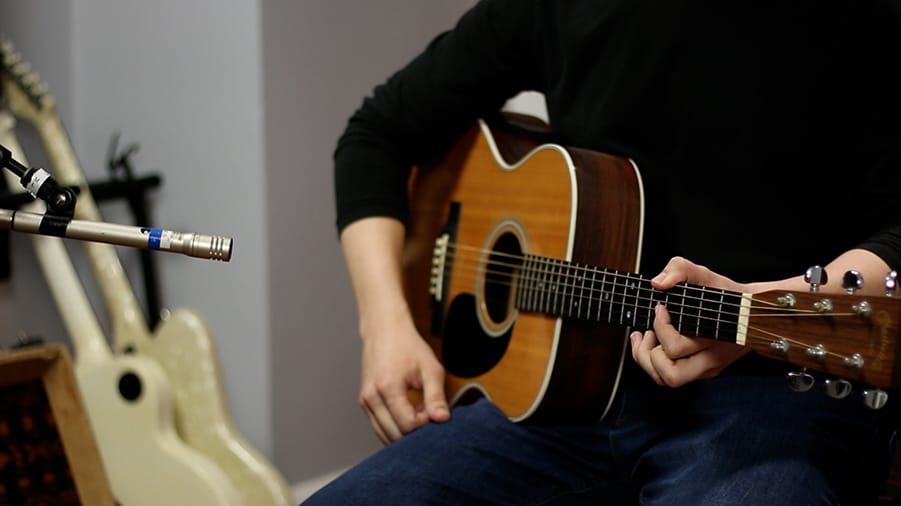
Even if you’ve got an acoustic-electric guitar with a built-in pickup, using a microphone in front of the guitar will almost certainly give you a more realistic sound. We’re just not used to hearing acoustic guitars with our ear inside the guitar.
I’ll be using a small diaphragm condenser microphone called the Shure SM81. In my opinion, it’s the most versatile and rugged small diaphragm condenser microphone under $500. And it’s only $350! Here is a video I created about why I believe it’s such a good choice for recording acoustic guitar:
You should be able to get a good sound with whatever microphone you’ve got access to. You can get a great-sounding recording with a dynamic microphone, too. If you’re a beginner or on a budget, I recommend the Shure SM58 or SM57, which are each about $100.
Go ahead and place your microphone on a mic stand and connect it to input 1 of your audio interface.
A good starting point for your microphone is about one foot away from the guitar, pointed toward the spot where the neck meets the body.
As you play the guitar, adjust the input gain knob on your interface until the meter on the screen averages around -18 dBFS.
Under no circumstances should the level exceed 0 dBFS. This will cause clipping, which sounds terrible. I usually like to see the peaks somewhere around -12 dBFS to ensure I’ve got plenty of headroom before clipping.
Step 4: Record a Test, Listen, & Adjust
Once you’ve got the microphone on the guitar, it’s connected to your interface, and you’re seeing good levels on the input meter, do a test recording. I know… I know… If you’re anything like me, you’re probably excited to start recording your song.
I urge you to be patient and listen back to the test recording critically. Then, make adjustments and record another test until you find the sound you’re looking for.
Moving the mic closer to the guitar will give you a closer-sounding recording with more bass. Moving the mic further from the guitar will give you a more open and natural sound.
Pointing the microphone directly toward the sound hole will add more bass, but will often sound too boomy in your final mix. Pointing the mic toward the frets will give you a thinner, more detailed sound.
The trick to getting a great recording is to listen and make adjustments from the beginning. Trust me – you’ll be glad that you took the extra time to get the right sound, rather than spending hours trying to fix it with EQ later.
One of the best ways to improve your mixing skills is with ear training. If you haven’t seen my post on Ear Training for Audio Engineers, make sure to check it out! When I first learned about this ear training method, it instantly changed the way I mix.
Get started right away with this free Ear Training Guide. It will give you the basics you need to get started practicing today, for free.
Step 5: Basic EQ & Reverb for Acoustic Guitar
The way you mix your acoustic guitar will depend entirely on the genre and the role your guitar recording plays in the song. The best method is to listen and experiment, but here are a few starting points for beginners.
I will usually go ahead and use a high pass filter at around 80 Hz to clean up the low, rumbling frequencies a bit.
If your guitar sounds a bit muddy, you can try using a parametric EQ. Try some subtractive EQ in the low-mids or perhaps a subtle boost with a high-shelf.

I also want to add just a little bit of reverb to the guitar to make it sound more realistic, like it’s being recorded in a nice-sounding room.
These settings will get you started if you’re a beginner, but I encourage you to do your own experimentation and listening. There is no one-size-fits all when it comes to mixing. There’s only one rule: “If it sounds good, it is good.”