By the end of this post, you’ll know how to get a great-sounding guitar recording by simply connecting an electric guitar directly to your interface. Instead of using a guitar amp and a microphone, we are going to use amp modeling plugins.
Why Record Guitar With A DI?
We will accomplish a few things by using a plugin rather than recording a real amplifier…
First of all it’s a lot quieter, so you can produce music whenever you want without your neighbors complaining about the noise. Connecting directly to your interface also means you won’t need to worry about noisy amps or leakage from the drums and other instruments.
On top of all that, the flexibility that comes with using virtual pedals, amp heads, and speakers makes the process of recording guitar and finding the right tone easier and even more fun.
Step 1: Set Up Virtual Amp VST Plugin
First, you’ll want to download a guitar amp simulator plugin. The good news is that there are incredibly powerful options for any budget. Most guitar amp plugins have a free trial download that will give you access to test before you buy.
If you’re on a budget, I’d recommend Waves GTR. It’s often on sale – I’ve seen it as low as $30! You’ll get a good collection of amp presets and pedals at an amazing price.

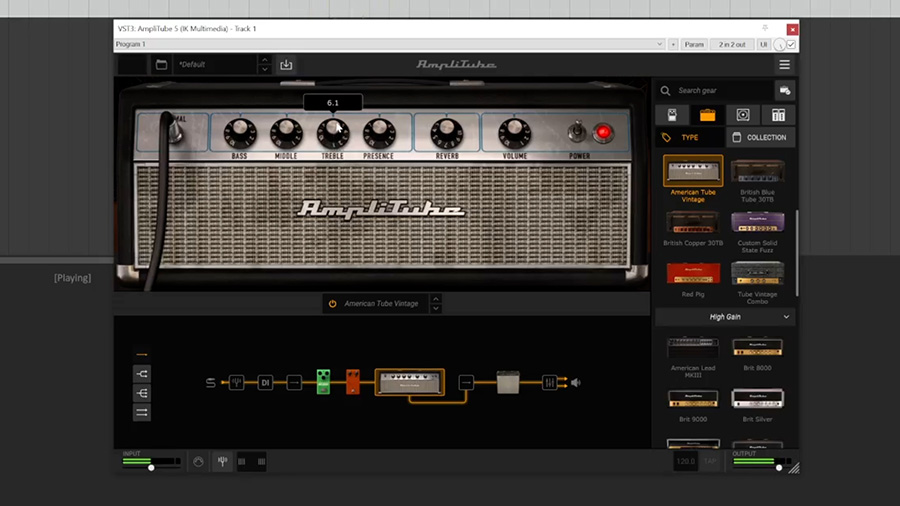
If you’ve got a little more to invest, there are many other options. I’ve been really impressed by IK Multimedia AmpliTube. The amp modeling is very realistic and the combinations of pedals, amps, speaker cabinets, and microphone placement are endless.

Both of these plugins will come with an app that will allow you to enter the license serial number that you purchase from the website.
Once you’ve got the plugin installed on your computer, you will open your DAW and create a track with the plugin set up as an insert on the guitar channel.
Step 2: Connect Your Guitar
Next, it’s time to connect your guitar to your DAW. To do that, you’ll need a ¼-inch instrument cable and an audio interface.
I’ll be using the Focusrite Scarlett 2i2, which is my number one recommendation for most people who plan to do this type of recording.

I’ll connect the guitar to input 1 and set that input to “Instrument” mode. In my DAW, I’ll select the input of the guitar track to “Input 1” and engage the record arm button. Now, I see the meters on that track.
I’m going to play as loud as I plan to play and set the input preamp knob on my interface until the meter in the DAW peaks at about -12 dBFS.

You may already be able to hear your guitar through the speakers. If not, make sure that the input monitoring button (usually near the record arm button) is turned on.
I’m experiencing a lot of latency when I strum my guitar. The reason is that the buffer size for my interface is set too high, which means the interface creates a bigger buffer.

There’s a balance between latency and processing power when it comes to the buffer size. A higher buffer size means more processing power, but higher latency. A smaller buffer size means less latency, but also less processing power, so turning it too low might cause glitches and problems.
I’m going to set my buffer size to 64, but you should choose the lowest number that your computer can handle without errors (errors usually manifest as crackles and pops in the audio). With the buffer size set lower, there will be less latency and it should be more comfortable to play.

Step 3: Record Your Guitar
Before we record, let’s just roughly set up the amp plugin for the sound we are going for… Keep in mind that the recording itself will be clean and nothing you do in this plugin is permanent.
I’m going to select an amp within AmpliTube and I’ll also set up a simple pedalboard. Now, I can just press record and start playing…

Step 4: Tweak Amp Settings
After getting a good take, I can turn off input monitoring and listen back to the recording.
It sounds pretty good, but there are some things I’d like to change. All I need to do is open the amp plugin and start turning the knobs. The changes will happen in real time.
I can even swap out pedals, speakers, or move the microphone positioning until I find the sound I’m looking for.

Home Studio Checklist
If you’re just getting started and want some help building your first recording setup, make sure to check out the free Home Studio Checklist!
In that checklist, I’ll show you the 6 essential components of a recording studio and recommend my favorite tools for recording music and podcasts at home.