MIDI has become a big part of modern music production. With MIDI you can turn a simple instrument like a keyboard into almost any instrument you can imagine!
In this video you’ll learn the basics of music production with MIDI and what you’ll need to start making music with MIDI in your home studio.
But if this is our first time meeting, my name is Kyle. Welcome to Audio University!
What Is MIDI?
MIDI is an acronym for Musical Instrument Digital Interface. It’s been around since the early 80s as a way for controllers, sequencers, and synthesizers to communicate. Essentially, it’s a language spoken by music production gear that allows us to store, edit, and modify musical performance, control, and clock information, such as pitch and velocity, as well as some other characteristics and settings.
The signal flow of a MIDI system is somewhat similar to the signal flow of an audio system. There are devices with outputs that can control other devices with inputs.
But the MIDI itself isn’t capable of producing any sound… To create sound with MIDI, you’ll need a sound module.
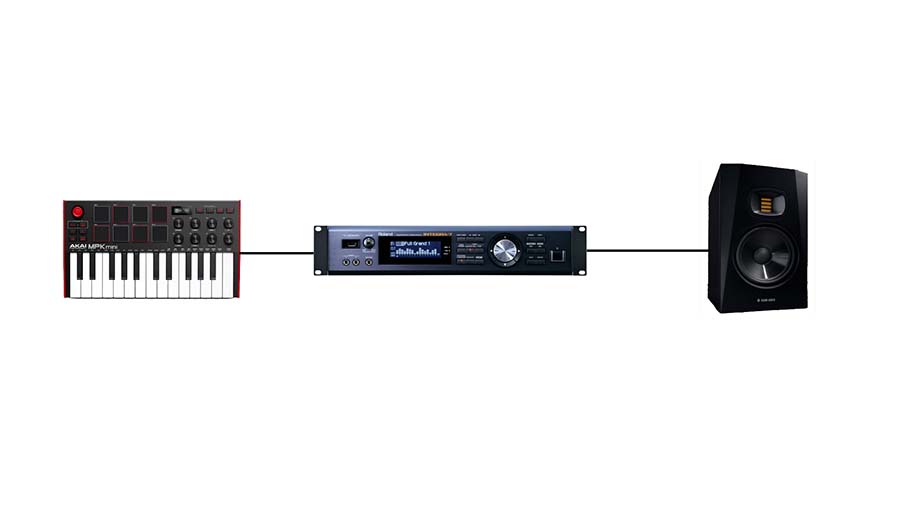
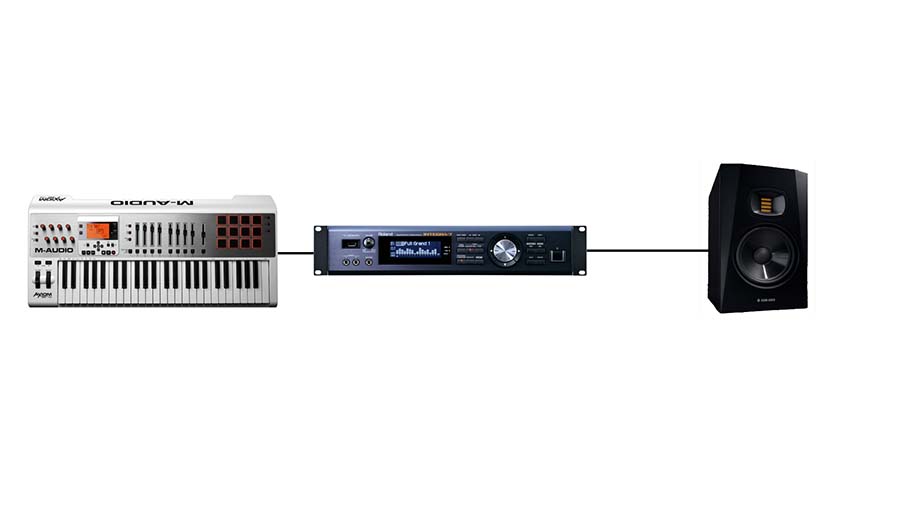
A basic MIDI system consists of a controller, a sound module, and an audio output. By sending MIDI data from the controller to the sound module, the sounds stored on the module will be triggered and played through that audio output.
MIDI Controller vs Keyboard
One of the biggest points of confusion for beginners is understanding the difference between a MIDI controller and other types of keyboards.
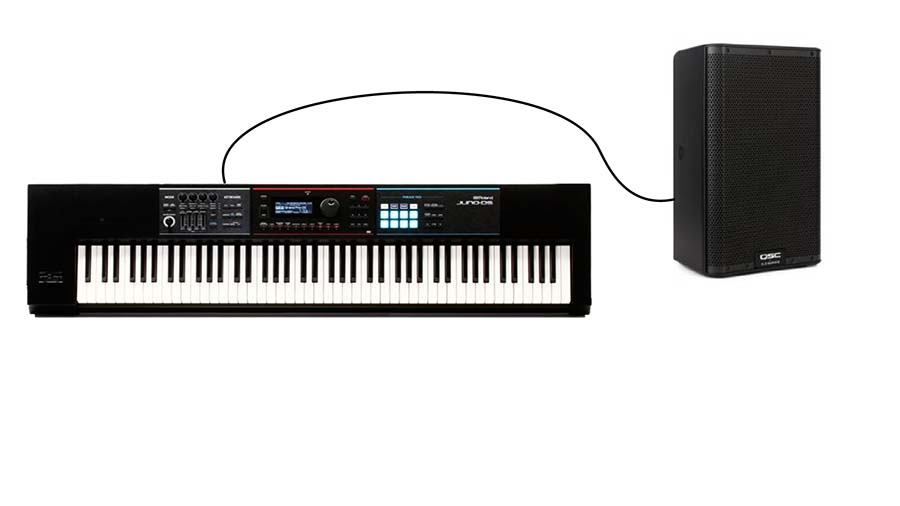
Let’s take this synthesizer and this MIDI controller as an example. Remember our three basic components: a controller, a sound module, and an audio output.
The controller and sound module are built into the Roland JUNO-DS 88 synthesizer. All you need to do is connect the audio output to a powered speaker. Now, I can turn it on and start making sounds.
On the other hand, the MIDI controller is just that: a controller. That means that we need to add the other two elements in order to make a full working system: a sound module and an audio output. If I turn on the controller and start playing with nothing else connected, we won’t get any sound because the MIDI controls aren’t going anywhere.
This is critical to keep in mind when shopping for a keyboard. If you want built-in sounds, you should go with a synthesizer, a digital piano, or another device that has a sound module built in. If you buy a MIDI controller that doesn’t have sounds, you’ll need some other equipment to complete your system.
Many synthesizers and digital pianos can also act as MIDI controllers, so while they could be used as a standalone system they can also be used to control sounds stored on other devices.
How To Set Up A MIDI Controller
Let’s take a look at how I would set this MIDI controller up to create a full working system for producing music with MIDI.
This particular MIDI controller, the M-Audio Axiom Air 49, has a MIDI input and output with 5-pin DIN connectors. If I had a MIDI interface, I could connect these inputs and outputs to my computer.
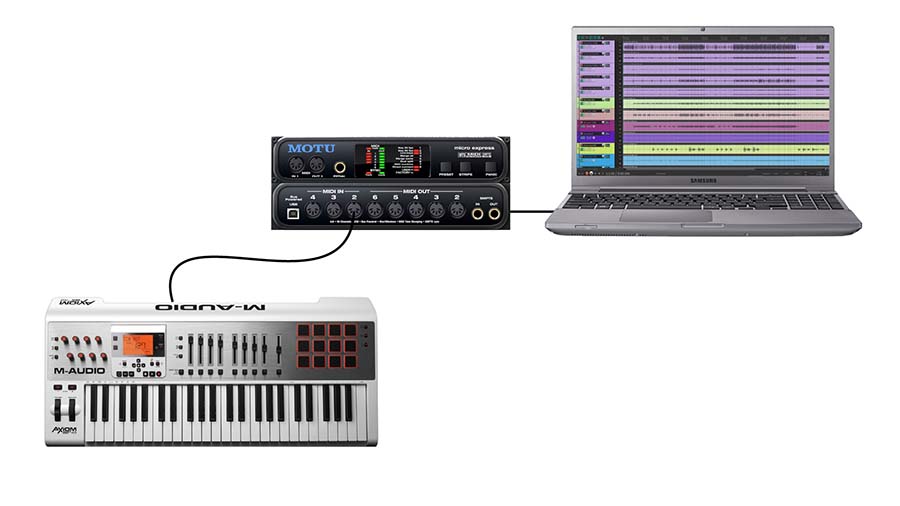
To keep it simple, I’m just going to use a USB connection instead. All I need to do is connect the controller to a computer with a USB cable.
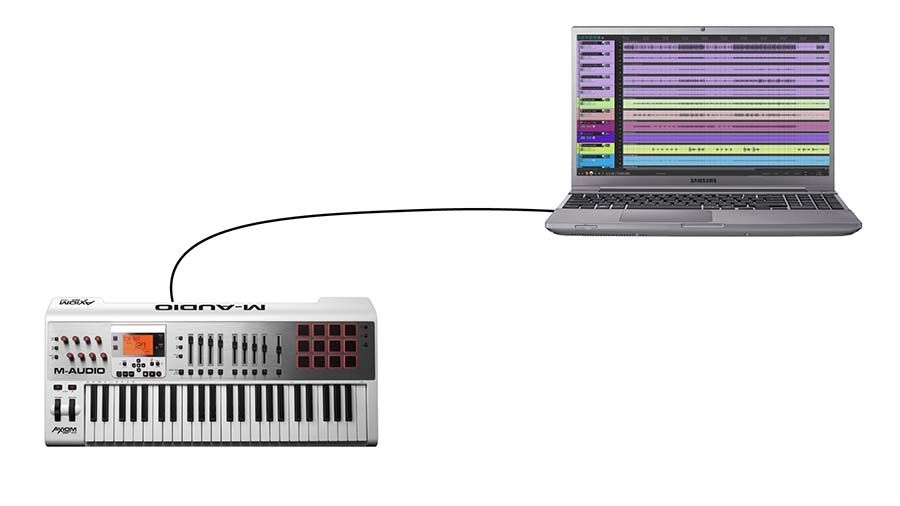
Once the controller is connected to the computer, I can open my DAW or recording software. I’ll be using Reaper, but the steps that follow will apply to mostly any software.
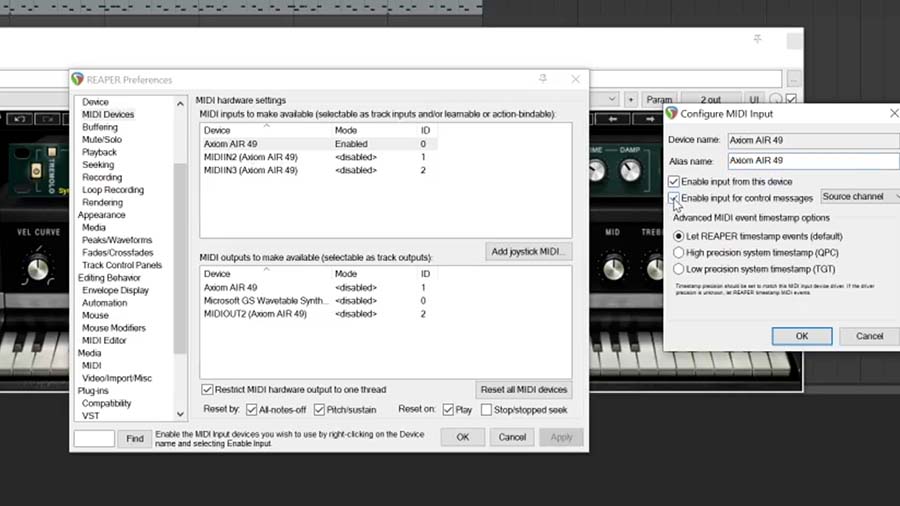
I’ll navigate to ‘Options’ and then click ‘Preferences’. Within the ‘Preferences’ window, I’m looking for ‘MIDI Devices’.
I can see that the Axiom Air 49 is listed, but it’s not enabled. To enable the controller, I’ll double-click it and select this check box that says, ‘Enable Input From This Device’.
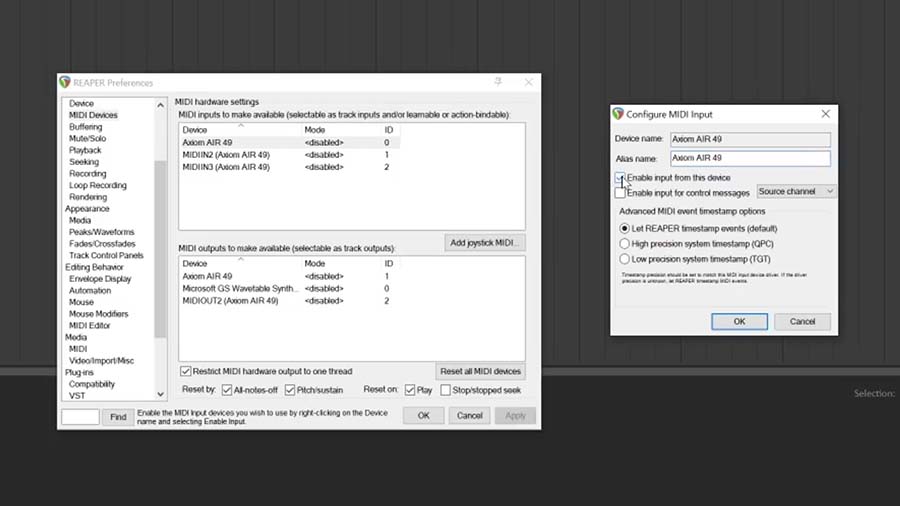
Next I’ll create a new track and set the input of that track to be all channels of the Axiom Air 49. Now the software is set up to receive MIDI controls from the controller.
By engaging the record arm on this track, I’m able to see levels when I play the keys on the keyboard, but I still don’t hear any sound… Remember, we need to add a sound module to the system.
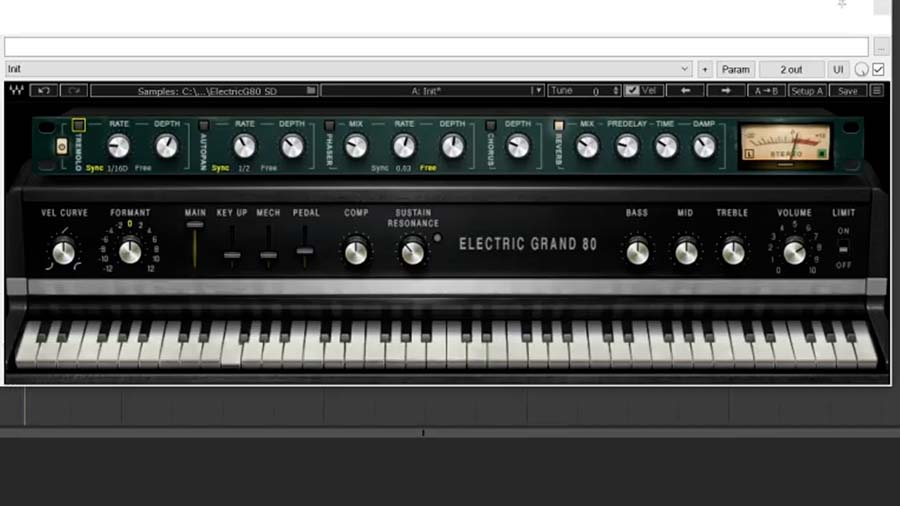
In this case, I’m going to use a VST virtual instrument, called Waves Electric Grand 80. I’ll set this up just like any other plugin by clicking the ‘FX’ button on the track and navigating to the virtual instrument I want to use.
Now when I play the keys on the keyboard, the MIDI information from the controller triggers the sounds in my VST plugin and I hear those sounds play through my speakers.
In this case, my audio output device is a Focusrite Scarlett 2i2 interface and a pair of studio monitors, but you could also use a pair of headphones connected directly to the output of your computer. Just make sure that, in your DAW, you set it up to utilize the correct audio output device.
How To Produce Music With MIDI
Once you’ve got your MIDI controller set up to control a virtual instrument on your DAW, you can record the MIDI information onto the track you’ve created.
The workflow is the same as recording a microphone or any other instrument. With the track armed, I’ll simply press record and start playing.
Here’s another thing that makes MIDI so incredibly powerful: I can make adjustments to the performance after recording!
Clearly, I’m not the most skilled keyboard player. So you can probably see and hear that I made some mistakes while recording.
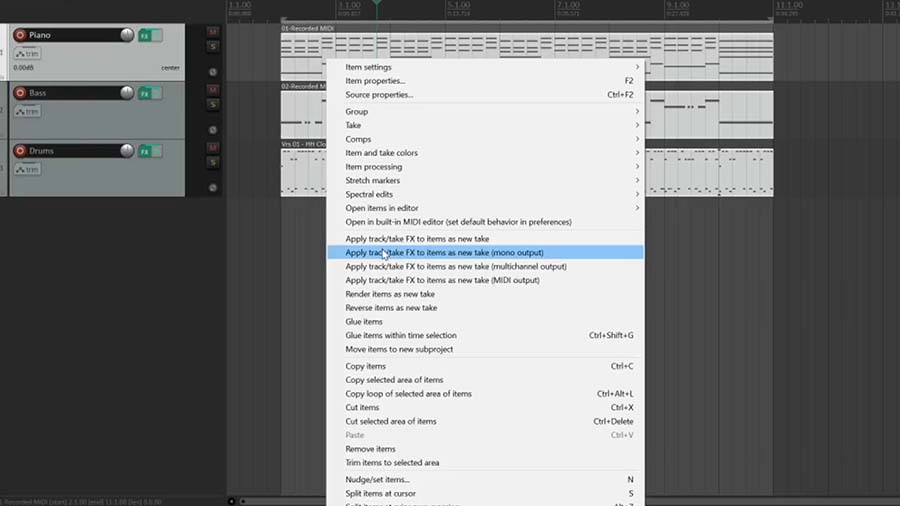
By double-clicking on the MIDI recording, it opens up a MIDI editor window. Here I can adjust the pitch of the notes, the timing of the notes, and even the velocity of notes.
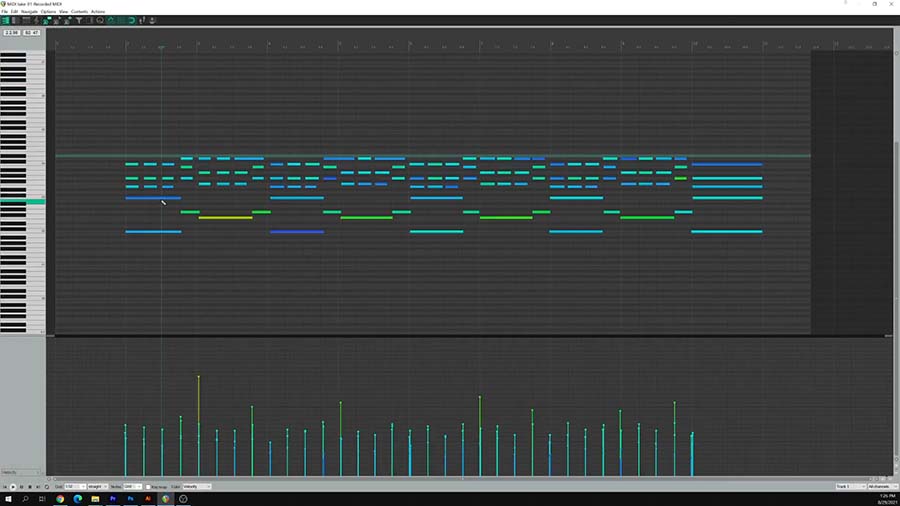
After listening to that a few times I’ve decided that a different piano sound might be better. Any adjustments I make to the VST instrument will be automatically applied to my MIDI recording.
From here, I can add another track using the same steps as before. I want to add some bass guitar, so I’ll load the Waves Bass Fingers plugin and control it with the same MIDI controller.
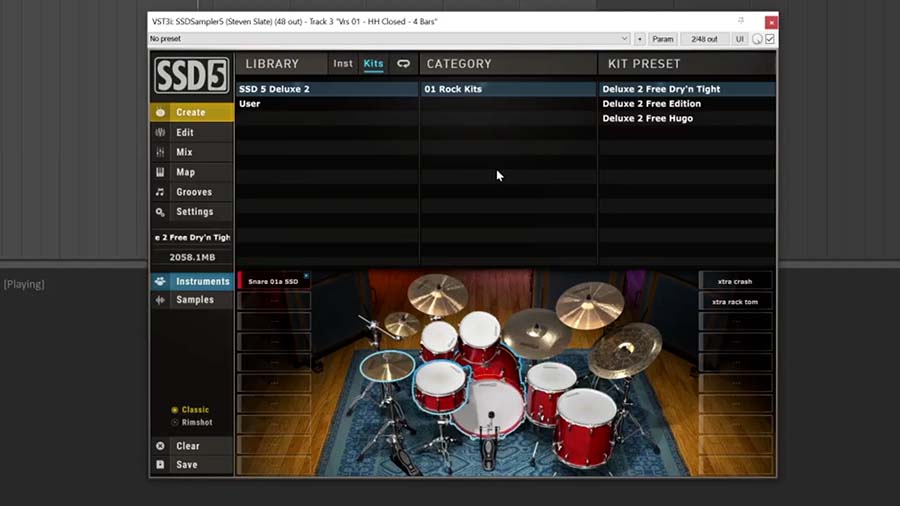
Then I can do the same thing with drums using the Steven Slate Drums plugin. This is a free version of the plugin that you can download right now. Trust me, even this free version is extremely powerful.
Okay, I could keep going on like this for hours, but nobody has time for that. As you can see, it’s pretty simple to create a full song with any instrument imaginable using just a simple keyboard controller like this one.
It’s not just musical performance information that can be stored and manipulated with MIDI though…
You can also use MIDI to control other parameters inside your software. For example, let’s say I want to use one of the knobs on my MIDI controller to adjust one of the virtual knobs on my virtual instrument.
First, I need to go back to my MIDI device settings, double-click on my controller, and enable input for control messages.
Then I can open my VST and click the ‘Param’ or parameters button in the top right corner. I’ll select the parameter I want to control under the ‘Learn’ tab. Now I just need to adjust the knob on my controller that I want to control that setting in the VST and the system will automatically make the assignment.
How To Convert MIDI To Audio
So, I’ve dialed in my song and saved the session to an external hard drive so that I can show my friend on their system. I connect the drive to their system and open my session…
To my disappointment, I see the MIDI recordings but the sound is completely different. Well that’s because my friend doesn’t have the same virtual instrument plugins as I do. So while the MIDI performance data is still in the session, the sounds are not.
To prevent this from happening, I need to render my MIDI performance to audio on a separate track.
While I won’t be able to make adjustments to the audio like I made adjustments to the MIDI before, this will save an audio file of the sound that can be played on any computer, regardless of the VST plugins on that computer.