An audio high pass filter (HPF) is an equalization tool that attenuates all frequencies below a set point. In other words, high pass filters remove low frequencies while allowing high frequencies to pass through. They are used in almost every application of audio technology.
Understanding how and when to use a high pass filter is a simple skill that will drastically improve the quality of your mixes. Whether you are mixing studio recordings, live sound performances, or tuning consumer audio systems, it is essential to learn to harness the power of this simple tool. In this post, you’ll learn what high pass filters are, how they work, and when to use them.
An audio high pass filter (HPF) is an equalization tool that attenuates, or reduces, all frequencies below a set point.
What is a High Pass Filter?
There are two main types of audio pass filters: high pass and low pass. These terms are often confused. High pass filters allow high frequencies to pass through the filter, low pass filters allow low frequencies to pass through the filter.
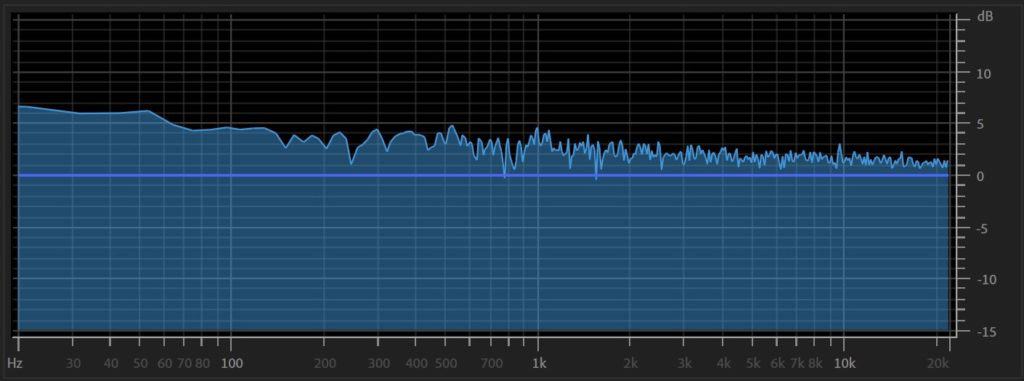
The following image shows a frequency response graph of pink noise. Every octave is evenly represented, forming a straight line from 20Hz to 20kHz:
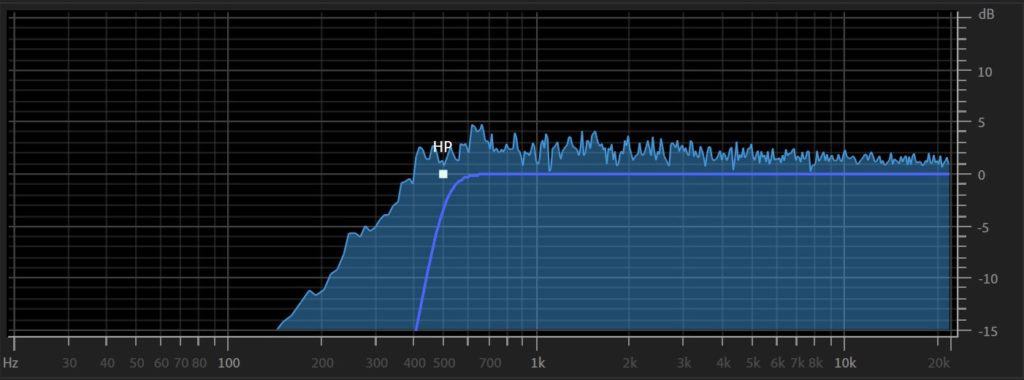
The next image shows the same pink noise after being processed through a high pass filter set to 500Hz. The frequencies above 500Hz are unaltered, but the frequencies below 500Hz have been attenuated:
Listen to the following audio example of music processed through a high pass filter:
High pass filters are built-in to some microphones and are almost always found on mixing consoles and digital audio workstations (DAWs). They are also incorporated into digital signal processors (DSPs) used for conferencing and telephony. In almost all cases, high pass filters are placed toward the beginning of the signal chain.
How to Use a High Pass Filter
This section will explore the basic operation of a high pass filter.
High Pass Filter Settings
Cutoff Frequency
The cutoff frequency setting of a high pass filter adjusts where in the frequency spectrum the filter begins. In the above example, 500Hz is the cutoff frequency.
Often the cutoff frequency is the point at which the filter attenuates by -3dB. Thus, the filter might actually begin at a higher frequency than stated by the cutoff adjustment.
The cutoff frequency settings of most high pass filters are infinitely variable, meaning that an engineer can set the cutoff frequency more precisely, using a knob. A high pass filter that does not have an infinitely variable cutoff frequency setting only allows for specific frequencies to be selected, using a switch.
Slope (Q)
The slope of a high pass filter determines the rate of attenuation. It is measured in decibels (dB) per octave.
The slope of a high pass filter is sometimes adjusted using the Q setting. Common high pass filter slopes are 6dB, 12dB, 18dB, and 24dB per octave.
Imagine a high pass filter with the cutoff frequency set to 400Hz and a slope of 12dB per octave. The following chart shows the attenuation of each frequency relative to the cutoff frequency:
| Frequency | Attenuation |
|---|---|
| 400 Hz (cutoff frequency) | 0 dB |
| 200 Hz (one octave below 400 Hz) | -12 dB |
| 100 Hz (two octaves below 400 Hz) | -24 dB |
| 50 Hz (three octaves below 400 Hz) | -36 dB |
Adjusting the slope of a high pass filter allows an engineer to choose between drastic attenuation over a small range of frequencies (steep) or gradual attenuation over a larger range of frequencies (gentle).
When to Use a High Pass Filter
In professional audio, high pass filters are used very often. This section will explore the various reasons to use a high pass filter.
1.) Remove Extraneous Low Frequencies
Each instrument produces sounds within a specific frequency band. High pass filters are most commonly used to remove low-frequency content that is not within an instrument’s frequency range.
As a general starting point, you should place a high pass filter on each channel and adjust it according to the lowest frequency the sound source can produce. For example, a male vocal will not contain frequencies lower than about 80 Hz. With this in mind, you can remove all frequencies lower than 80Hz using a high pass filter. This can be adjusted later, but setting this up from the beginning quickly fixes a lot of problems and creates a good starting point.
2.) Remove Environmental Noise
Traffic, wind, and HVAC systems can create noise in your audio signal. Luckily, these noises are primarily composed of low-frequency energy. Using a high pass filter will allow you to remove the rumbling effects of these noises without affecting the signal you wish to record.
It’s always best to eliminate the source of the noise itself rather than try to remove it later. Turn off any fans, refrigerators, or HVAC systems for each session if possible. Often these sounds are not able to be eliminated, such as in live sound or conferencing applications. In these cases, high pass filters are the best option for reducing their effects. Listen closely to both the sound source and noise sources during sound check.
3.) Remove Plosives
Plosives, or P-pops, are vibrations of a microphone diaphragm caused by gusts of air created by a vocalist. Although it is best to prevent plosives by using good microphone technique and a pop filter, they can sometimes be removed through the use of a high pass filter.
Plosives are comprised of low frequencies. As you move the high pass filter higher, you will notice the popping sounds will begin to sound thinner. You may reach a point when the plosive sound and the vocalist occupy the same frequency band. This means that to remove the plosive completely would require removing some of the vocal signal, too. This is why it is best to prevent plosives before pressing record.
Learn more about pop filters in this Audio University article.
4.) Remove Handling Noise
In live sound or conferencing situations, microphones may be adjusted by the user while in use. This causes a low-frequency rumble that can be reduced by applying a high pass filter.
Handling noise includes footsteps on a stage, vibrations on a conference table, and dropped microphones. Setting a high pass filter will help to ensure that handling noises are reduced.
5.) Isolate Sound Sources
Often sound from one source will leak into other microphones in the room. High pass filters can help to improve isolation between instruments.
If you place your microphones so that their polar patterns reject the high-frequency sounds coming from other sources in the room, only low-frequency leakage will be captured. This low-frequency content can be removed with a high pass filter.
6.) Shape Tone for Mix Clarity
Even if a sound source is capable of producing low-frequency energy, you may still wish to attenuate it to prevent masking other instruments. High pass filters can be used to carve space for the other components of a mix.
Kick drums create sub-bass frequencies that might not be beneficial to the mix. Acoustic guitar bodies might vibrate or resonate at frequencies lower than the notes being played. A bass guitar and a kick drum might compete for the same frequency band. High pass filters can be used to alter the tone of sounds so that they can fit together more cohesively.
7.) Increase Gain Before Feedback
Low frequencies are less directional than high frequencies. This means that the first frequencies to feedback in sound reinforcement situations are often low frequencies. For this reason, it is important to use a high pass filter to reduce the possibility of a low-frequency feedback loop.
Start by removing unnecessary low frequencies from each channel. If low-frequency feedback is still occurring, try rolling the high pass filter a bit higher to eliminate the possibility of feedback.
To learn more about preventing feedback, check out this Audio University article.
8.) Optimize Headroom
You might notice that low frequencies take up a disproportionate amount of headroom. Often this causes meters to be misleading. Removing unnecessary low-frequency energy helps to ensure that you are optimizing the available headroom for the most important frequency bands.
Using a high pass filter can prevent a compressor from engaging prematurely based on low-frequency energy. Without a high pass filter, too much low-frequency content can cause an amplifier to work unnecessarily hard to produce frequencies that will not even be heard through the speakers.
9.) Set Speaker Crossover
Speaker systems are often comprised of several drivers. Common configurations include subwoofers, woofers, and tweeters. High and low pass filters can be used to send only specific frequency bands to each driver.
If low-frequency energy is sent to a high-frequency tweeter, it can damage the diaphragm and voice coil. Use the speaker’s manufacturer specifications for setting a crossover point.
Read this Audio University article to learn everything you need to know about speaker crossovers.
Think Outside the Box
Now you know the most common and conventional ways to use high pass filters. This knowledge will help you navigate the common situations, but also the more unique challenges of audio. Use your imagination and what you know about these tools to creatively solve issues that might come up in the field.